![]()
User Help
- User Help Home Page
-
 Quickstart User Guides
-
 Data Workflow User Guides
-
More Workflow User Guides
-
Other OMERO Applications
-
More

Using OMERO for Facility Managers
Introduction
This section brings together descriptions of common workflows for Facility Managers and links to useful sections of User Help and technical documentation.
Installation and configuration
Documentation covering the installation and configuration of the OMERO server is in the System Administrator documentation on the main OME website.
Specifications for hardware
This is a frequently asked question, and the simplistic (if slightly unhelpful) answer is the best you can manage.
Apart from basic CPU number, speed and physical disk size, there are a number of other issues to be taken into account, including the nature of the storage being used for the data, the connection type, and the speed of the network used to access the server.
Examples of system specifications and set-ups for production OMERO servers have kindly been provided by a number of institutes to serve as illustrations of working systems. These are shown in the Example production server set-ups page on the OME website.

Using OMERO
Details on downloading the OMERO clients and accessing the OMERO server are in Getting Started with OMERO.insight in User Help.
Details on accessing OMERO with the OMERO.web client are in the Using the OMERO.web Client section of User Help.
Details of the command line interface OMERO.cli are in the OME documentation.
Permissions on OMERO
There are three levels of user permission in OMERO, Administrator, Group Owner and Member. Each level of permission allows different actions to be performed on a user's own, or other user's data, and certain administrative tasks.
In brief, and practically speaking, Administrators can do anything they like to any user's data, in any group (except annotate in Private groups) and Group Owners can do anything to any user's data in the groups they own.
Full details of the permissions for each level of user are shown in the User Roles table in the Sharing data section of User Help.
Access control, authentication, user accounts
The recommended way to control access to the OMERO server is to configure integration with your institute's authentication system (most commonly LDAP).
See the documentation for LDAP configuration for details. Instructions for using Active Directory included on this page.
Using LDAP authentication means new user accounts are created, and the user placed in the default group, the first time a user logs in, substantially reducing the administration load. Any change in the LDAP password by the user will then be reflected in the OMERO login.
With LDAP authentication configured, an administrator can still create new accounts for non-LDAP users. In general, OMERO.web offers the best interface for administrative tasks.
Users from other institutions
It is recommended to adopt a policy where users who do not have LDAP logins, such as external collaborators, must apply for guest accounts at the host institute if they wish to access the OMERO server.
This ensures that the identities of such users are correctly verified, they sign up to the standard terms and conditions of use agreements of the host institute, and the burden of authentication security such as reminders of regular password changes does not fall on the OMERO server administrator.
Managing Groups
Group structures and permissions are completely flexible in OMERO, so it is worthwhile taking some time to draw up a policy for the structure and naming of groups on your OMERO server that will meet the requirements of your facility.
In Life Sciences institutes, groups generally reflect the laboratory structure of the institute, with groups for each lab, groups containing members from different labs for cross-lab collaborative projects, and groups for cross-facility and inter-institution collaboration.
PIs or laboratory leaders are usually made Group Owners of their lab groups, which enables them to add new members to their groups and import and manage data for users who are members of their groups. Groups may have more than one owner. The permissions for these groups are most commonly set as Read-Annotate, although Read-Write might be more appropriate in some cases.
Administrators and Group Owners can change group permissions between Private, Read-Only and Read-Annotate. Only Administrators can change a group to Read-Write. Full details of permissions can be seen in the System Administrator documentation.
Note
If permissions are reduced to Private when one member has created output from another member's image in the group using a script, e.g. made a projection, the permissions change will fail.
Default groups
Most facilities use a default group that a new user is automatically allocated to when they first log on and create an account using the LDAP or similar authentication system, or when an account is created for them by the Admin. Typically this group would be Private.
If the user is also made a member of their lab or other groups, they can set any group as their default group. This group will be then shown in the data tree each time they log in.
For details on how users can change their default group see Changing your default group in the Sharing Data section of User Help.
Administrators can set or change the default group for a user through the Admin tab in OMERO.web or the Administration tab in OMERO.insight.
Note
Although the Administration functions are shown for both OMERO.web and OMERO.insight, the OMERO.web Admin tools are recommended for ease of use over the OMERO.insight Administration tools.
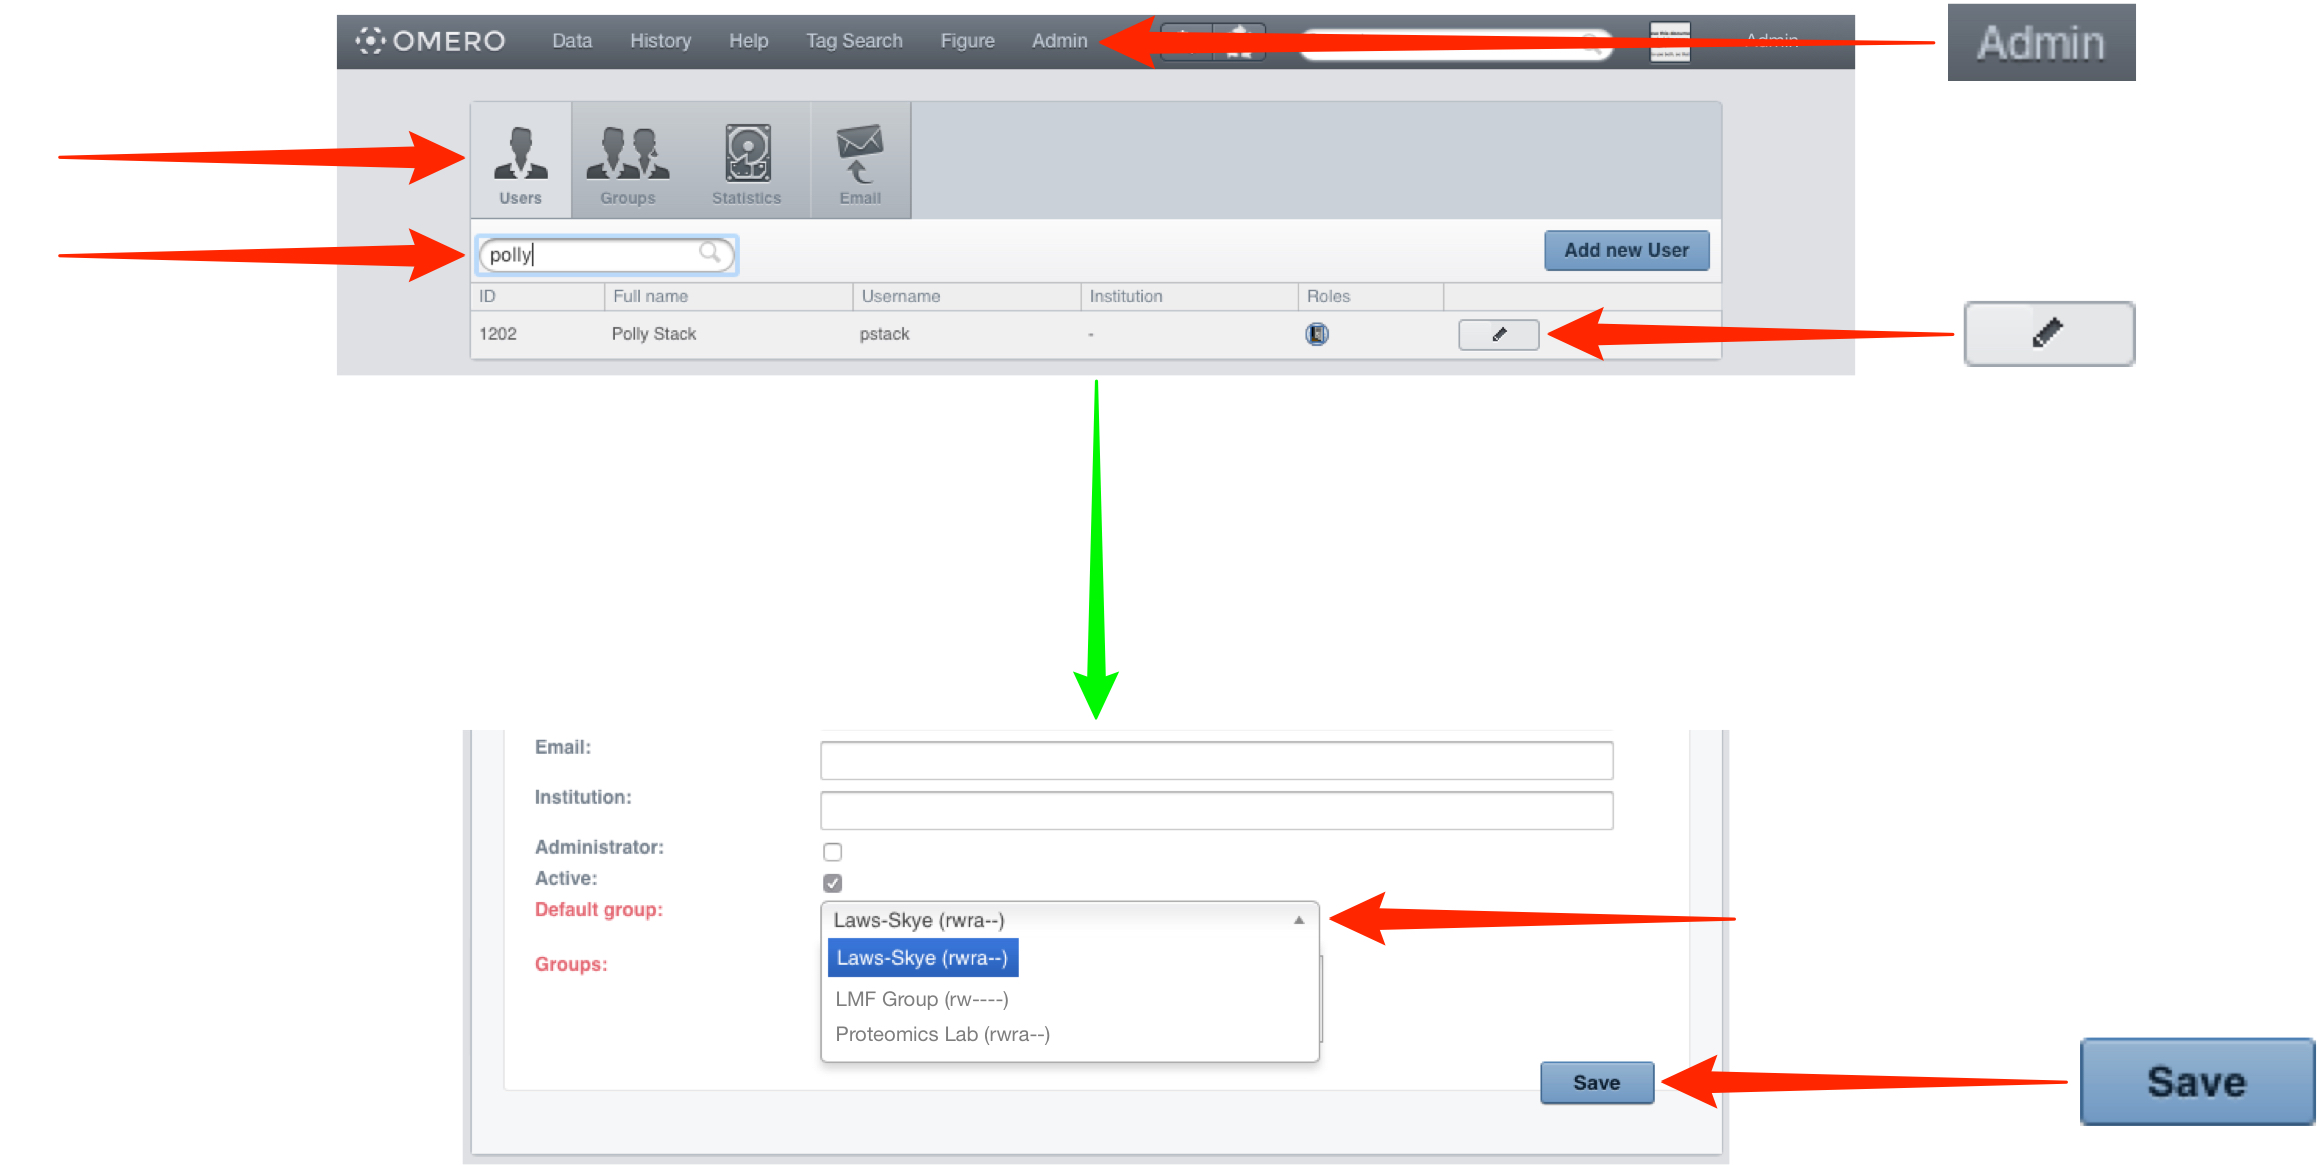
OMERO.web
-
Click on Admin in the top toolbar.
In the Users tab, find user by filtering.
Click on the Edit button.
Select the new default group from the drop-down list.
Click Save.
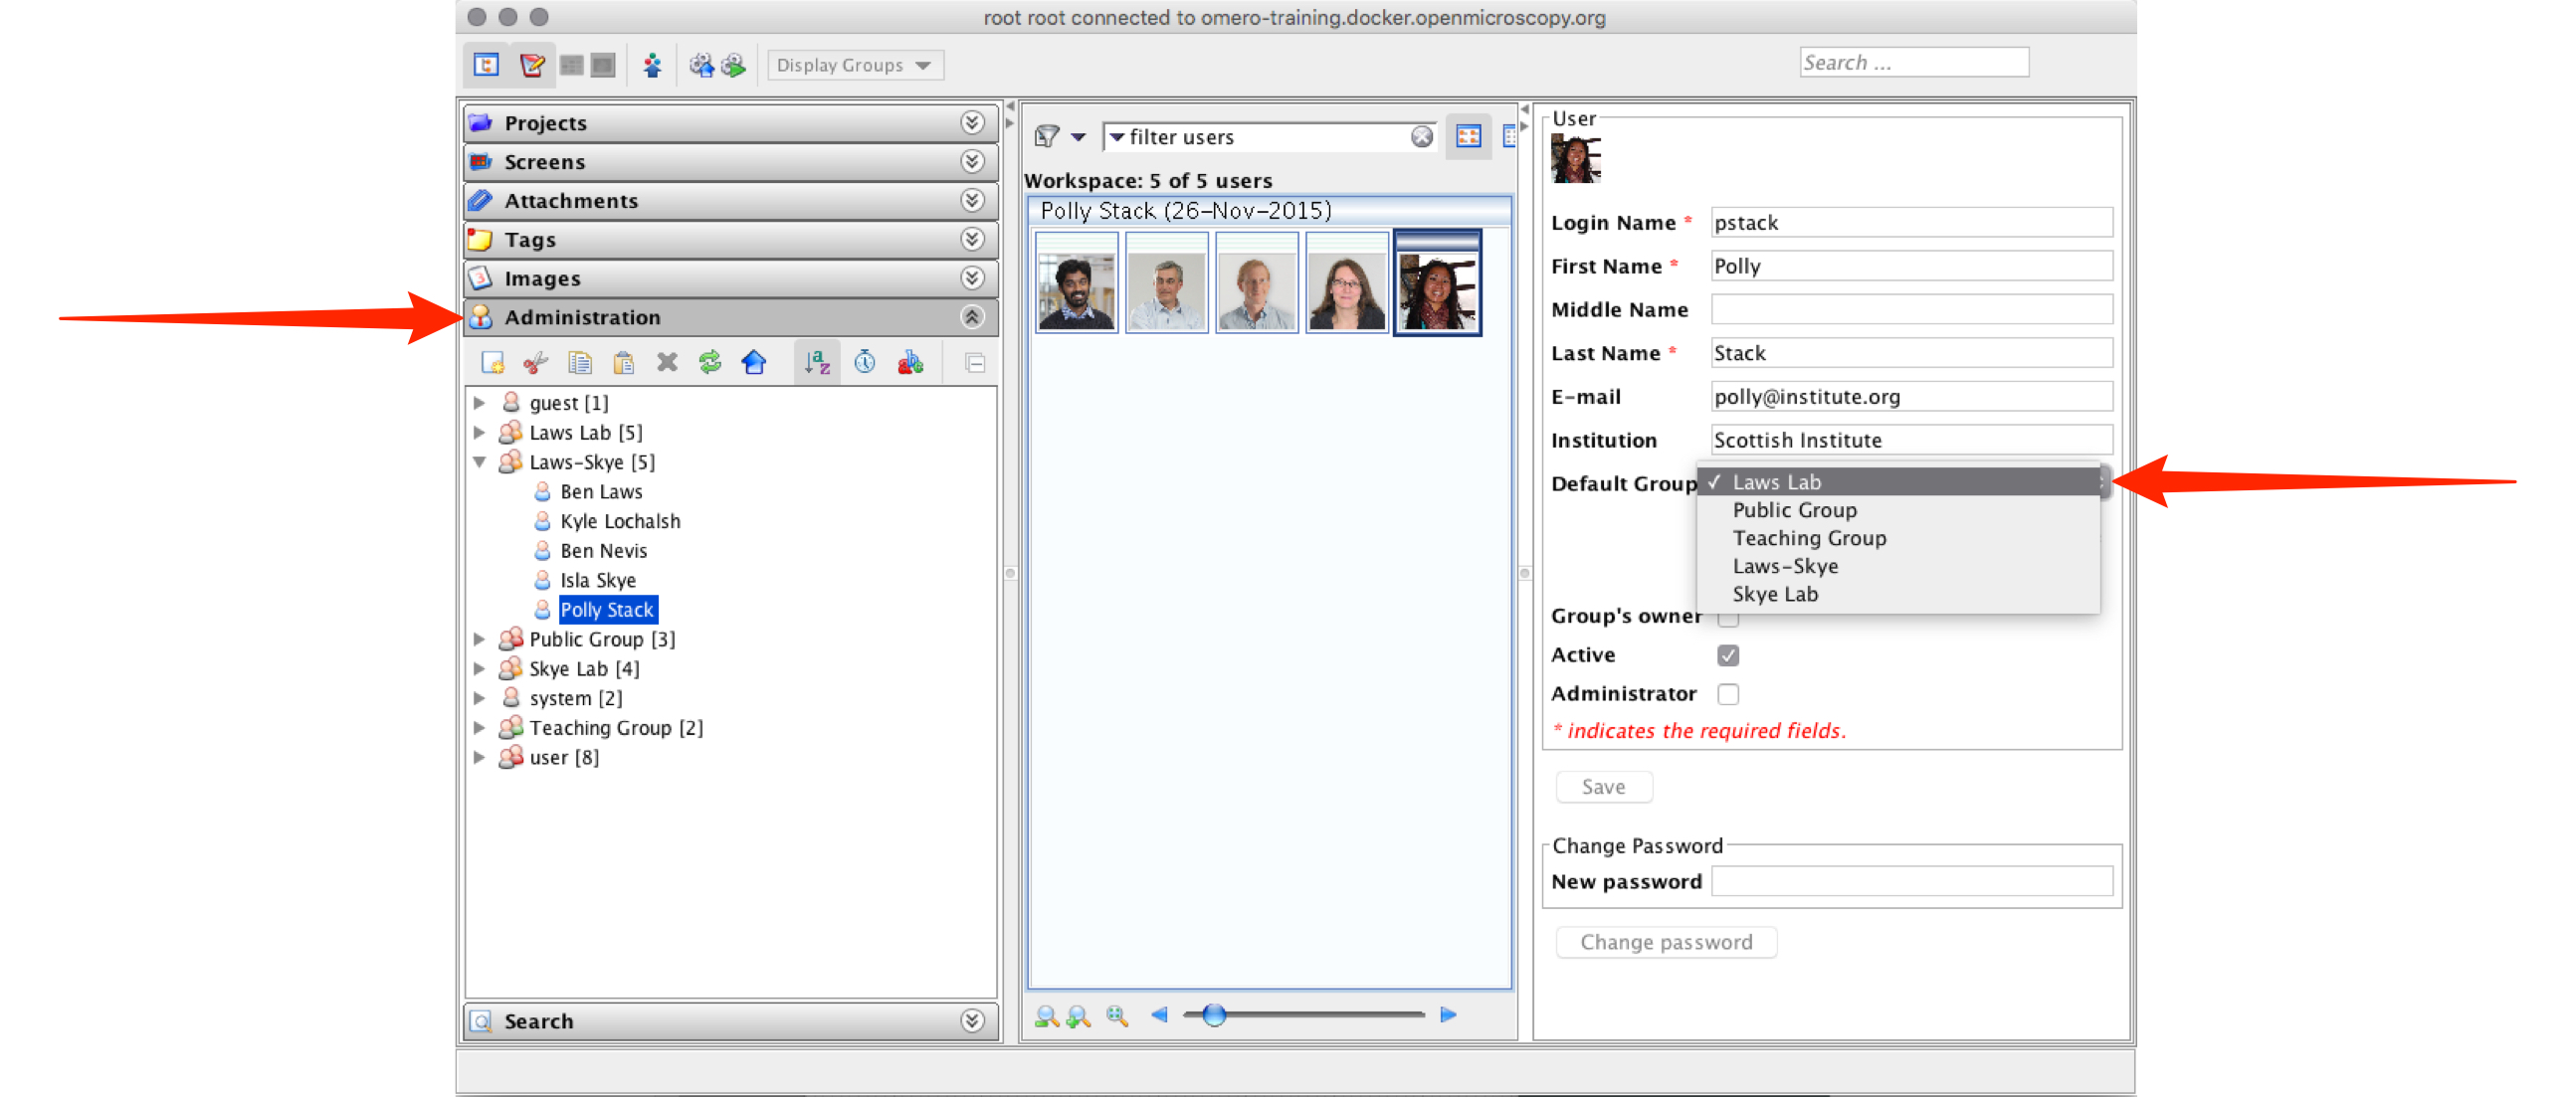
OMERO.insight
-
Select the Administrator tab in the left hand pane.
Select a group of which the user is already a member.
Select the user from the group members.
In the right-hand pane, select the new default group from the drop-down list.
Click Save.
Creating groups and users
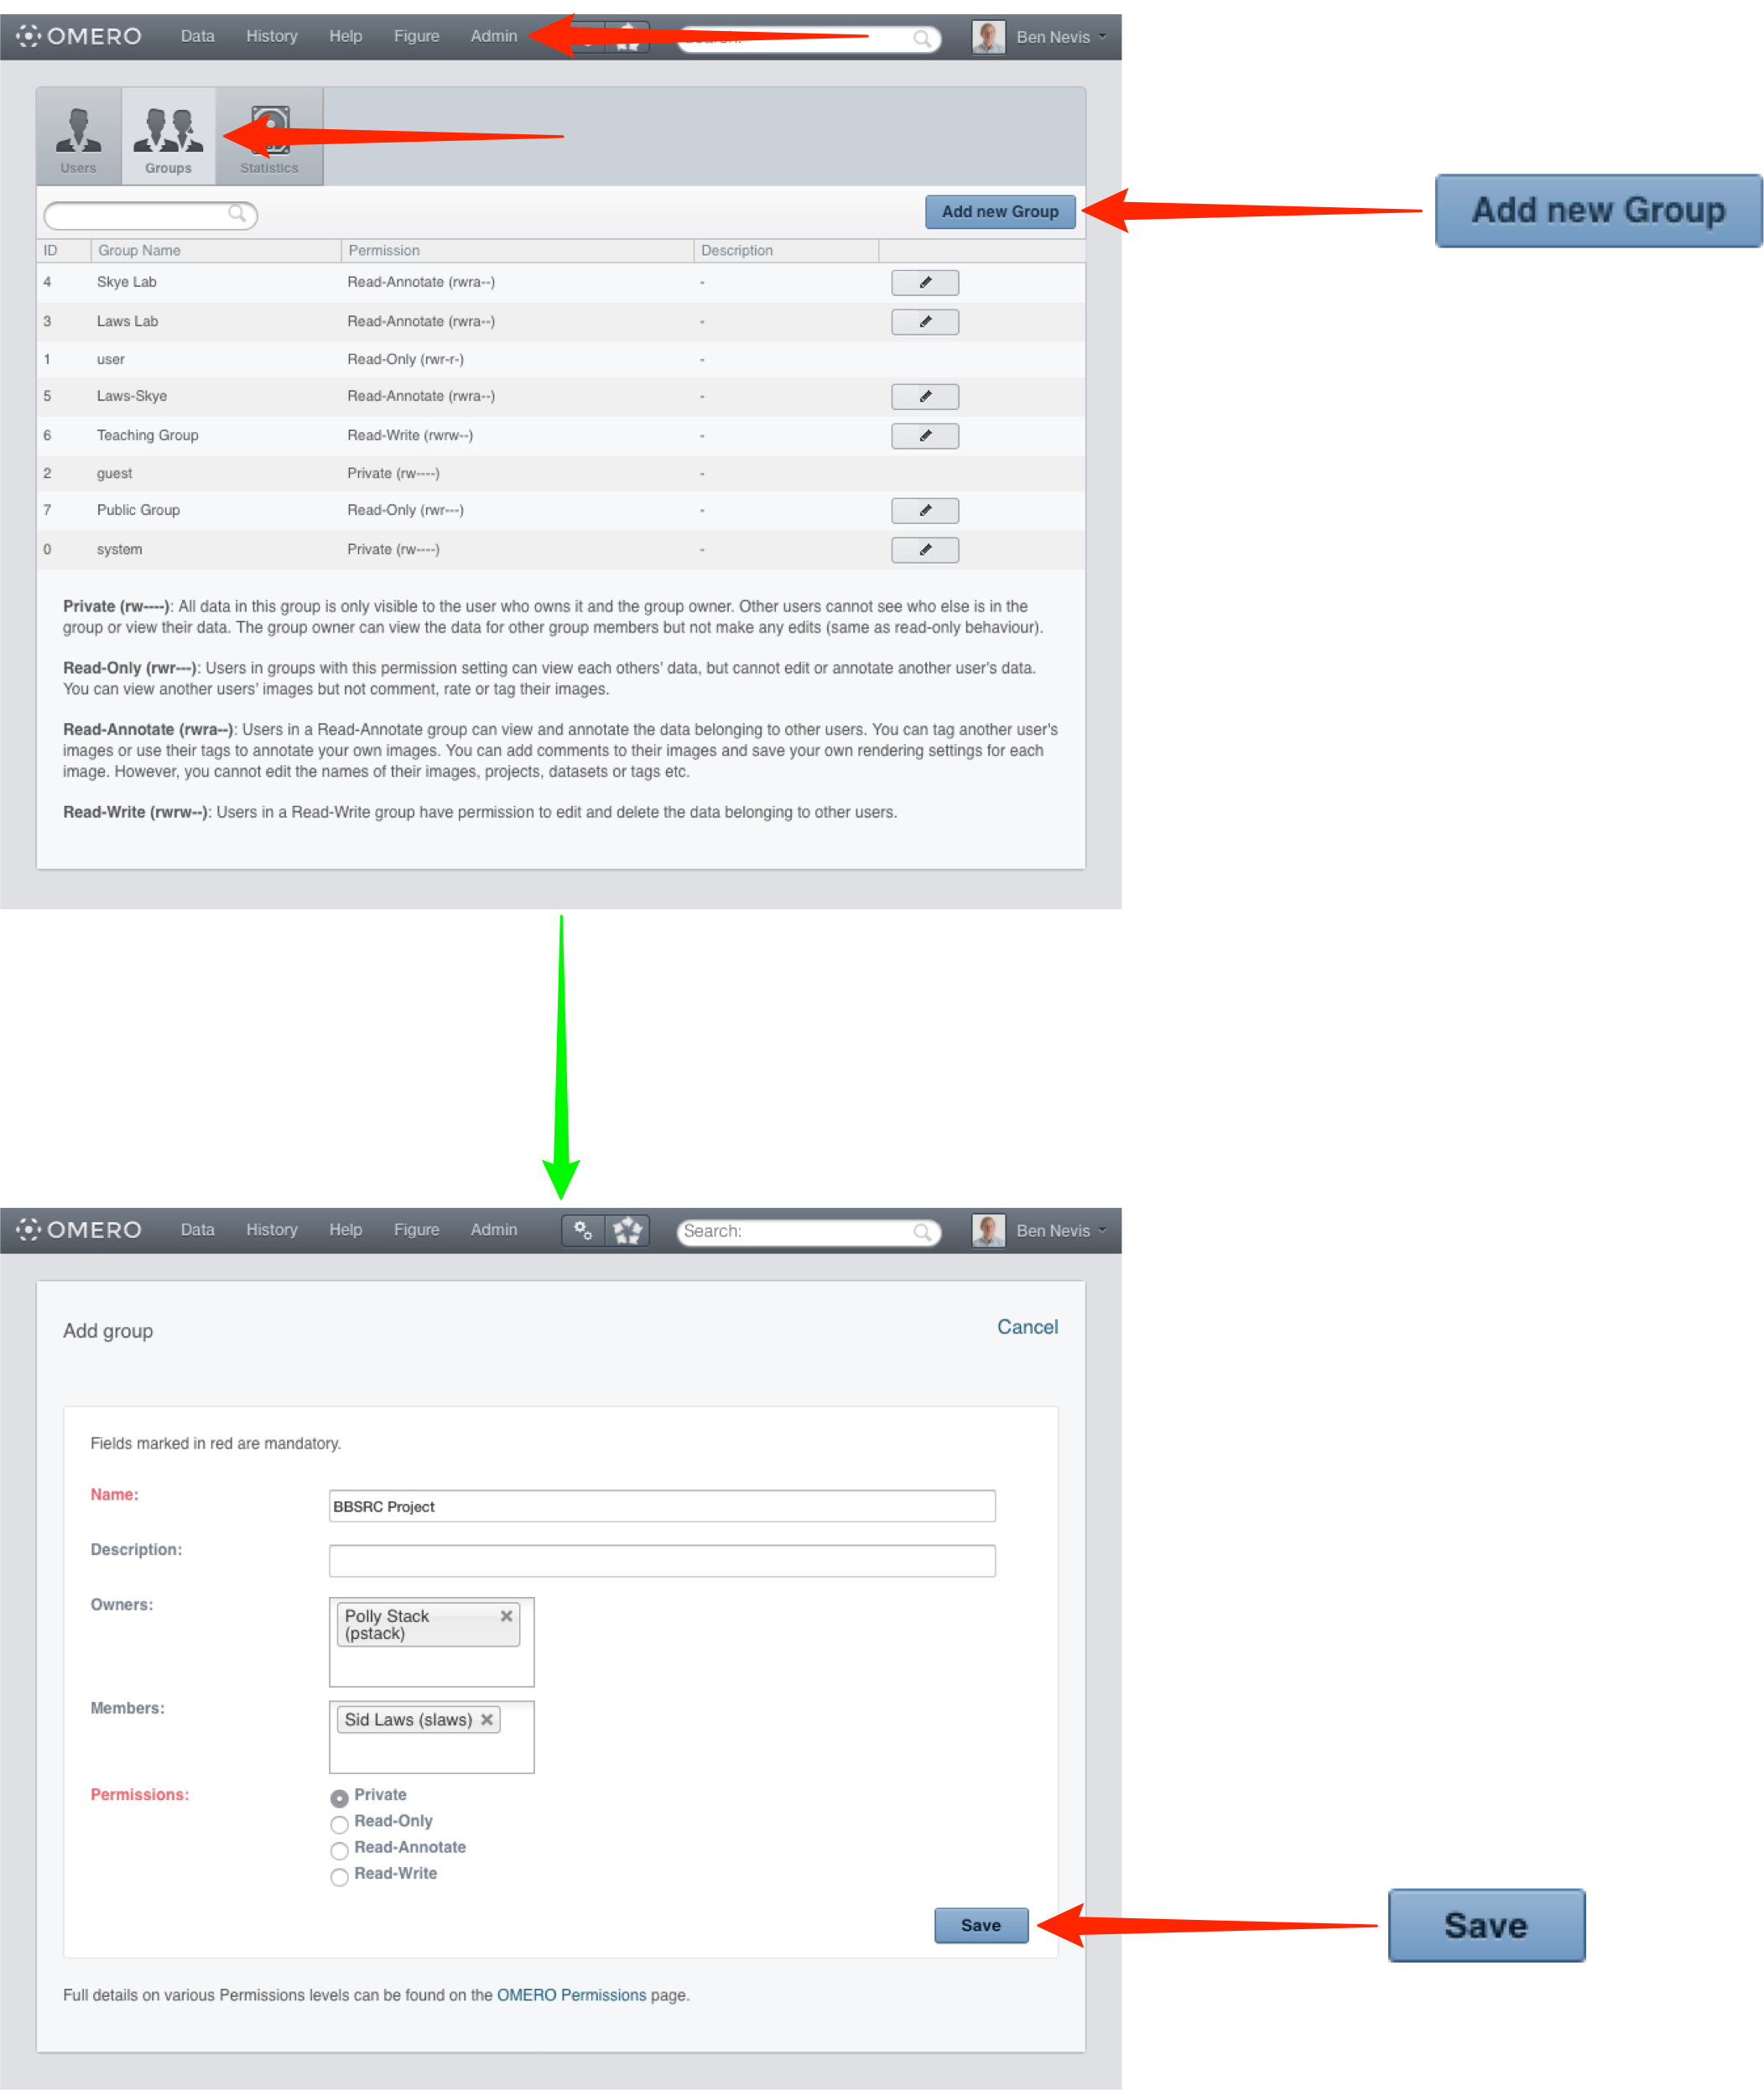
OMERO.web
-
Click on Admin in the top toolbar.
Click on the Groups tab.
Click on the Add new Group button.
Fill in the details.
Add group owners and members.
Click to select the permissions level.
Click Save.
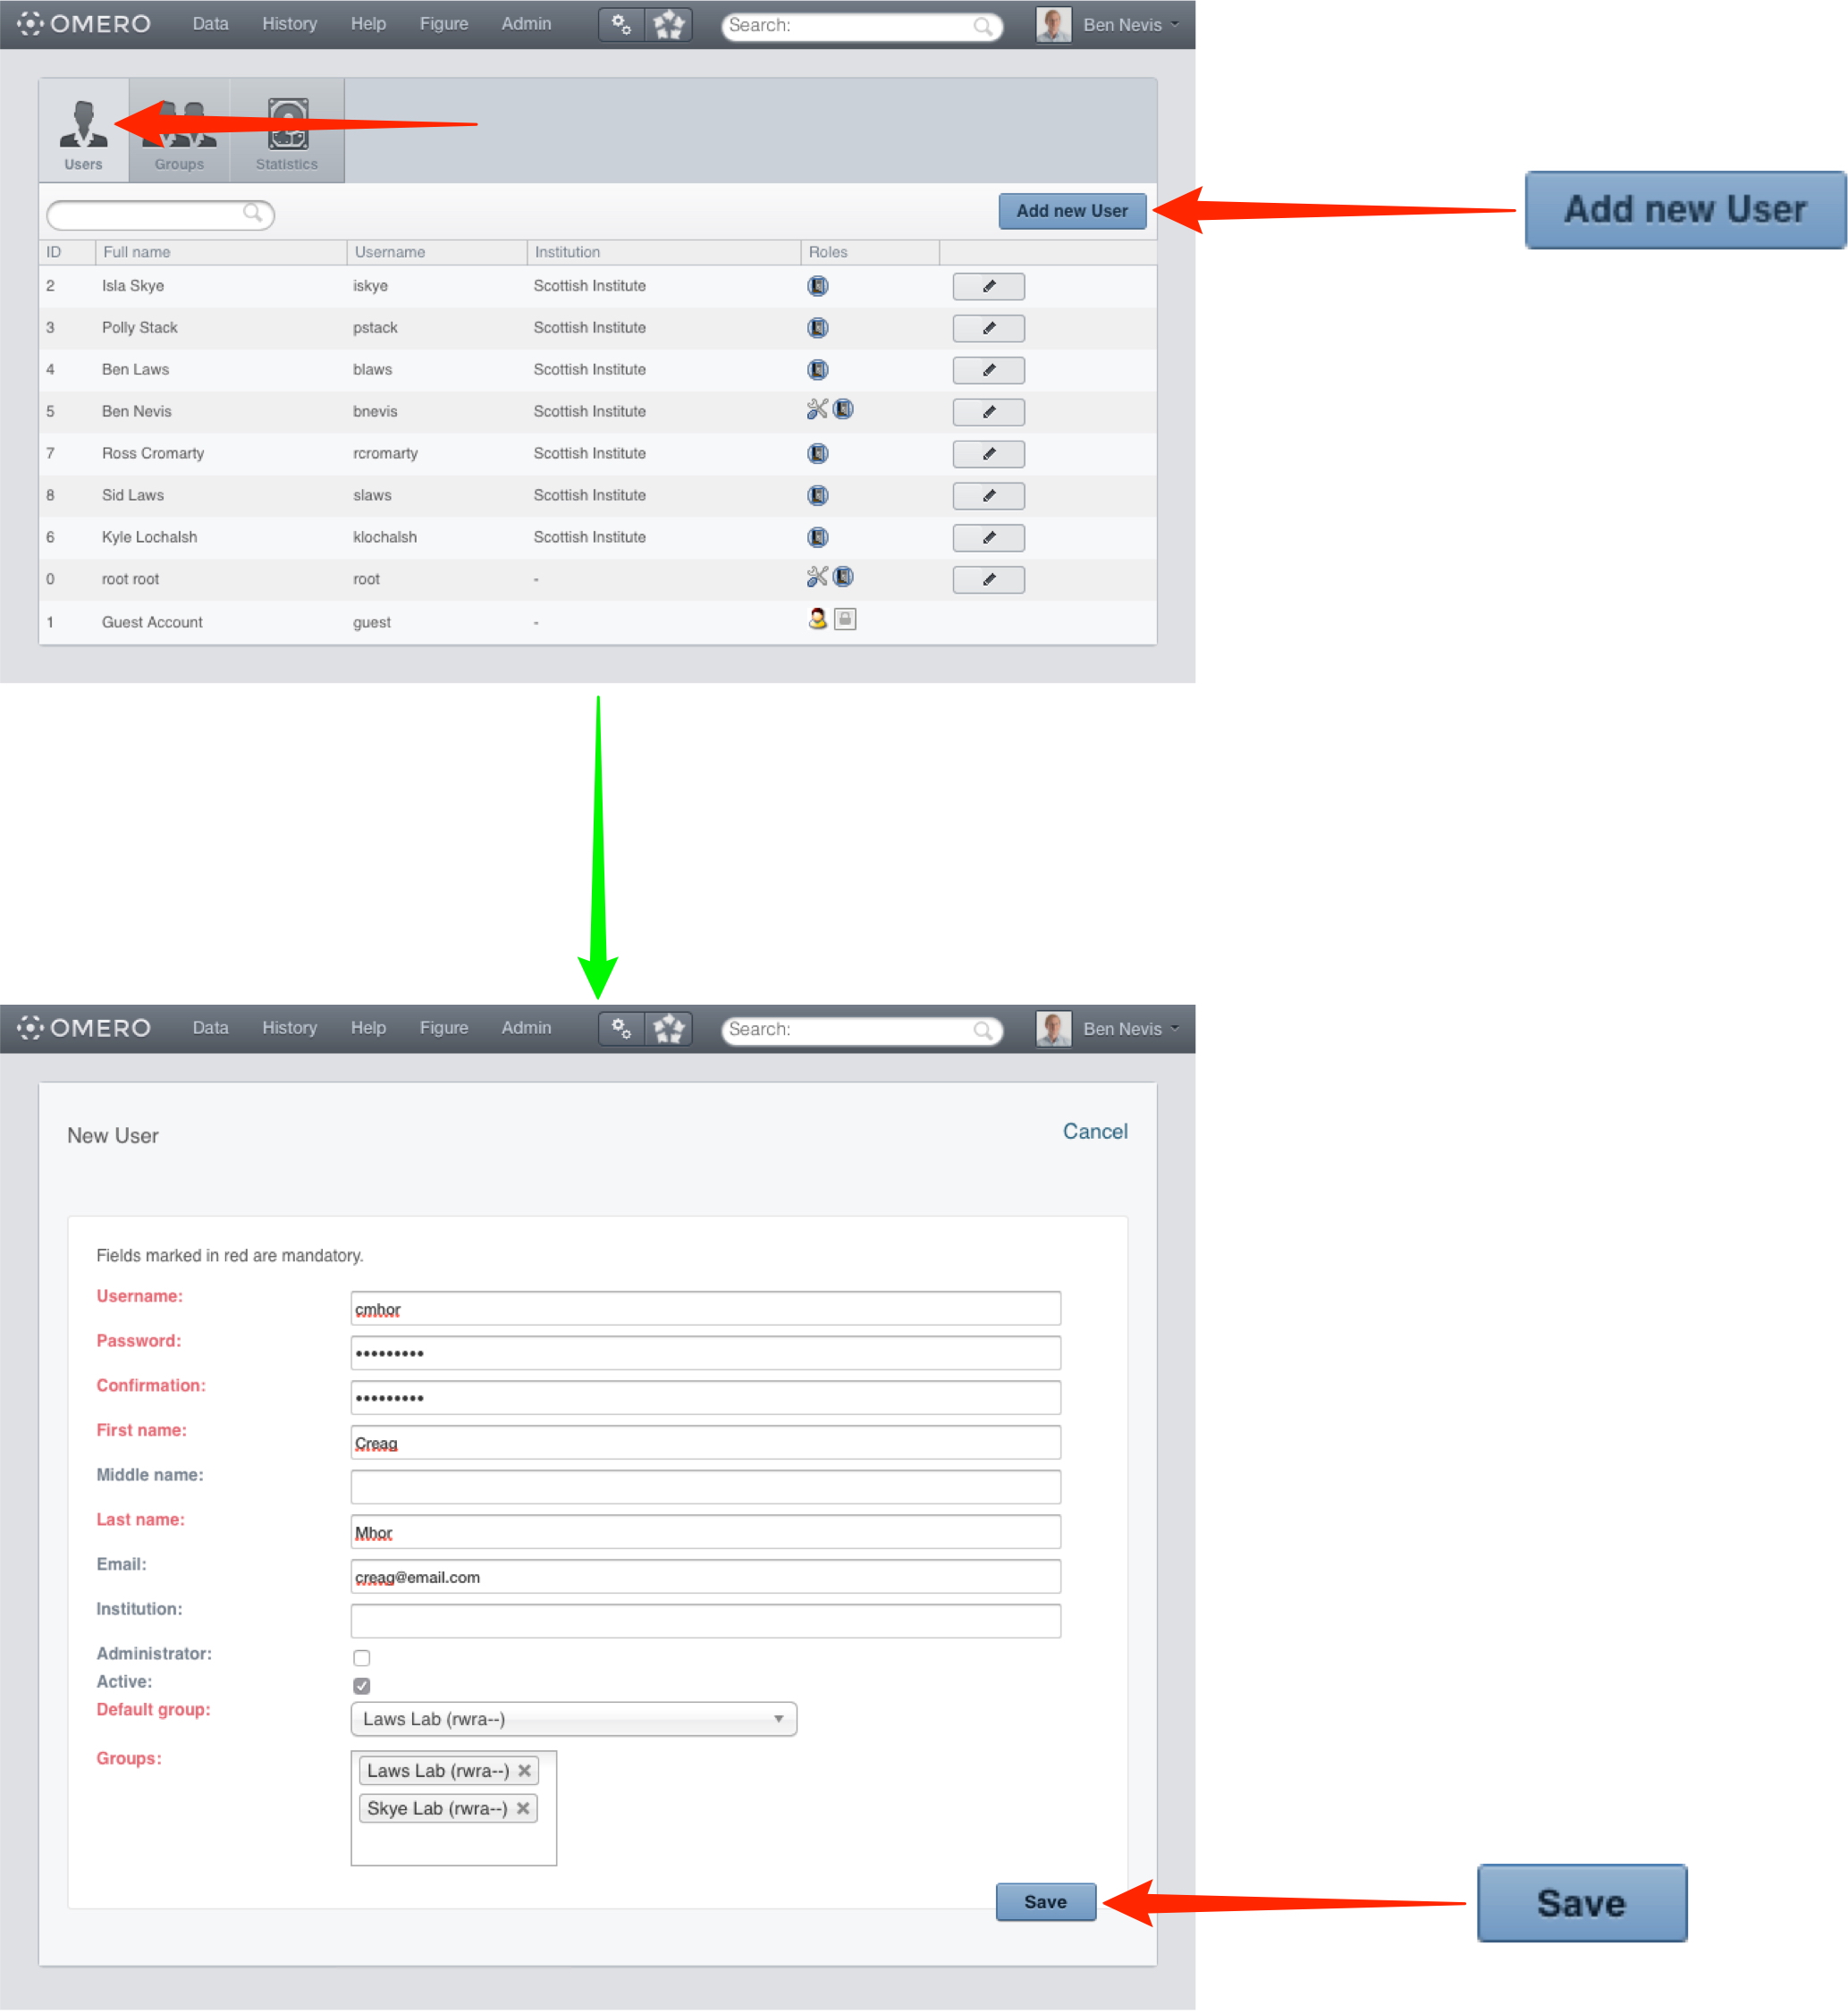
-
Click on the Users tab.
Click on the Add new User button.
Fill in the details.
Add a group to make the user a member of it.
Select the users default group in the drop-down list.
Click Save.
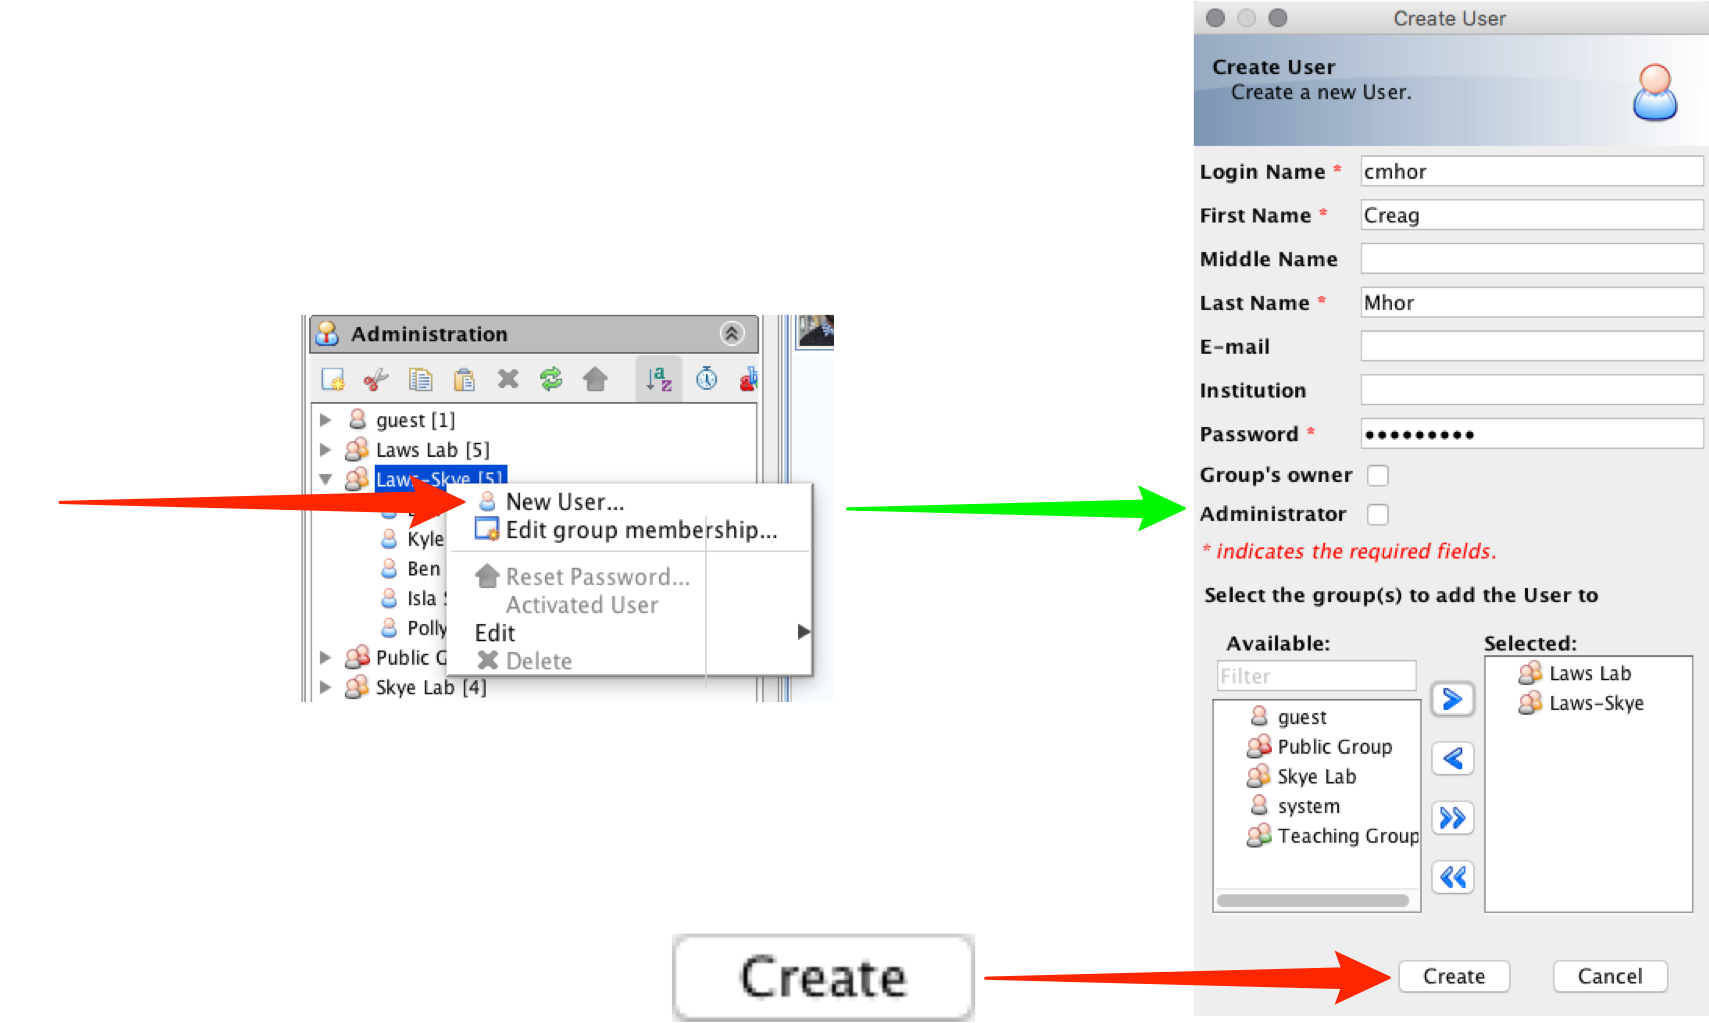
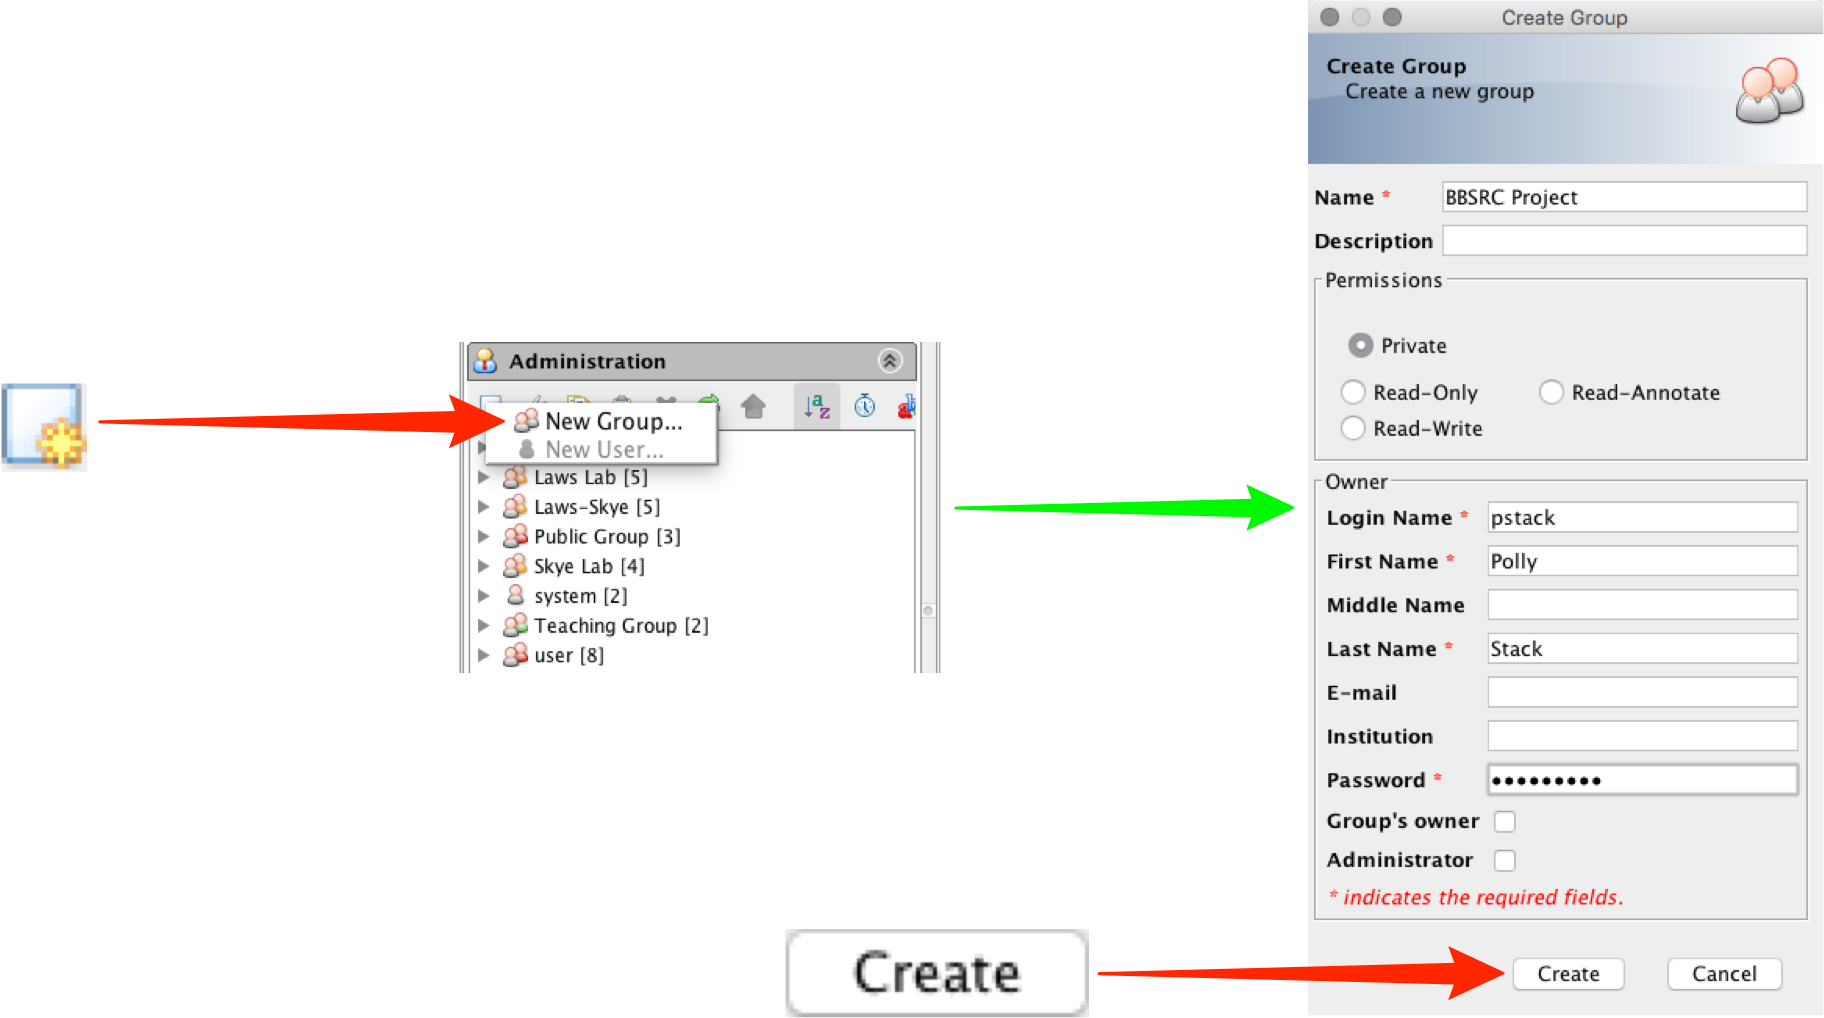
OMERO.insight
-
Select the Administrator tab in the left hand pane.
Select New Group from the button drop-down menu.
Enter the group name.
Click to select the Permissions level.
Add the group owner's details.
Click Create to save the new group.
-
Right-click on the Group tab.
Select the New User entry.
Fill in the details.
Click to select if group owner or administrator.
Add groups to make the user a member of them.
Click Create to save the new user.
Removing a user from a group
This requires using the OMERO.web Admin tool.
There are two ways to do this.
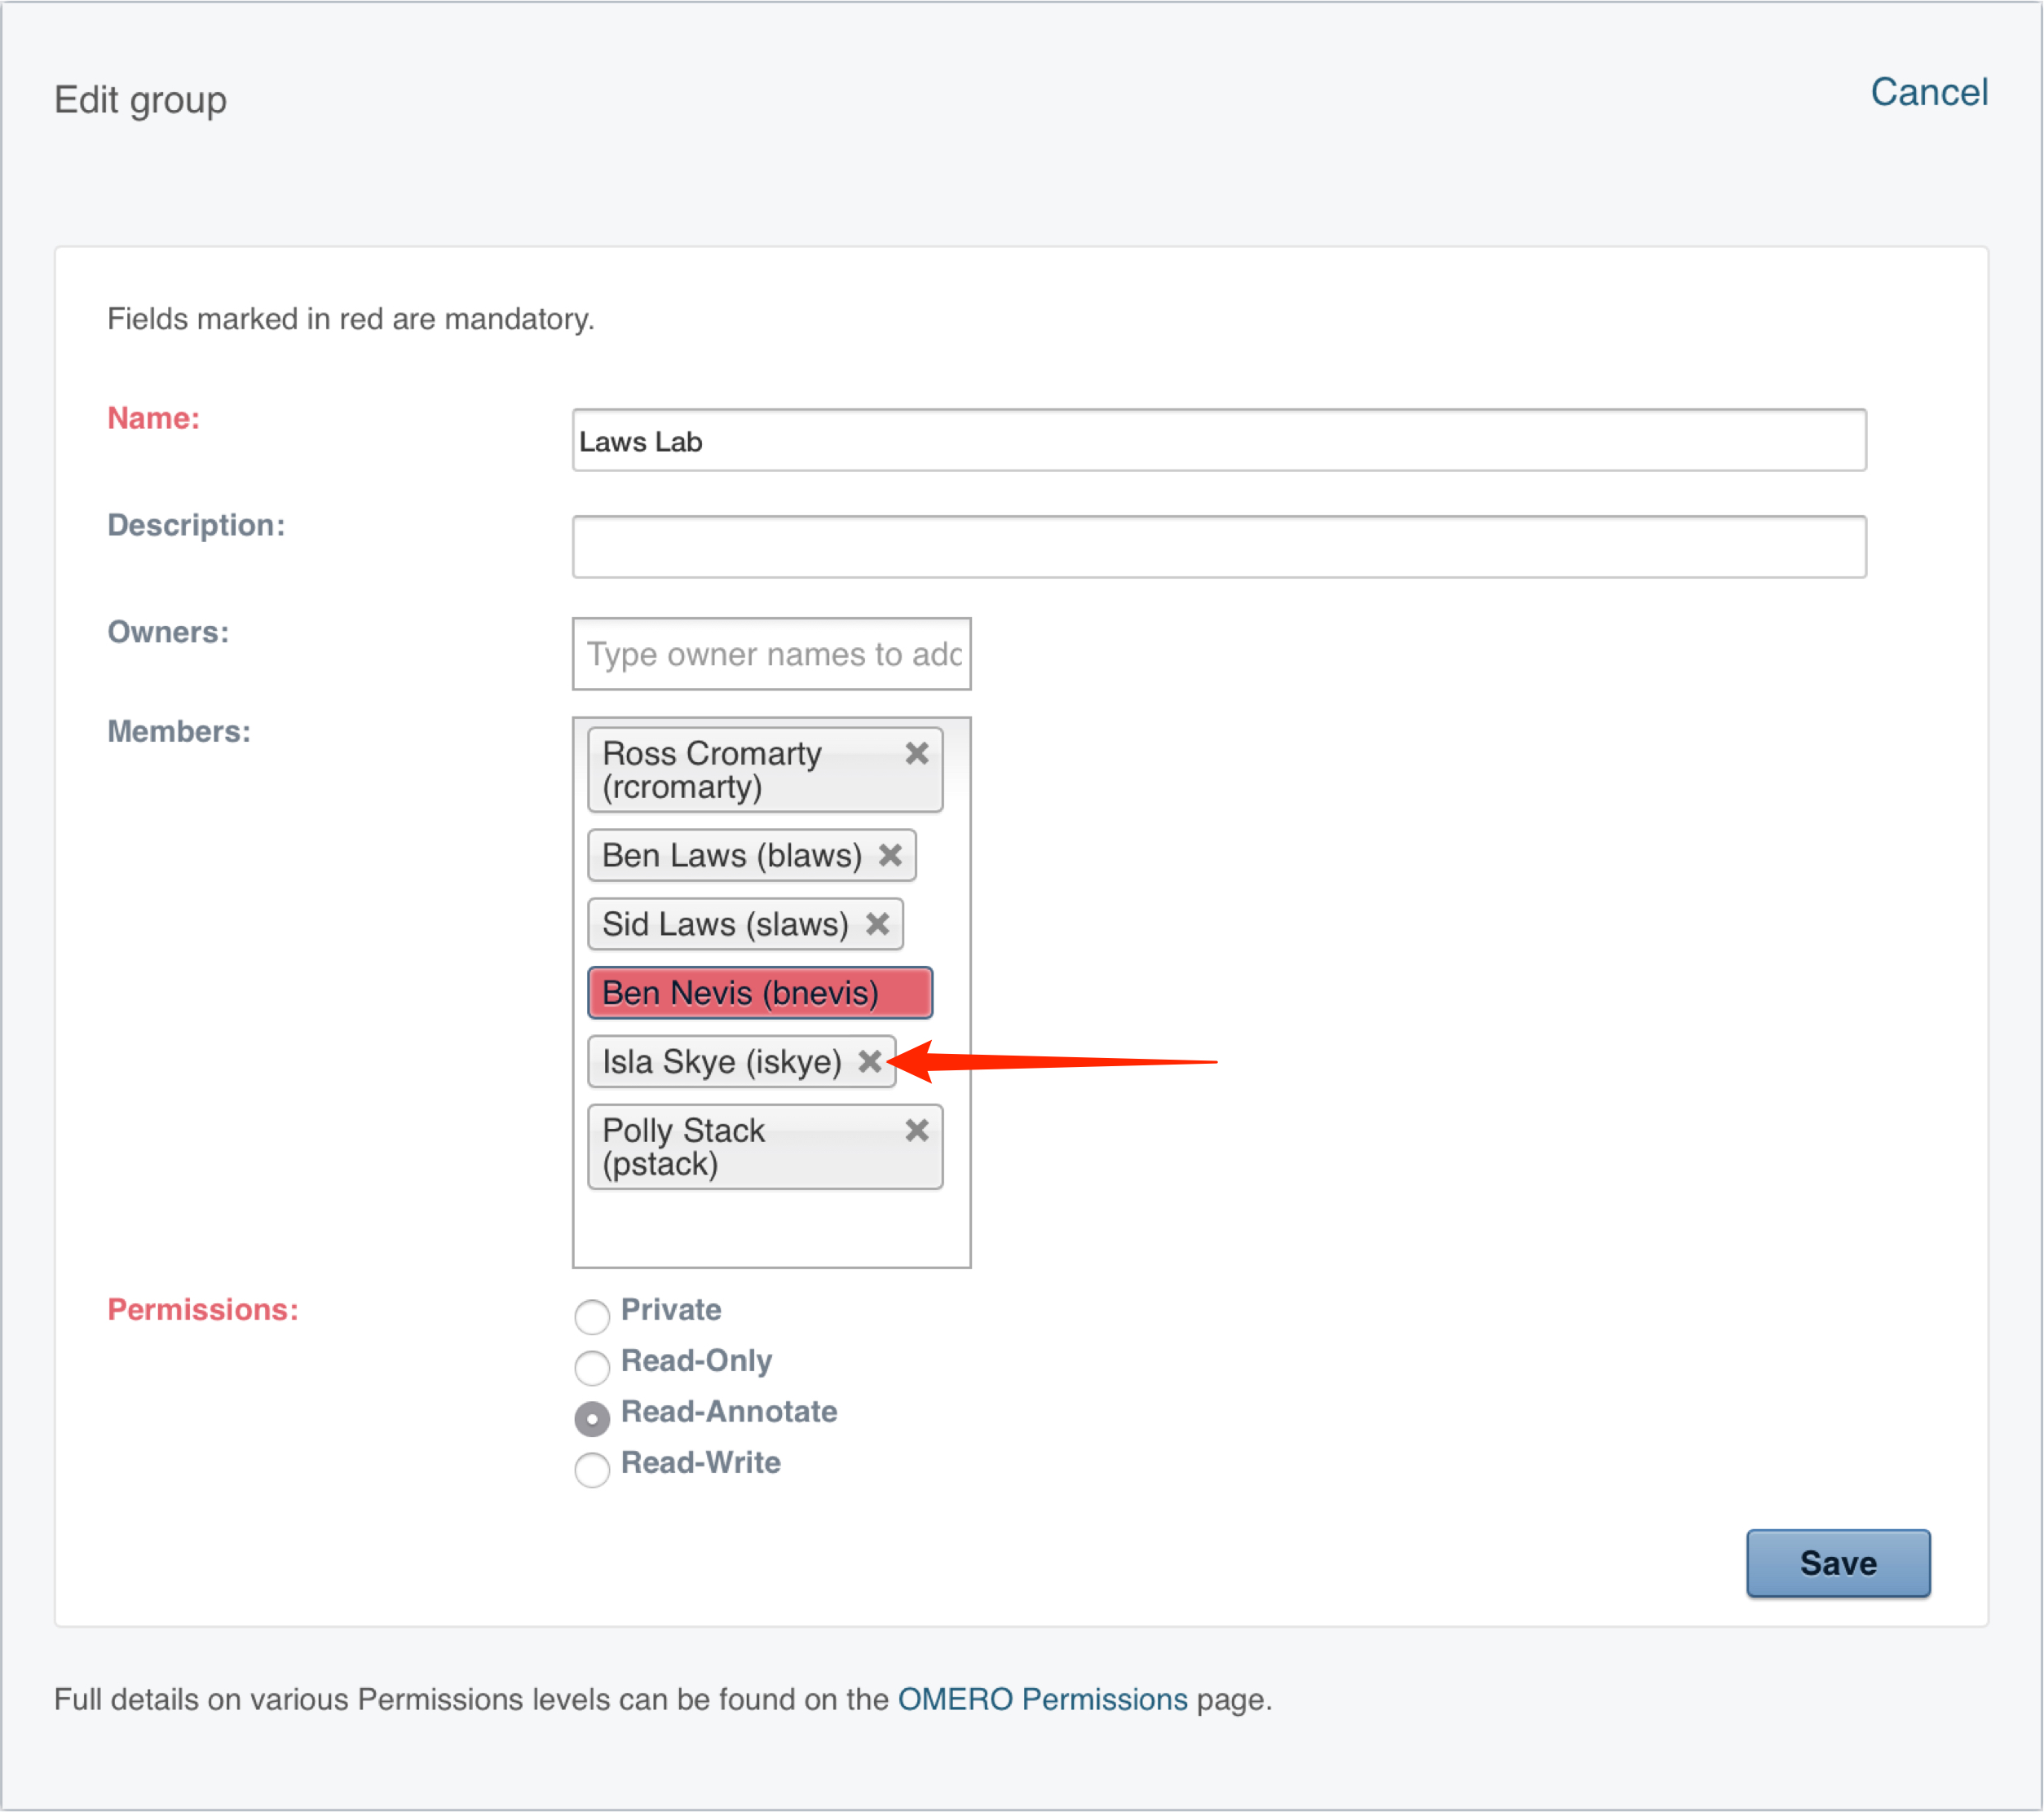
OMERO.web
-
Click on Admin in the top toolbar.
Click on the Groups tab.
Click on the Edit Group button.
Click on the x to the right of the user's name in the members or owners list.
Click Save to complete the change.
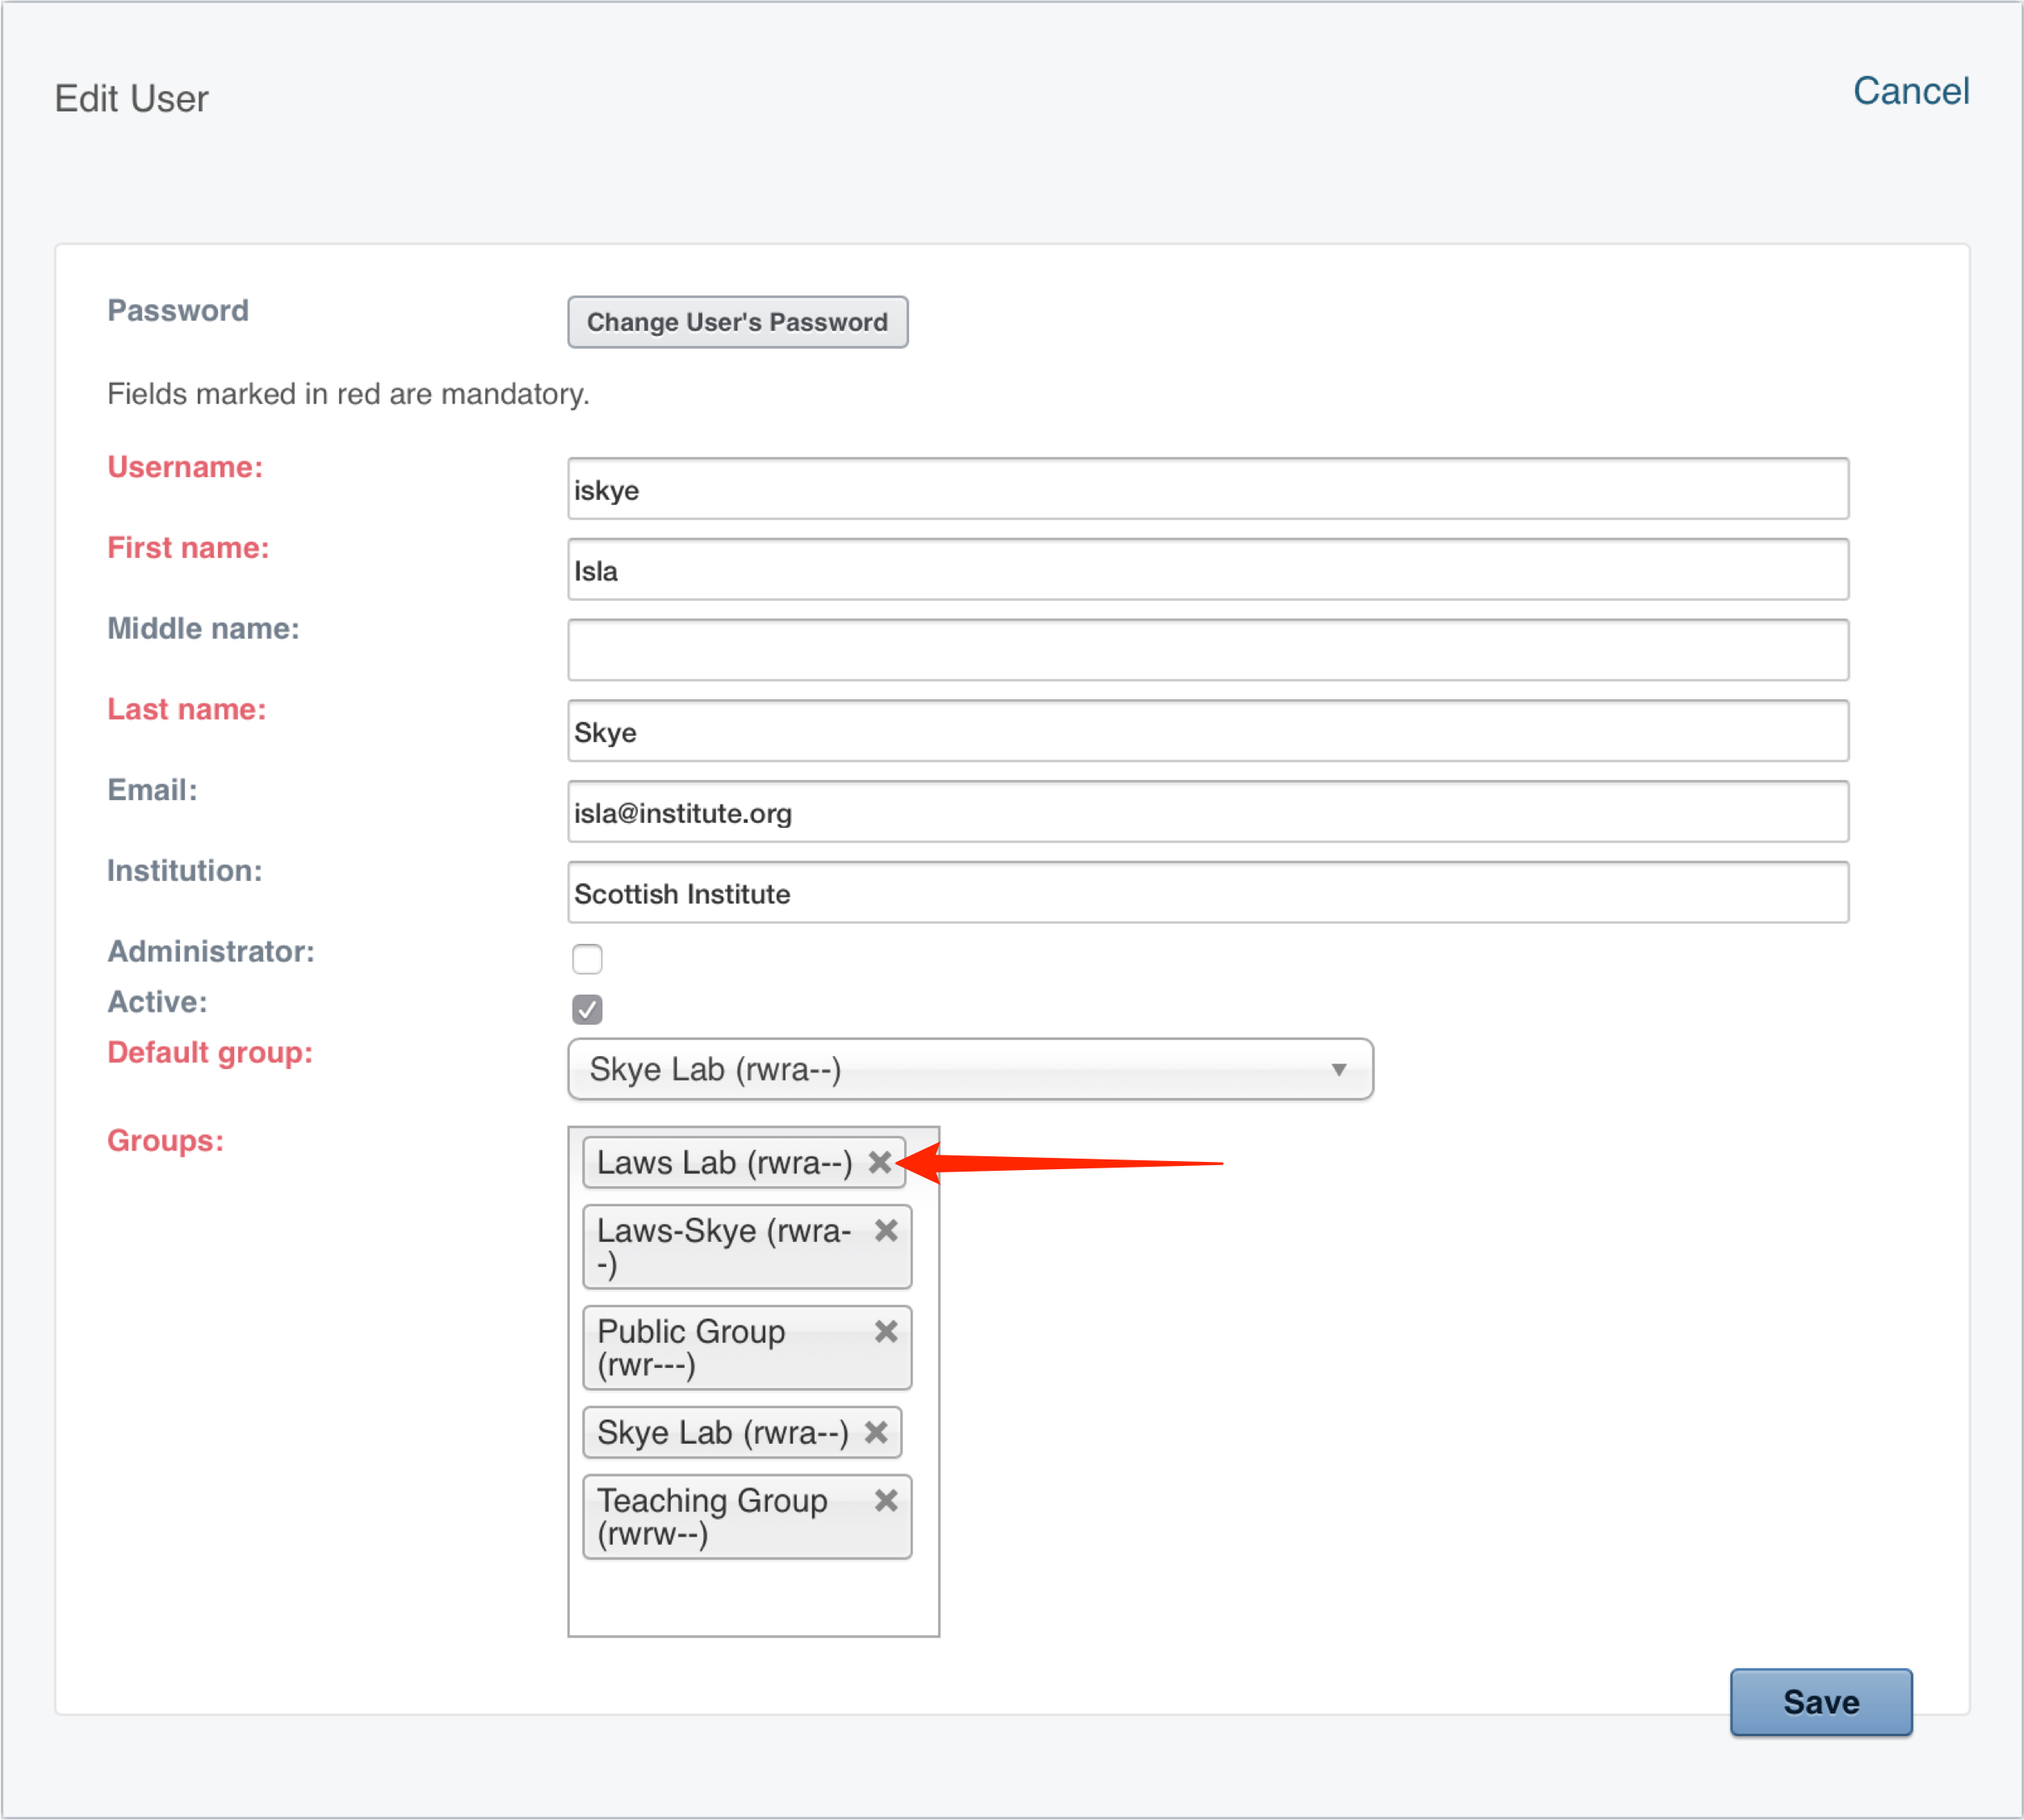
-
Click on the Users tab.
Click on the Edit User button.
Click on the x to the right of the group's name in the Groups list.
Click Save to complete the change.
Moving Data
When a user is removed from a group, any data they have in the group remains in the group, and is still owned by the user.
Data can be moved to another group by the user before they are removed, or by the group owner or administrator at any time.
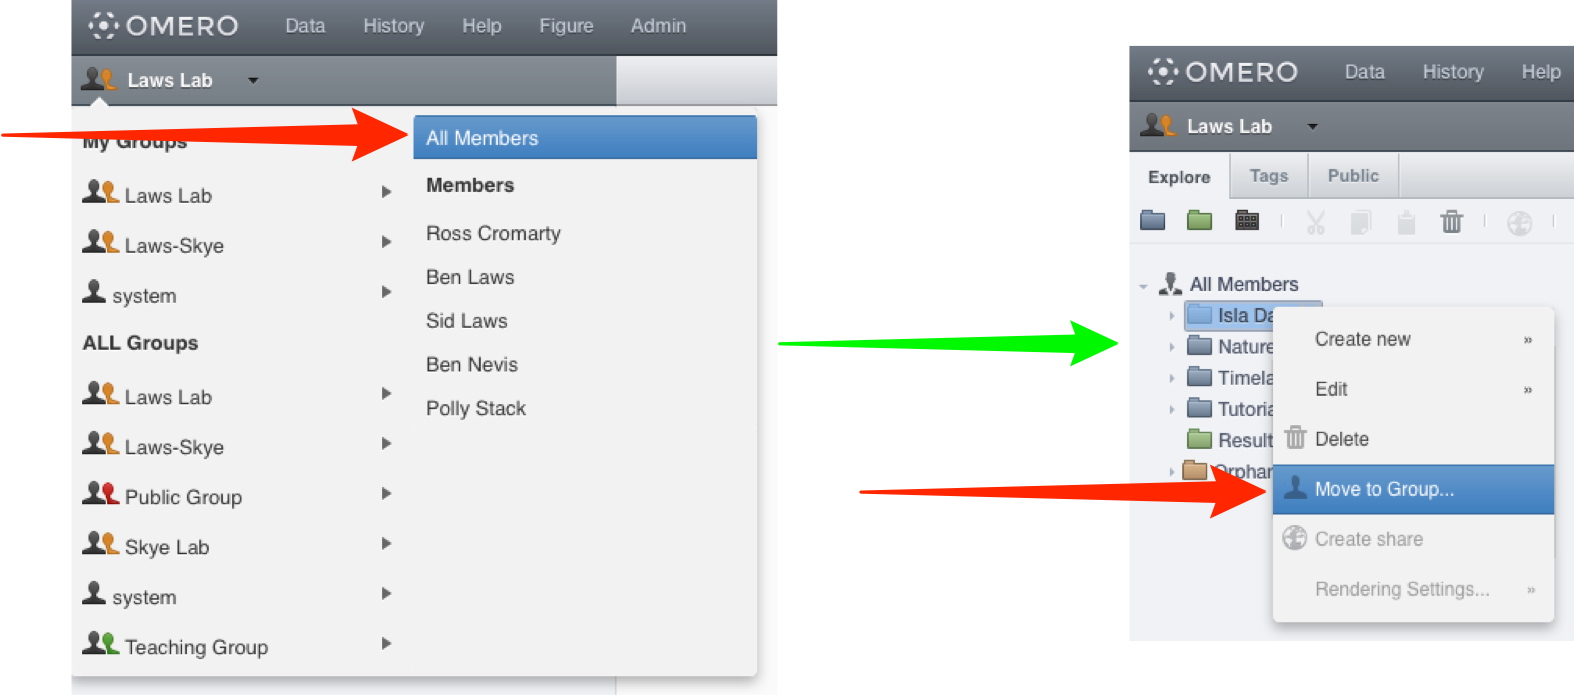
OMERO.web
-
Select All Members from the group display menu to view data owned by a user who is no longer a member of the group.
Right-click on the data to be moved and select Move to Group ... .
Select the destination from the pop-up window.
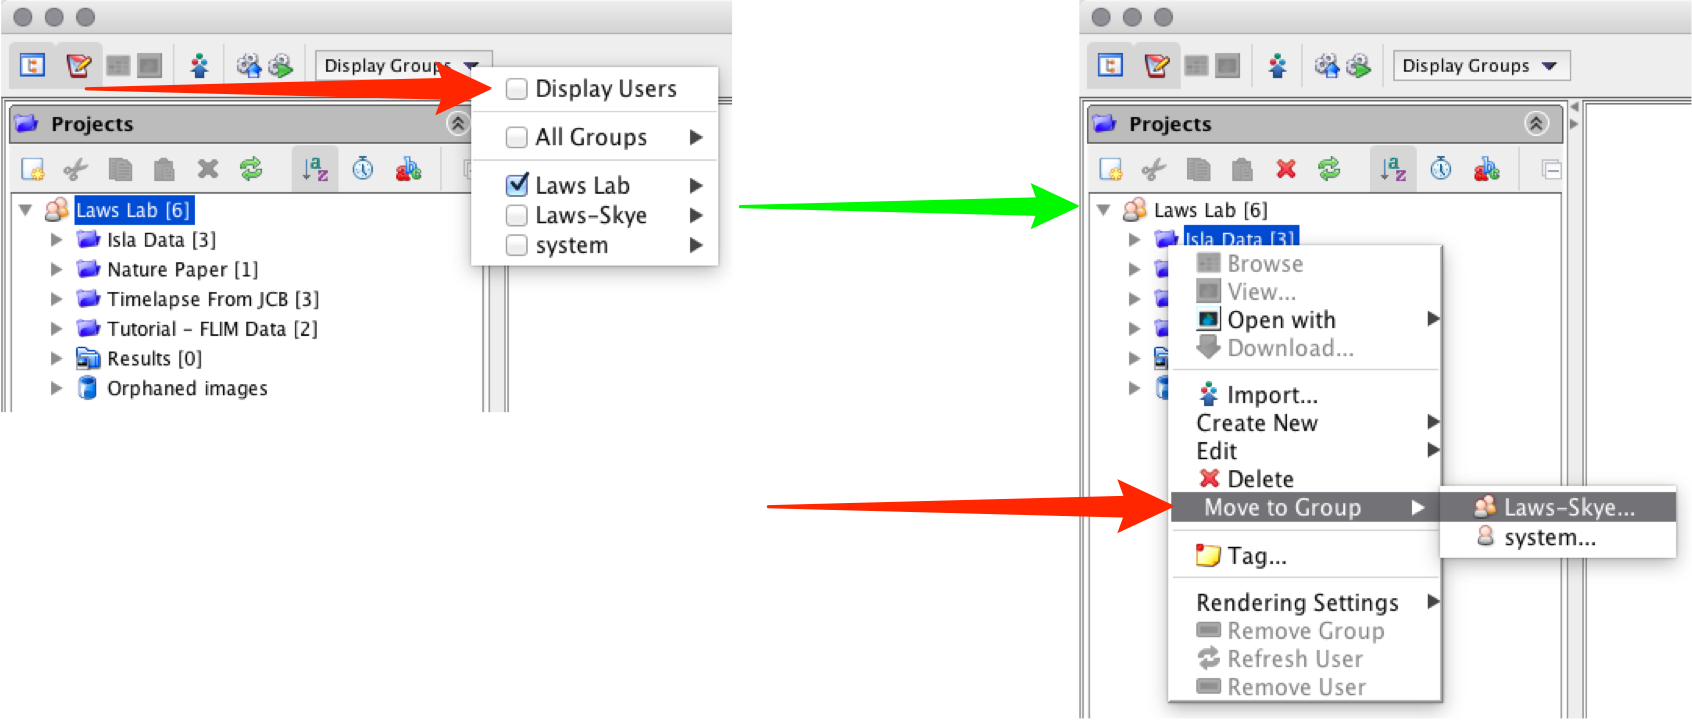
OMERO.insight
-
Uncheck Display Users from the Display Groups menu to view data owned by a user who is no longer a member of the group.
Right-click on the data to be moved and select Move to Group ... .
Select the destination group from options.
Note
Using the Command Line Interface (CLI), administrators and group owners (for data in their groups) can:
- list and move data owned by users no longer a member of a group
- change ownership of data
Importing
Import for another user
Any data imported by a user will be owned by them and will be in a group of which they are a member. For details on importing see Importing Data.
Administrators can import data to any group for any user i.e. the data will belong to that user.
Similarly a Group Owner can import for other members of their group.
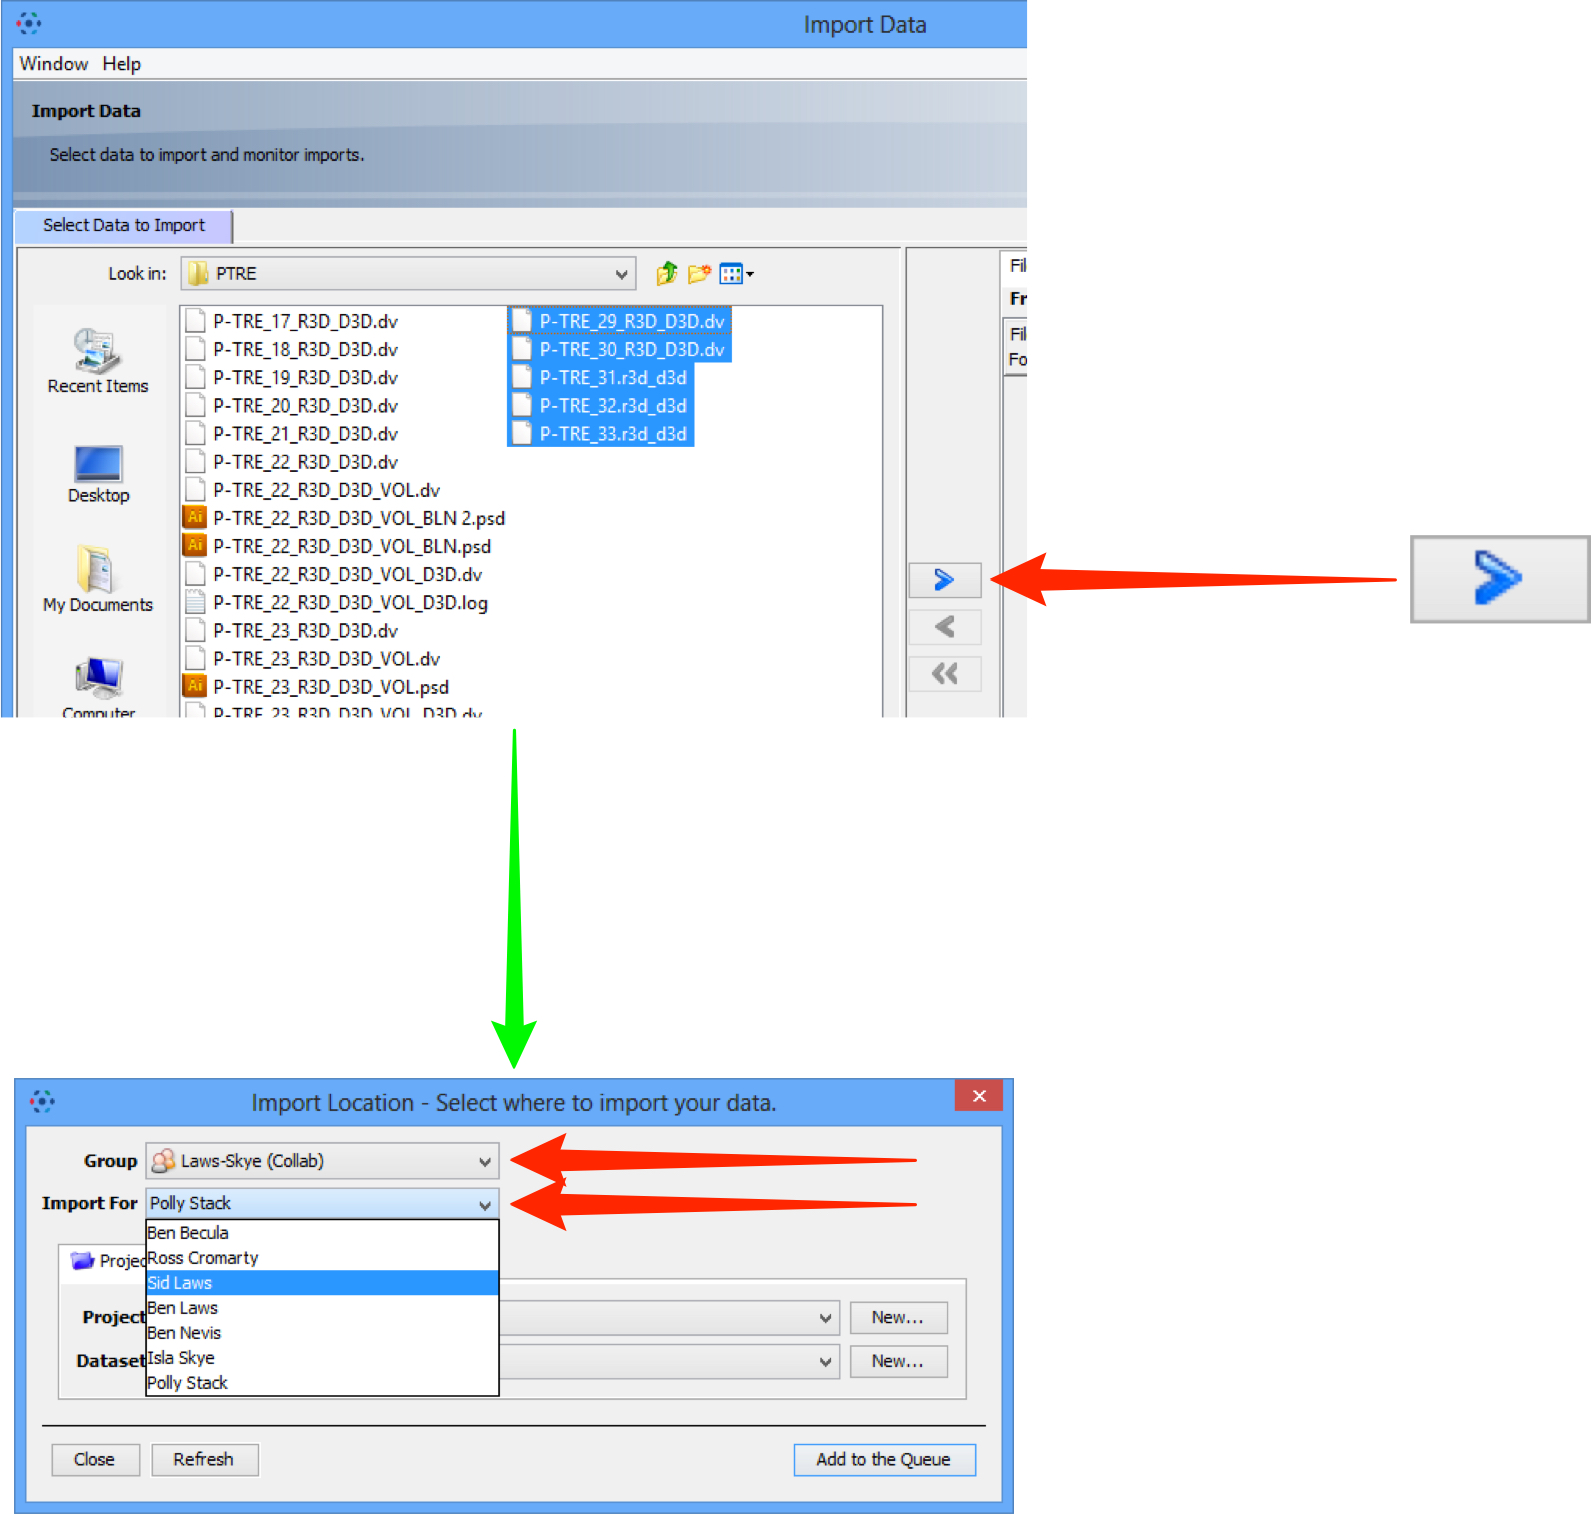
-
Select image data to be imported.
Click the right Add arrow.
In the Import Location window select from the Group drop-down box.
Select the user to import for from the Import For drop-down box.
The Project and Dataset drop-down boxes will list the projects and datasets available for the selected user.
OMERO.dropbox
OMERO.dropbox monitors designated folders on a storage system, detects newly uploaded files and runs a fully automatic import of those files to the OMERO server if possible. User Help for OMERO.dropbox is in the Using OMERO.dropbox page.
OMERO.dropbox runs on the same machine as the OMERO server and is started automatically when the OMERO.server starts and it will run subject to prerequisites being met. Full details on configuring and using OMERO.dropbox are in the sysadmin documentation OMERO.dropbox page.
Data structure
OMERO supports a Project - Dataset - Image structure for conventional image data and a Screen - Plate - Run - Well - Field structure for High Content Screening data.
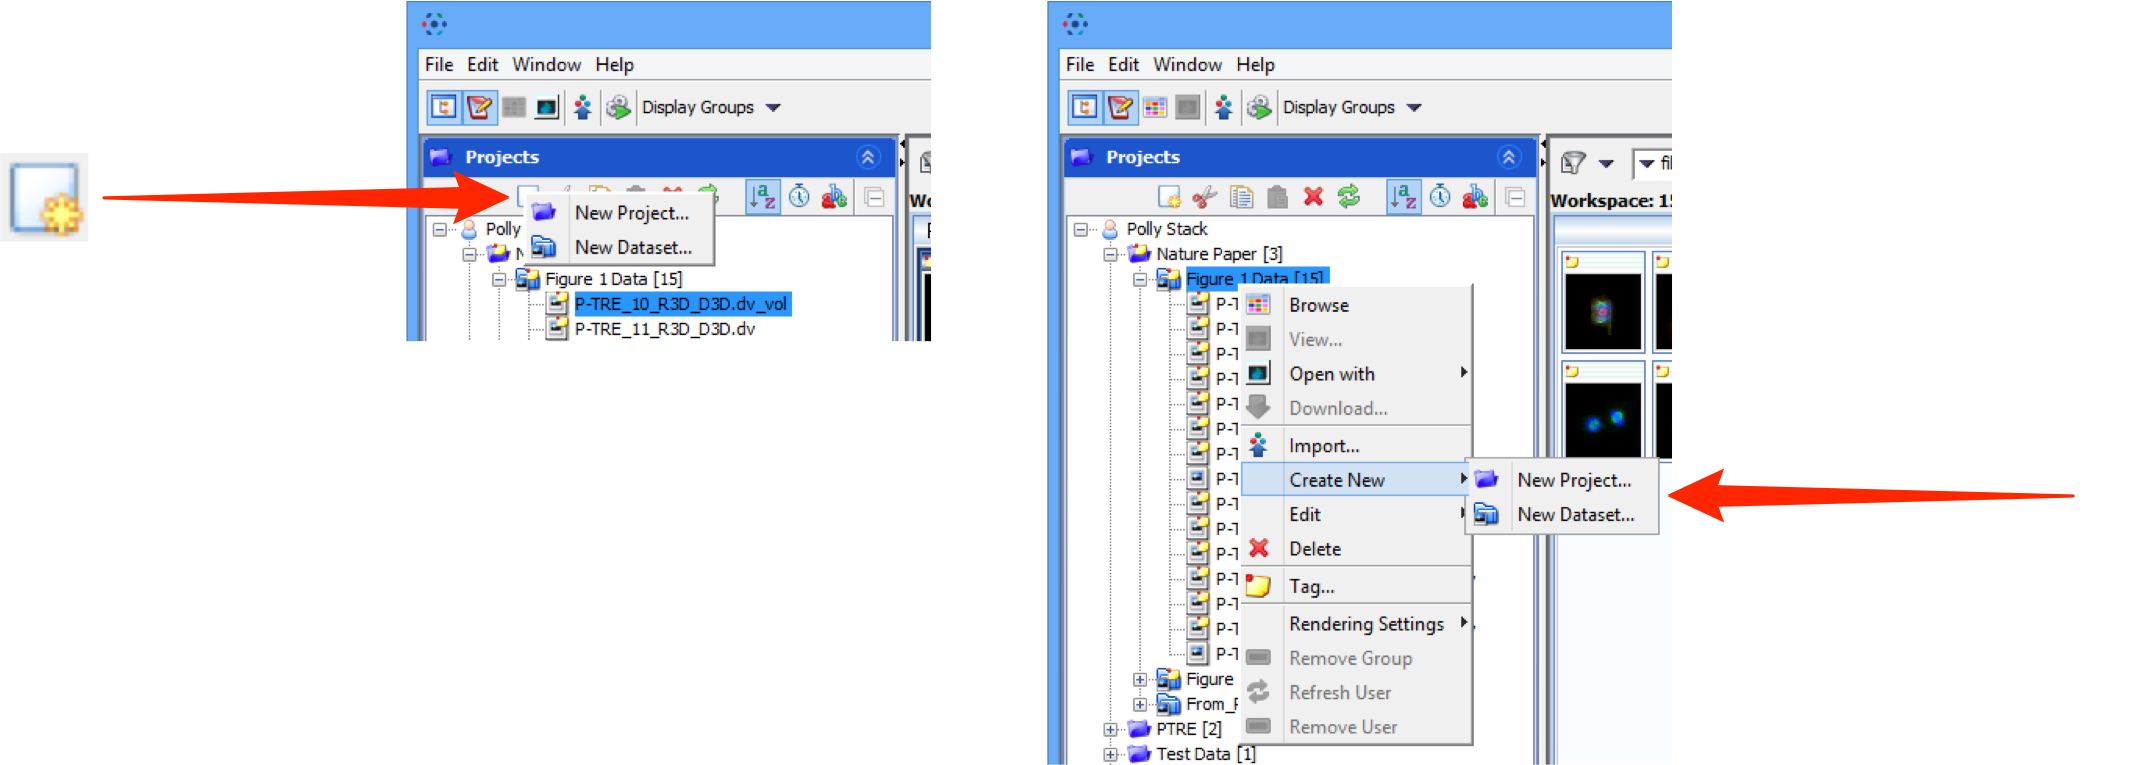
New containers can be created at the time of import or from the data tree in the left-hand pane.
OMERO.insight
-
Click on New Container icon or Right-click in the data tree to create a new Project or Dataset.
-
Click on Screens tab and on New Container icon or Right-click in the data tree to create a new Screen.

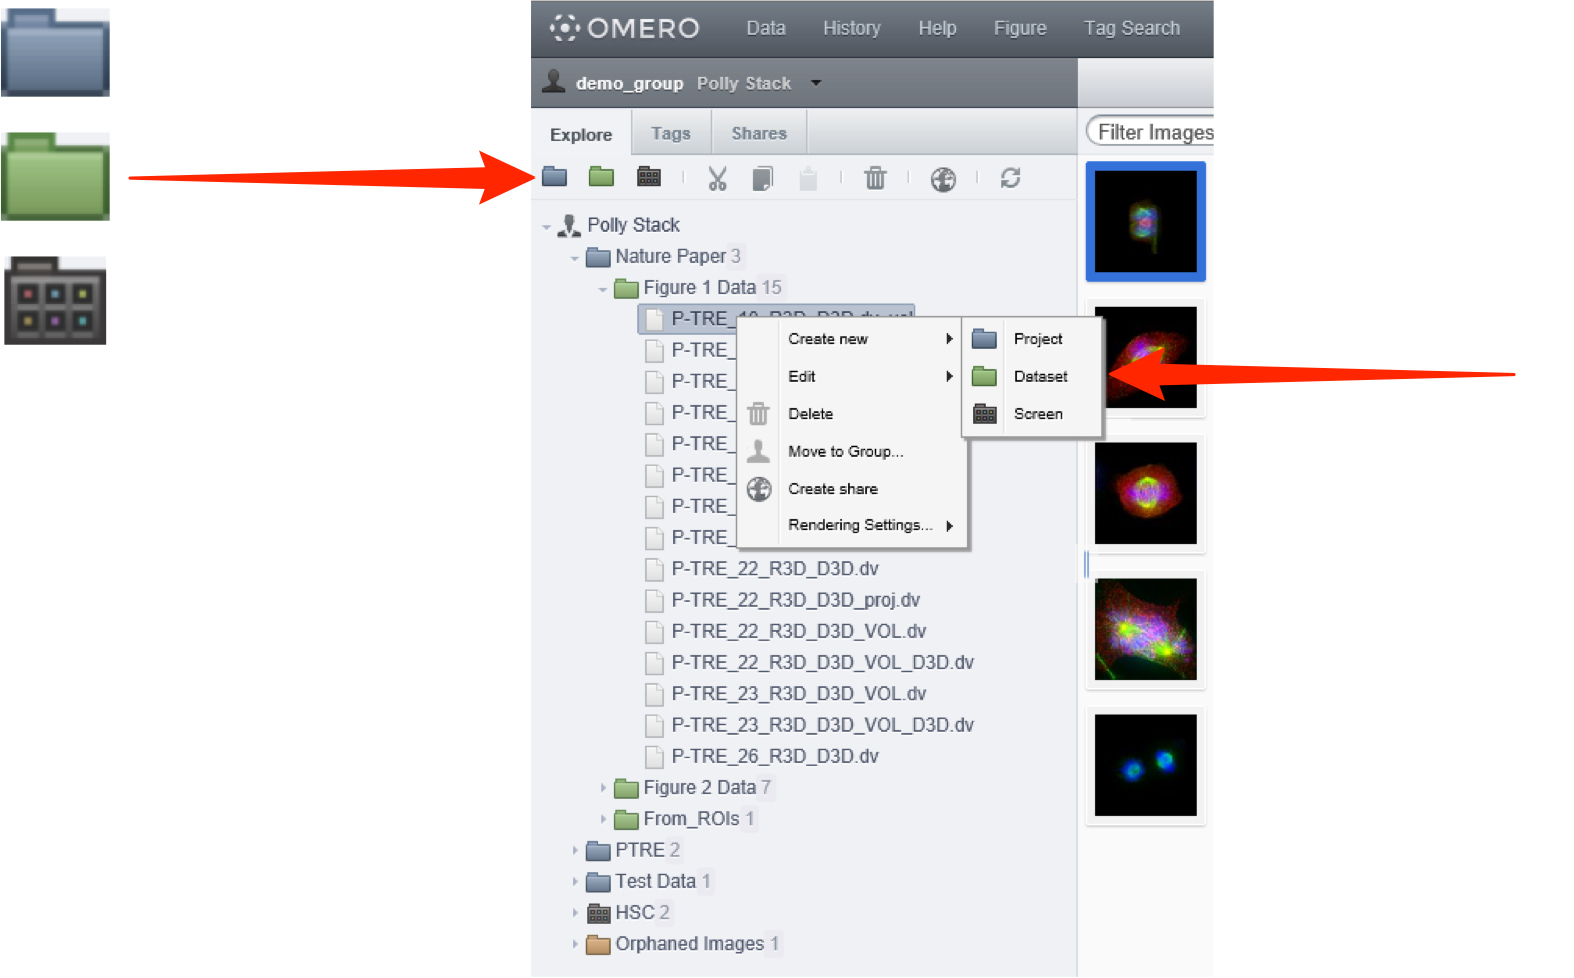
OMERO.web
-
Click on New Project, New Dataset or New Container icon or Right-click in the data tree to create a new Project, Dataset or Container.
Measurement and analysis
OMERO.insight has a Measurement Tool that enables Regions of Interest (ROIs) to be drawn on images, and then basic intensity analysis to be performed. Details on how to use it are in the ROIs and Measuring Tool section of the Help.
There are a number of standard scripts shipped with OMERO, and the Administrator can add additional scripts to the repository so they run on the OMERO server and are available in the scripts menu of both clients.

More complex analysis can be done using the OMERO API that allows scripts written in Python, Matlab and other languages to use data from the OMERO server and save results back to the server.
Further details on writing and installing scripts, the OMERO script repository and where to find other scripts are in Script Sharing page.
Further details of using MATLAB and Python in conjunction with OMERO are in the Matlab and Python section of the developer documentation.
Details on Using the OMERO API are in the OME developer documentation.
OMERO.mtools is a suite of MATLAB-based tools which allow you to perform common image analysis tasks on images stored in an OMERO server. OMERO.mtools has its own GUI and only requires an installation of MCR (MATLAB Compiler Runtime) to run. Further details can be found on the OMERO.mtools page of the OME website.
ImageJ and Fiji
Using the OMERO.insight plugin, ImageJ and Fiji can be used to open and view images on the OMERO server, draw ROIs and save the ROIs back to the OMERO server. Results of analysis performed in ImageJ or Fiji can be saved back to the OMERO server, attached as a file to the associated image. Full details of how to install the OMERO.insight plugin, and the workflows for using ImageJ and Fiji with OMERO are in the Using ImageJ with OMERO section of the User Help.
Disk usage
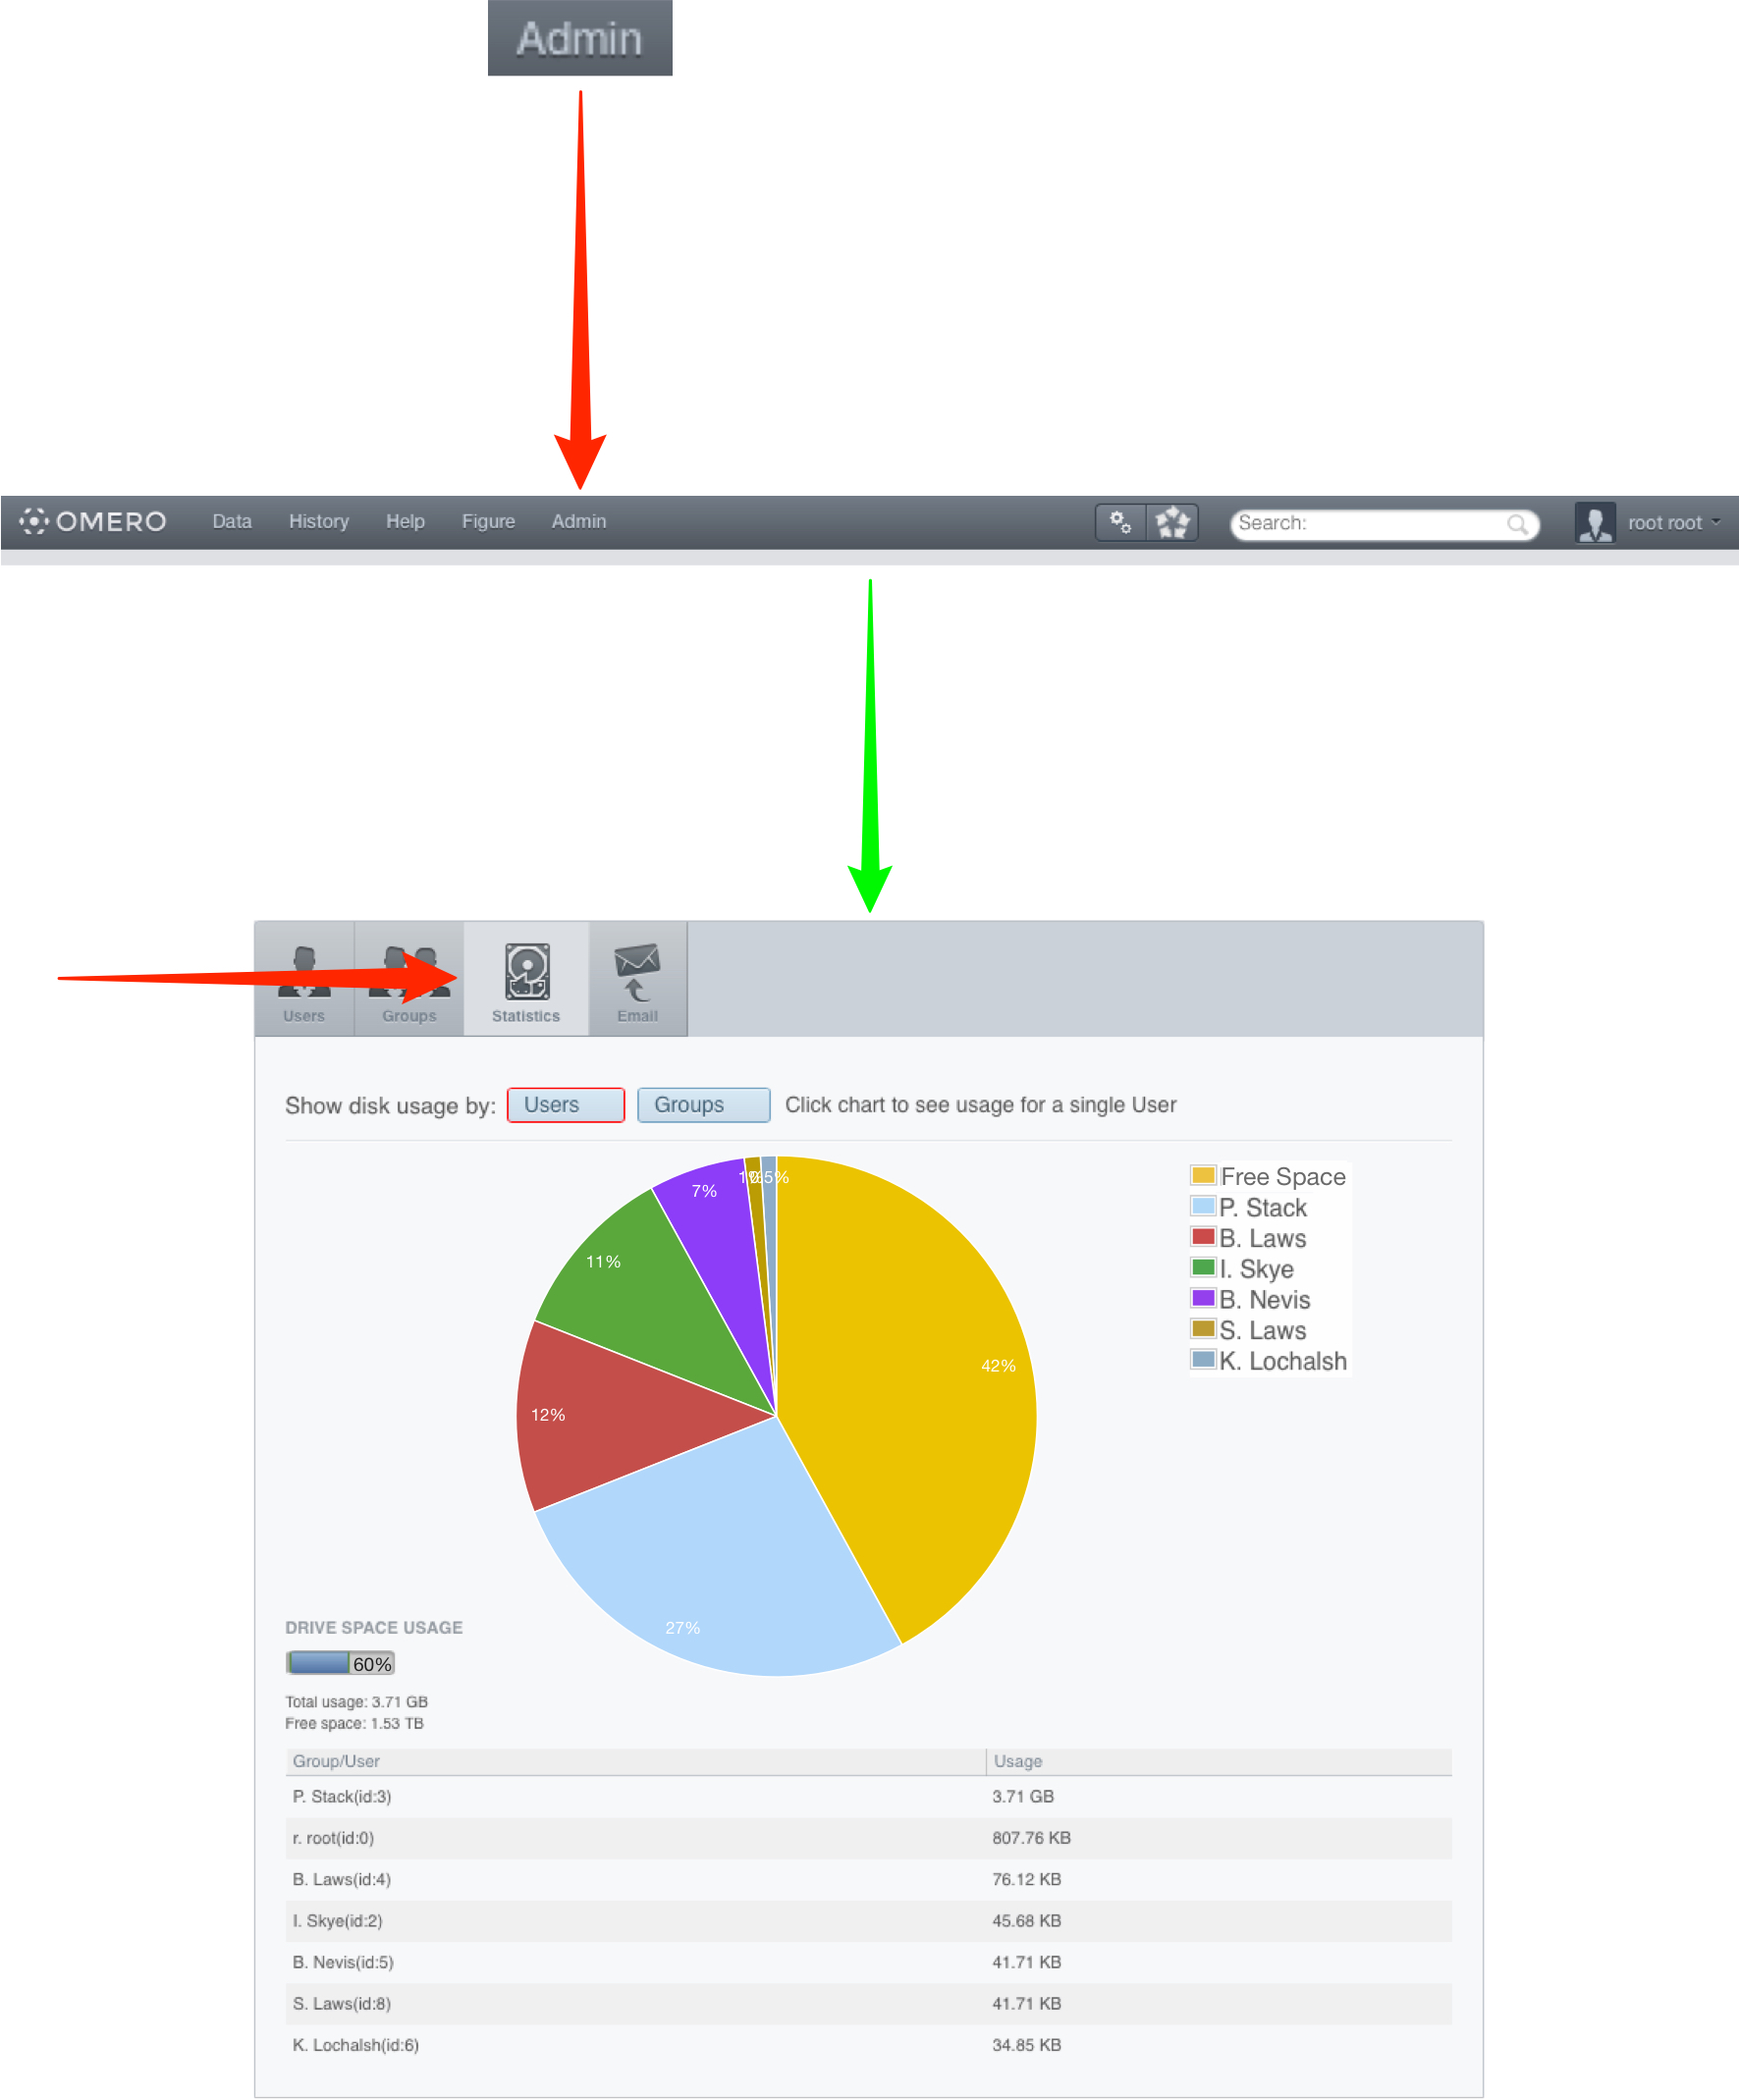
System administrators can view disk usage using the OMERO.web Admin tab. The disk usage reported reflects only the image data owned by the users or groups. Files that are uploaded, or created in situ, and attached to Projects, Datasets or Images, are not included in the disk usage statistics.
-
Click on the Statistics tab to see the disk usage for all users and groups on the OMERO server.
Emailing users
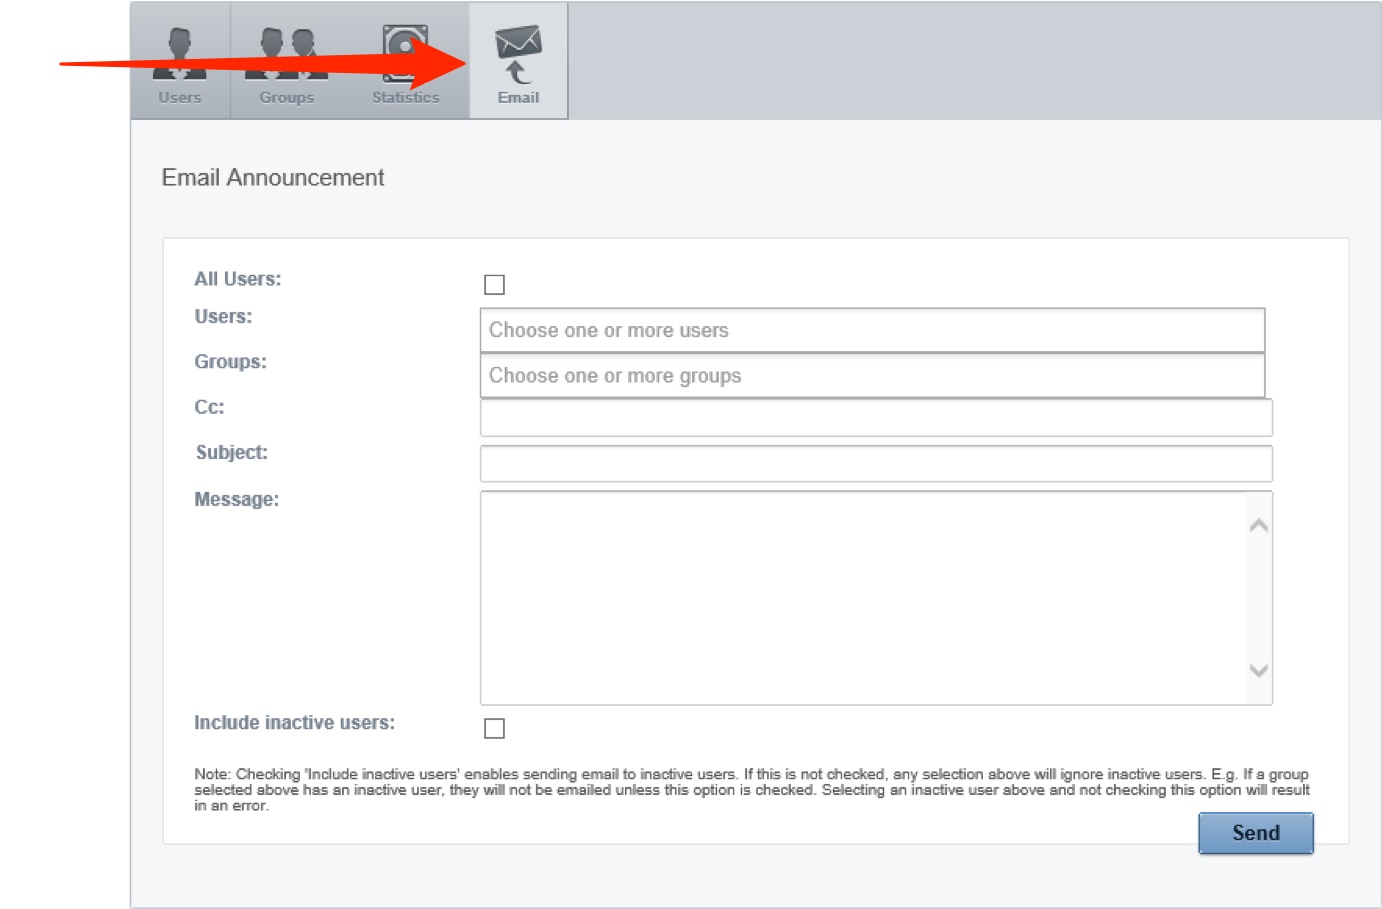
The OMERO server can be configured so that administrators can use the OMERO.web Admin screen to email users through the OMERO system. Details on the configuration properties for mail are on Configuration properties glossary in the sysadmin documentation.
Recipients can be selected from all users, specific users or specific groups.
-
Click on the Email tab to send emails to OMERO users or groups.
Upgrading
OMERO and Bio-Formats are developed and released independently, so new releases of Bio-Formats that address bugs or enable new data type handling are not held up by OMERO development and vice versa.
OMERO point releases, i.e. 5.2.x, occur regularly, and clients and servers are backwardly compatible for these. This is not the case for breaking releases, i.e. 5.x.0.
Given the number of server operating systems, clients and components involved in OMERO, the matrix of versions and compatibility is large. If you are in any doubt about the suitability for upgrade of your particular installation, draw on the wide experience of the OMERO community via the OME Forums or OME Mailing Lists, giving as much detail as you can.
Using OMERO for publication
Public groups can be used to make data accessible without the need for authentication. The permissions on the public group are usually set to Read-Only. In order for a user to be able to place data in the public group, they must ask the Administrator to make them a member of the group. Details on how to configure public groups and make them publically accessible on the OMERO server are in the Public user section of the system administrator documentation.
As data in a public group is accessible without login credentials, this enables image thumbnails, from the OMERO server, and links to open images in the full OMERO.web viewer, to be embedded in any HTML-based page. Details of how to embed thumbnails and links in web pages or Wikis are in the User Help Publishing with OMERO section.
The full OMERO.web viewer can be embedded in pages as a customisable OMERO viewport. The level of interactivity can be set by adding buttons, links or scalebars etc. as desired. Details on the viewport can be seen in Customizing the content of the embedded OMERO.web viewport.
OMERO is widely used as the basis for public data repositories. OMERO.gallery provides a basic gallery front end based on the Group-Project-Dataset-Image, and is a good starting point to develop a bespoke front end. Full documentation on how to set up OMERO as a public repository and details of customisation options can be found in the OMERO Repository documentation.
Getting users started
Experience indicates that including a short introduction to OMERO when users have their induction to the microscopy facility is a very effective way of getting them started. This helps avoid confusion when the users are establishing their data workflows and setting up file storage systems. It also ensures that the OMERO server names are correctly entered, login works, and users are members of the appropriate groups and can import data into these from the start.
There are a number of training resources available on the User Help website, including printable “Getting Started” sections, which can be customised with URLs and server names. Details are on the Training Course Material page.
For more extensive group training sessions, the individual chapters of the training material can be customised and the OME team can be contacted via the OME Mailing Lists, for help with organising and running training sessions either on-site, depending on location, or online.
All Tutorial Material is available on line at: help.openmicroscopy.org
The Main OME website is at: www.openmicroscopy.org