![]()
User Help
- User Help Home Page
-
 Quickstart User Guides
-
Data Workflow User Guides
-
 More Workflow User Guides
-
Other OMERO Applications
-
More

Sharing Data in OMERO
Introduction
Groups are used in OMERO to enable sharing of data between users. Groups are created by the OMERO system administrator and usually have one or more group owners. Group owners and admins can add or remove members.
There are four levels of group permissions allowing members different degrees of interaction with the data owned by other members in the group. In all groups, you retain ownership of your own data, and there are no limitations on the operations and actions you can perform on your own data. You can be in many groups, each with different permissions.
As group permissions are set at a server level, they apply to OMERO.insight, OMERO.web or any other application or script being used to access the data. Data can only be in one group, but can be moved between groups.

User roles
There are three levels of role in any group:
Member - the level most users will be at:
- can always see and interact fully their own data in any type of group
- how much they can see and interact with data belonging to other group members depends on the type of the group.
Owner - typically used by laboratory or research group leaders:
- groups can have more than one owner
- can manage group membership
- can increase the permissions level on a group
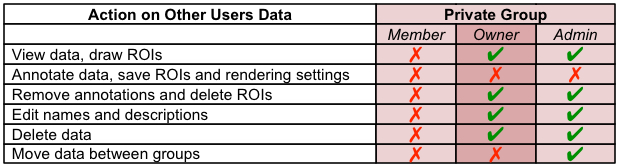
- can view, annotate, edit and delete data belonging to other members in the group (except annotate in Private groups)
- other interactions with data belonging to other group members depends on group type.
Admin - this role is typically reserved for the OMERO server administrator:
- practically speaking, Administrators can do anything they like to any user’s data, in any group (except annotate in Private groups).
Group types
There are four types of group in OMERO: Private, Read-Only, Read-Annotate and Read-Write.
The main points can be summarised as:
- you can be in many groups, each with different permissions
- you always retain ownership of your data
- your rendering settings cannot be overwritten by any other user
- only administrators can move your data between groups
- only you, a group owner or an Administrator can delete your data except in a Read-Write group.
The following sections summarise how other members in each of the group types can interact with your data.
Private Group - your data is only shared with the Group Owner(s) and Administrators.
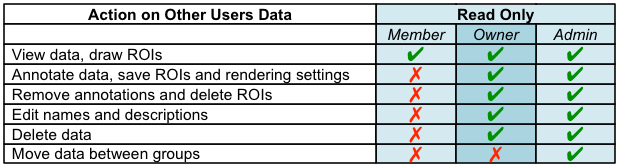
Read-Only Group - group members can view but not alter your data.
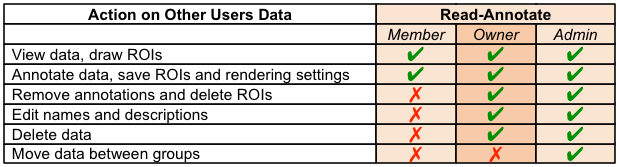
Read-Annotate Group - group members can add to your data but not remove anything.
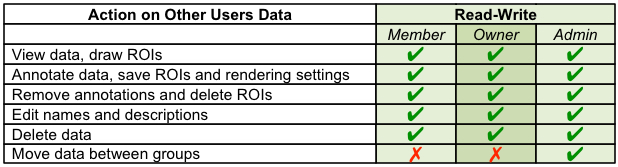
Read-Write Group - group members are effectively co-owners of all the data except for moving data between groups.
Warning:
Data deleted from OMERO cannot be recovered.
Read-Write groups allow any member to delete any data in that group.
Note
Permission levels on groups can be changed by Group Owner or Admin users, therefore possibly making your data accessible to other users.
There is also a danger that some annotations such as tags, attachments and Key-Value pairs associated with data in the group might be lost if the permission levels are changed. This is more likely to occur when changing a group to a more restricted access level, e.g. from Read-annotate to Private.
Viewing data by groups
If you are a member of more than one group, your default group shows in the data tree on start-up (left hand panel).
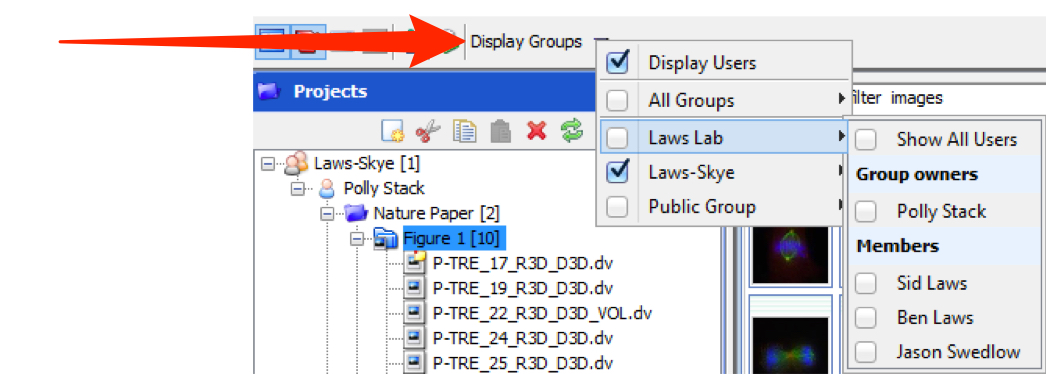
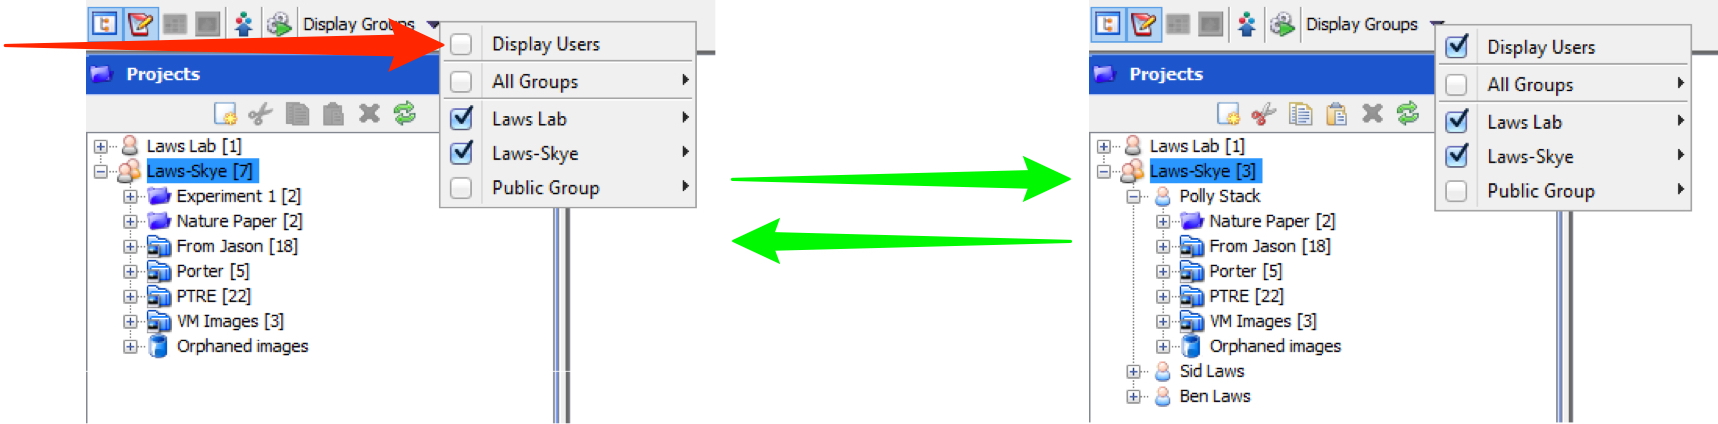
Click on the Display Groups menu to select another group.
In OMERO.insight more than one group can be displayed at a time.
OMERO.insight
OMERO.web
In OMERO.insight:
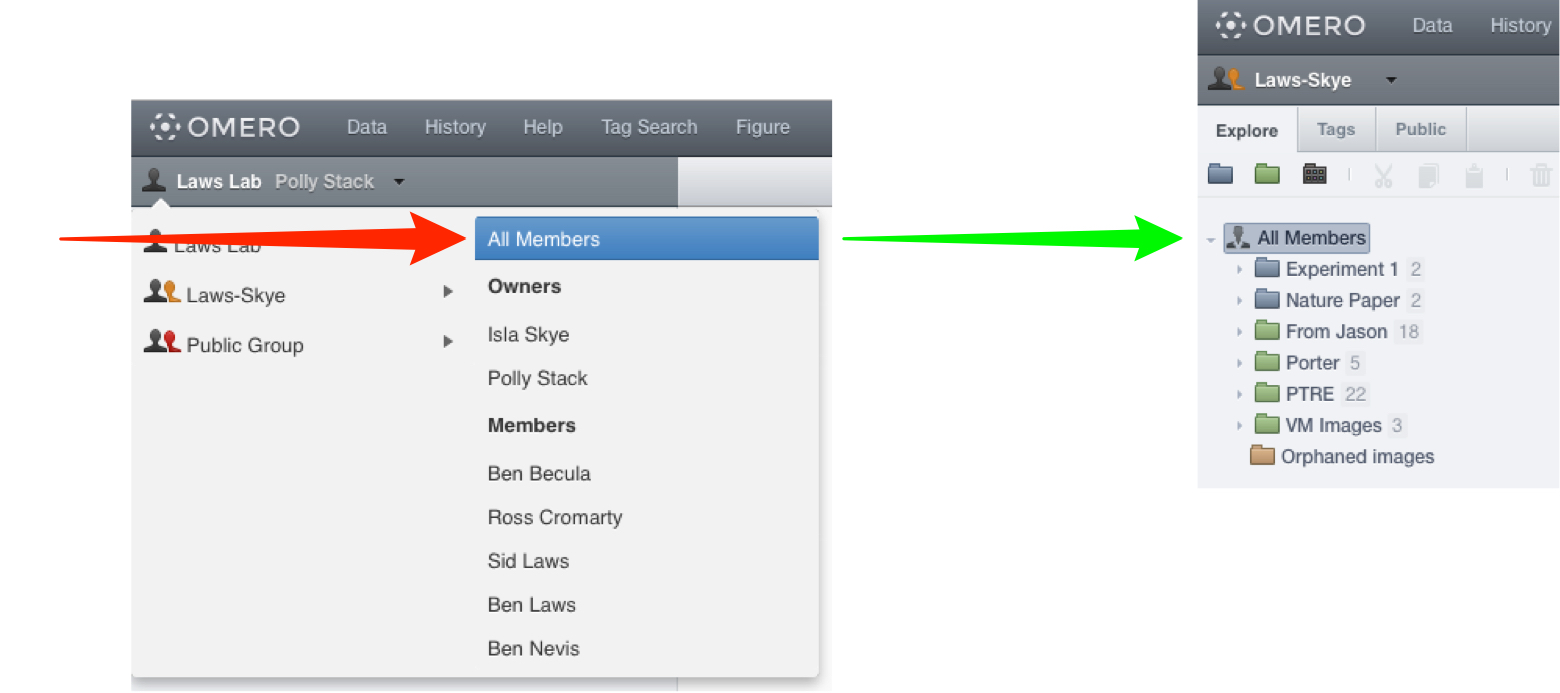
Select a group in the first tier of the menu to display your data in that group in the data tree.
Select Show All Users to display all users in the group in the data tree.
Click Update.
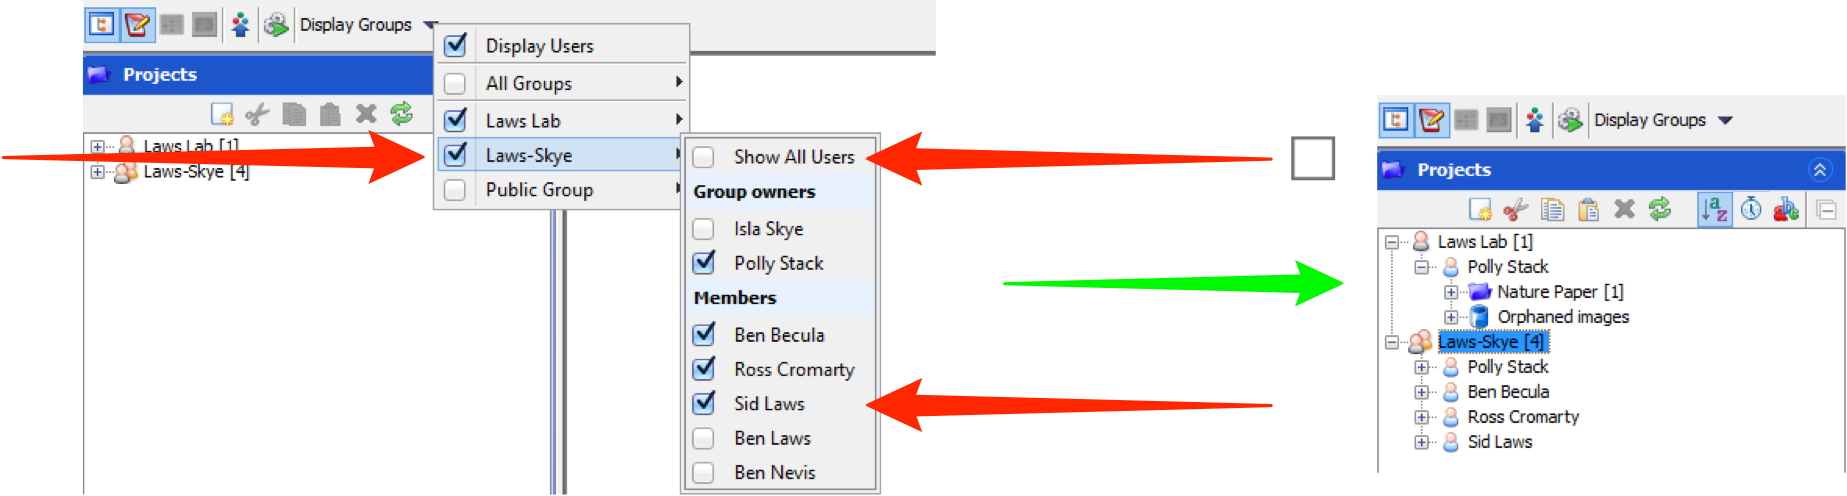
By default, data is shown according to the owner of the data.
Uncheck the Display Users checkbox to see all data from the group combined, irrespective of the owner.
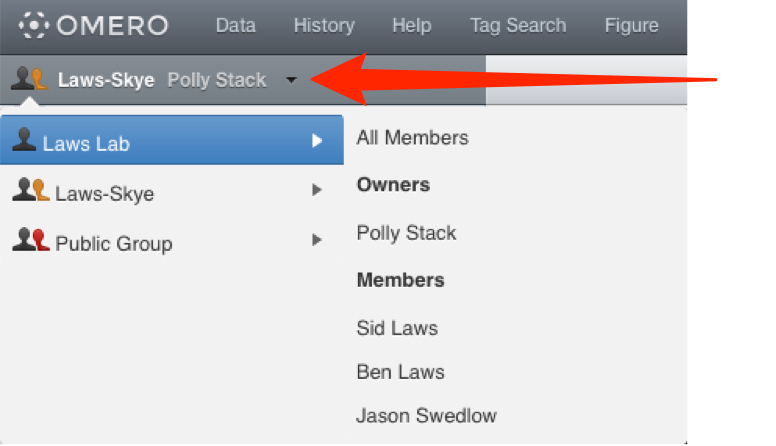
In OMERO.web:
Select an individual user to view their data in the data tree.

Select All Members to display all the data belonging to all users in that group.
Moving data between groups
If you are a member of more than one group, you can move data between groups.
Warning:
It is likely that any tags, attachments, Key-Value pairs, comments or other annotations will not be moved to the new group and will be lost.
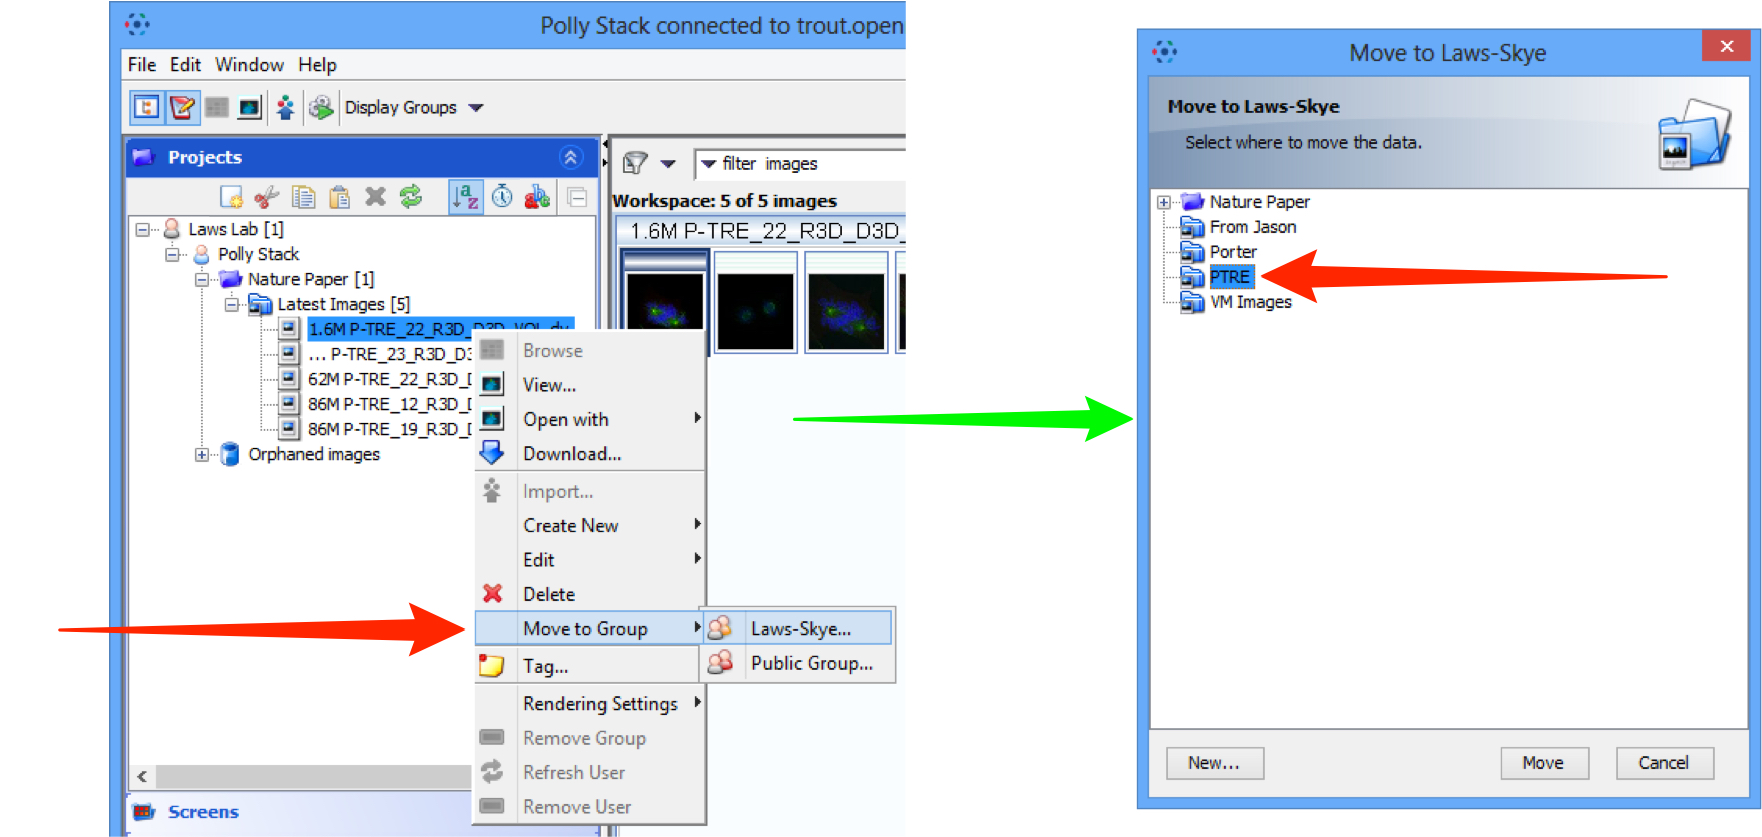
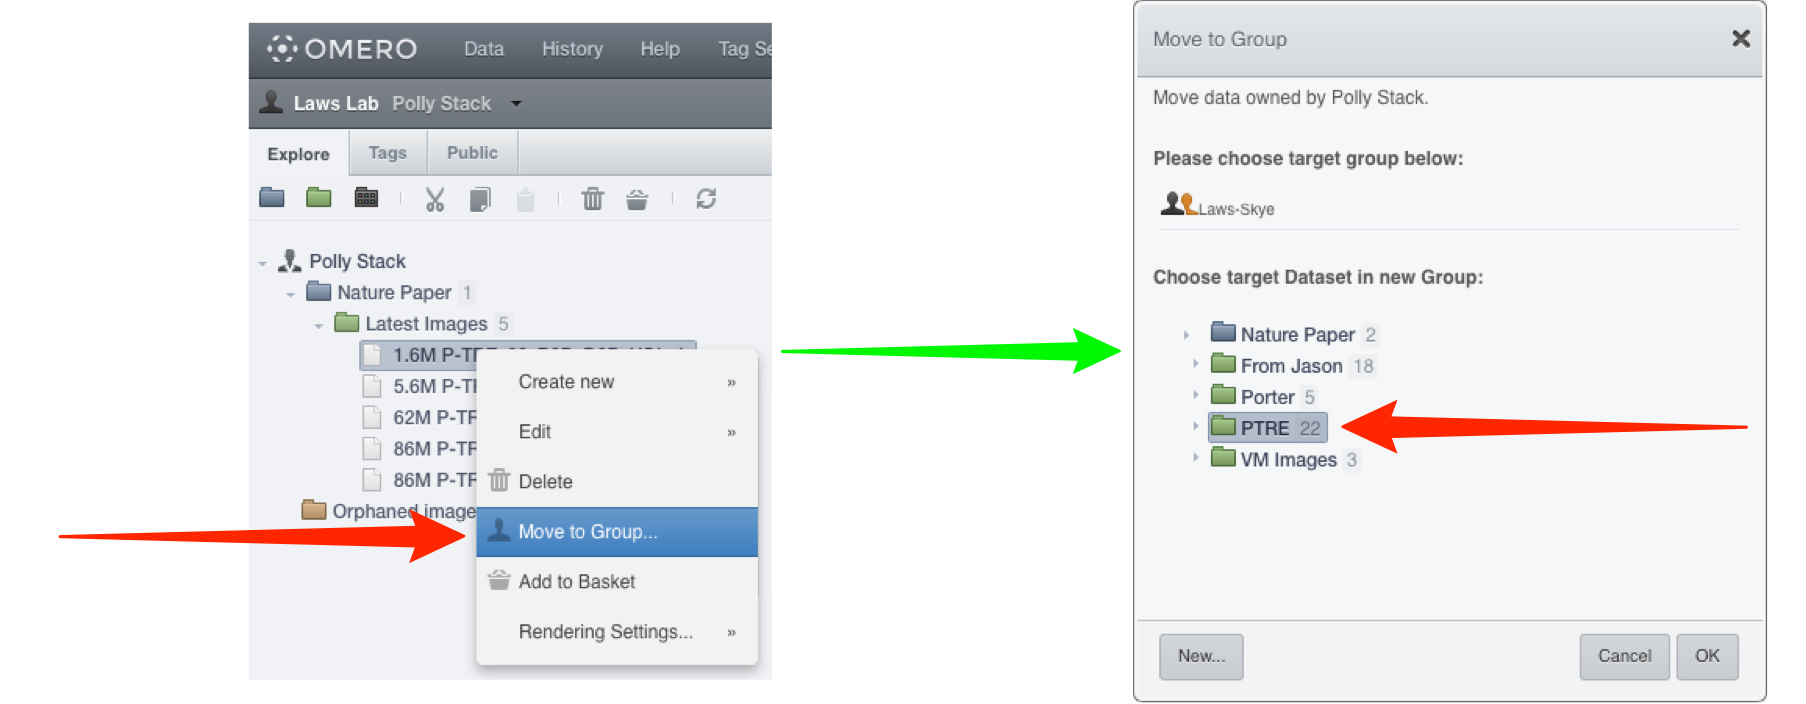
Right-click on a Project, Dataset or one or more Images and select Move to from the menu.
Select the destination group from the options.
Select an existing Project and/or Dataset as the destination.
Click OK when done.
If no destination is selected the images will be placed in Orphaned in the destination group.
OMERO.insight
OMERO.web
Changing your default group
OMERO.insight
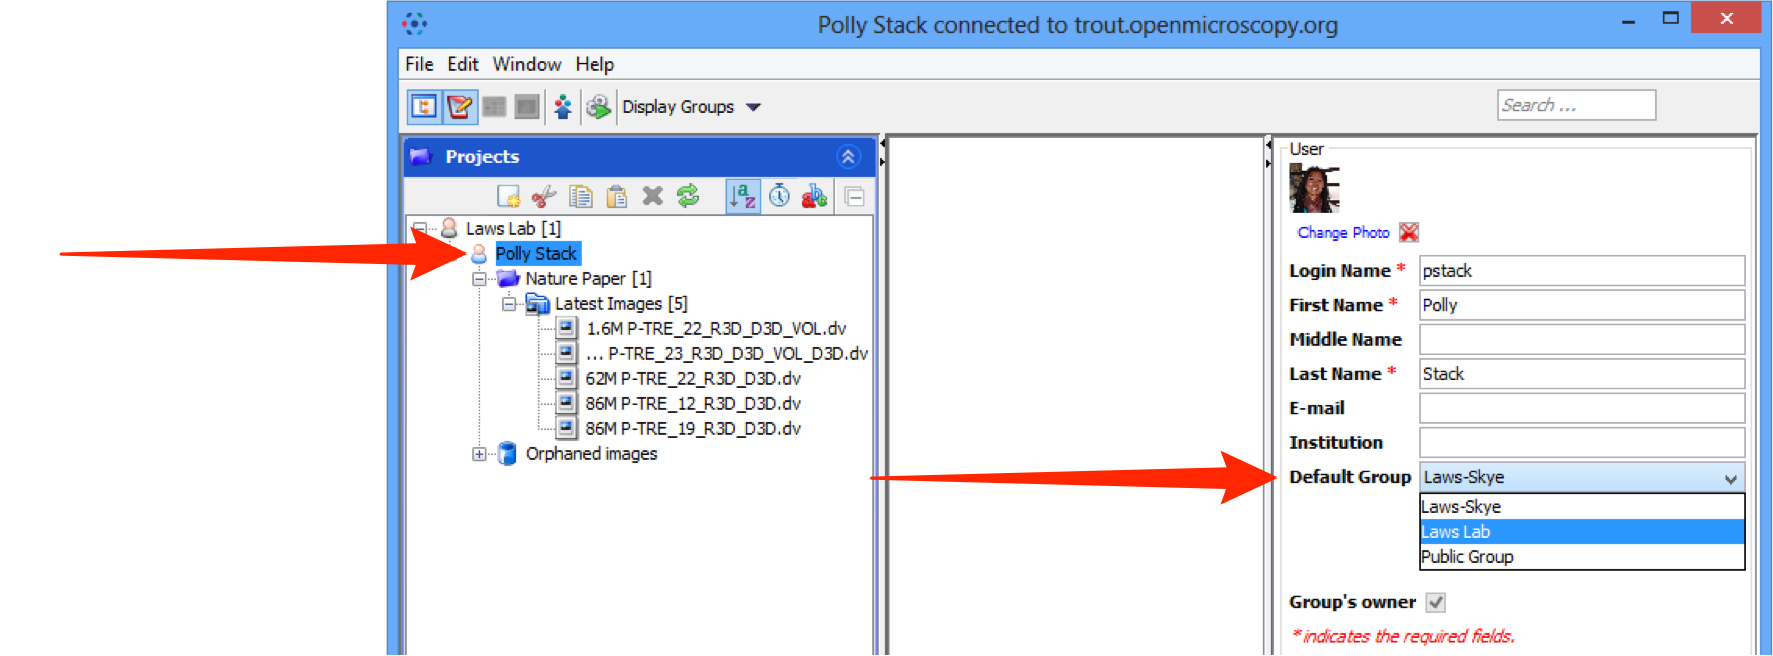
To change your default group, the group that’s shown when you log in, select your name in the Projects tab.
In the User pane on the right-hand side, select the new default group from the drop-down list.
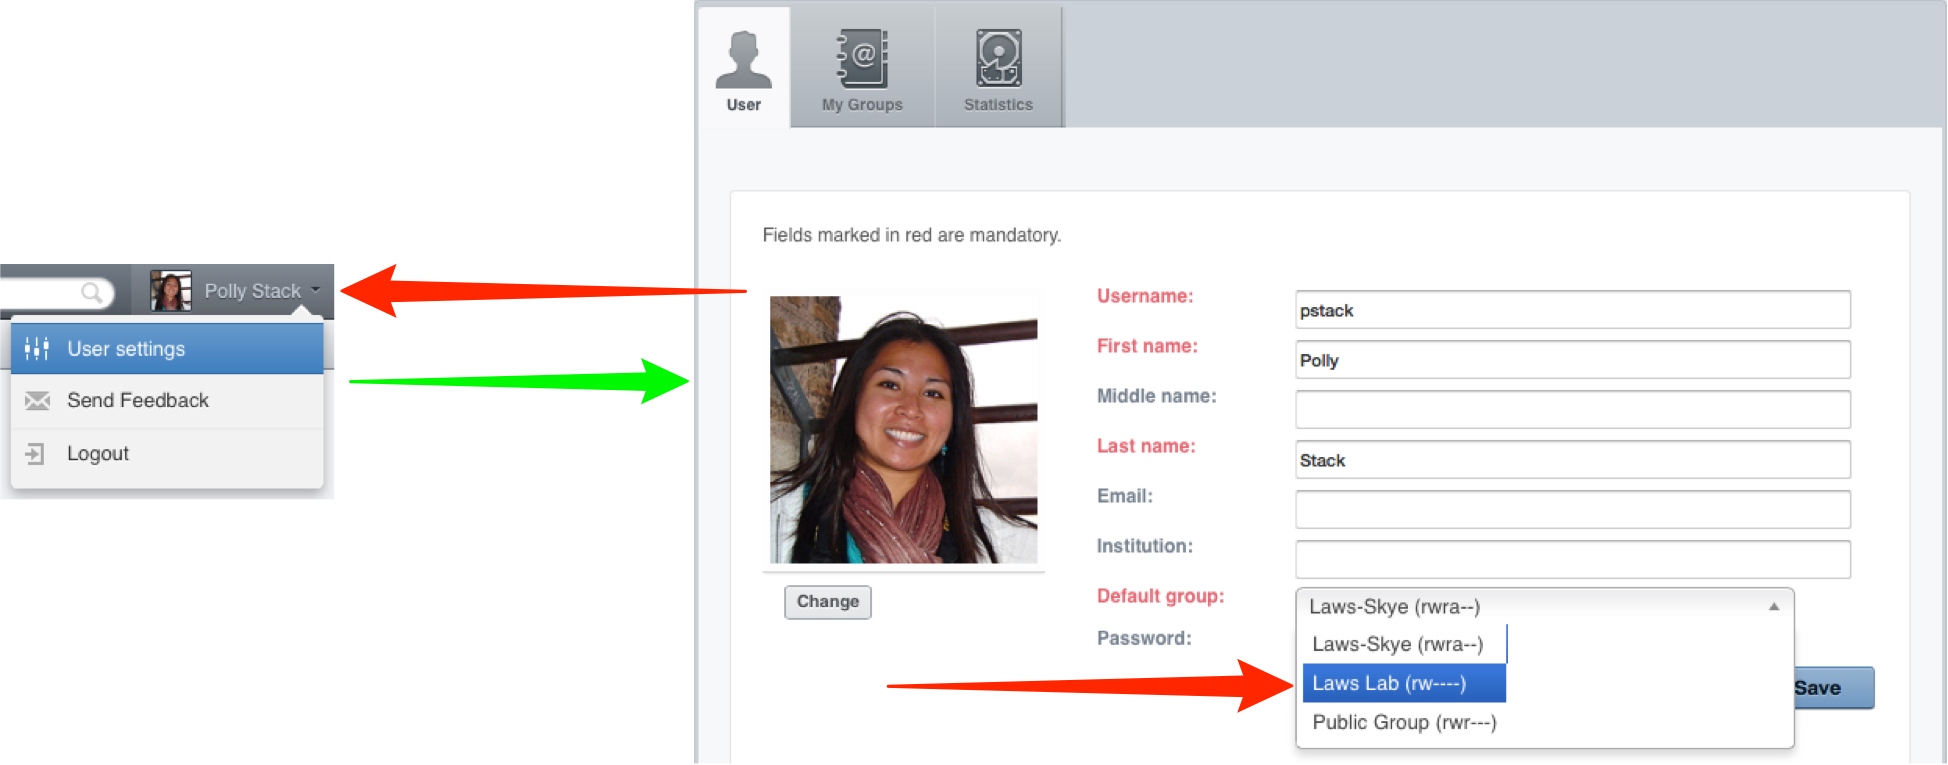
OMERO.web
To change your default group, the group that's shown when you log in, select User settings from the drop-down menu in the top right-hand corner.
In the User tab, select the new default group from the drop-down list.
Click Save to save your new default group.
Sharing data with users you are not in a group with
OMERO.web
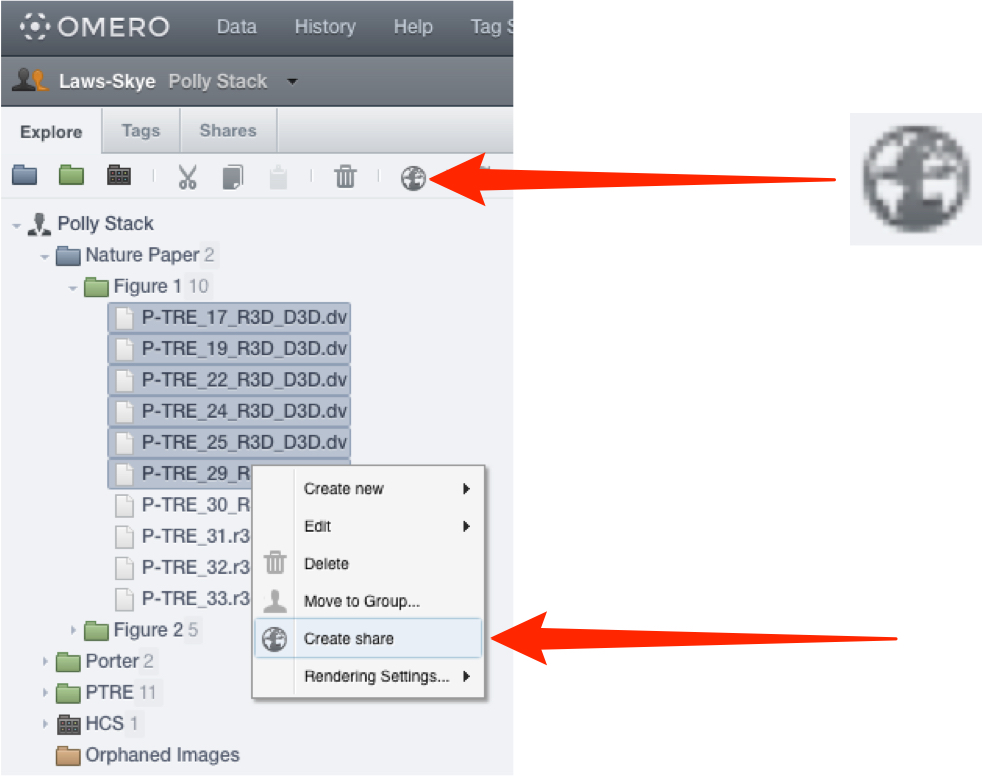
In OMERO.web, you can share data with selected other users in different groups by adding it to your Public list (the other users must have accounts on the same OMERO server).
Select the image(s) you wish to share.
Click on the Globe icon in the toolbar.
or right-click on the selected images in the data tree and select Create share.
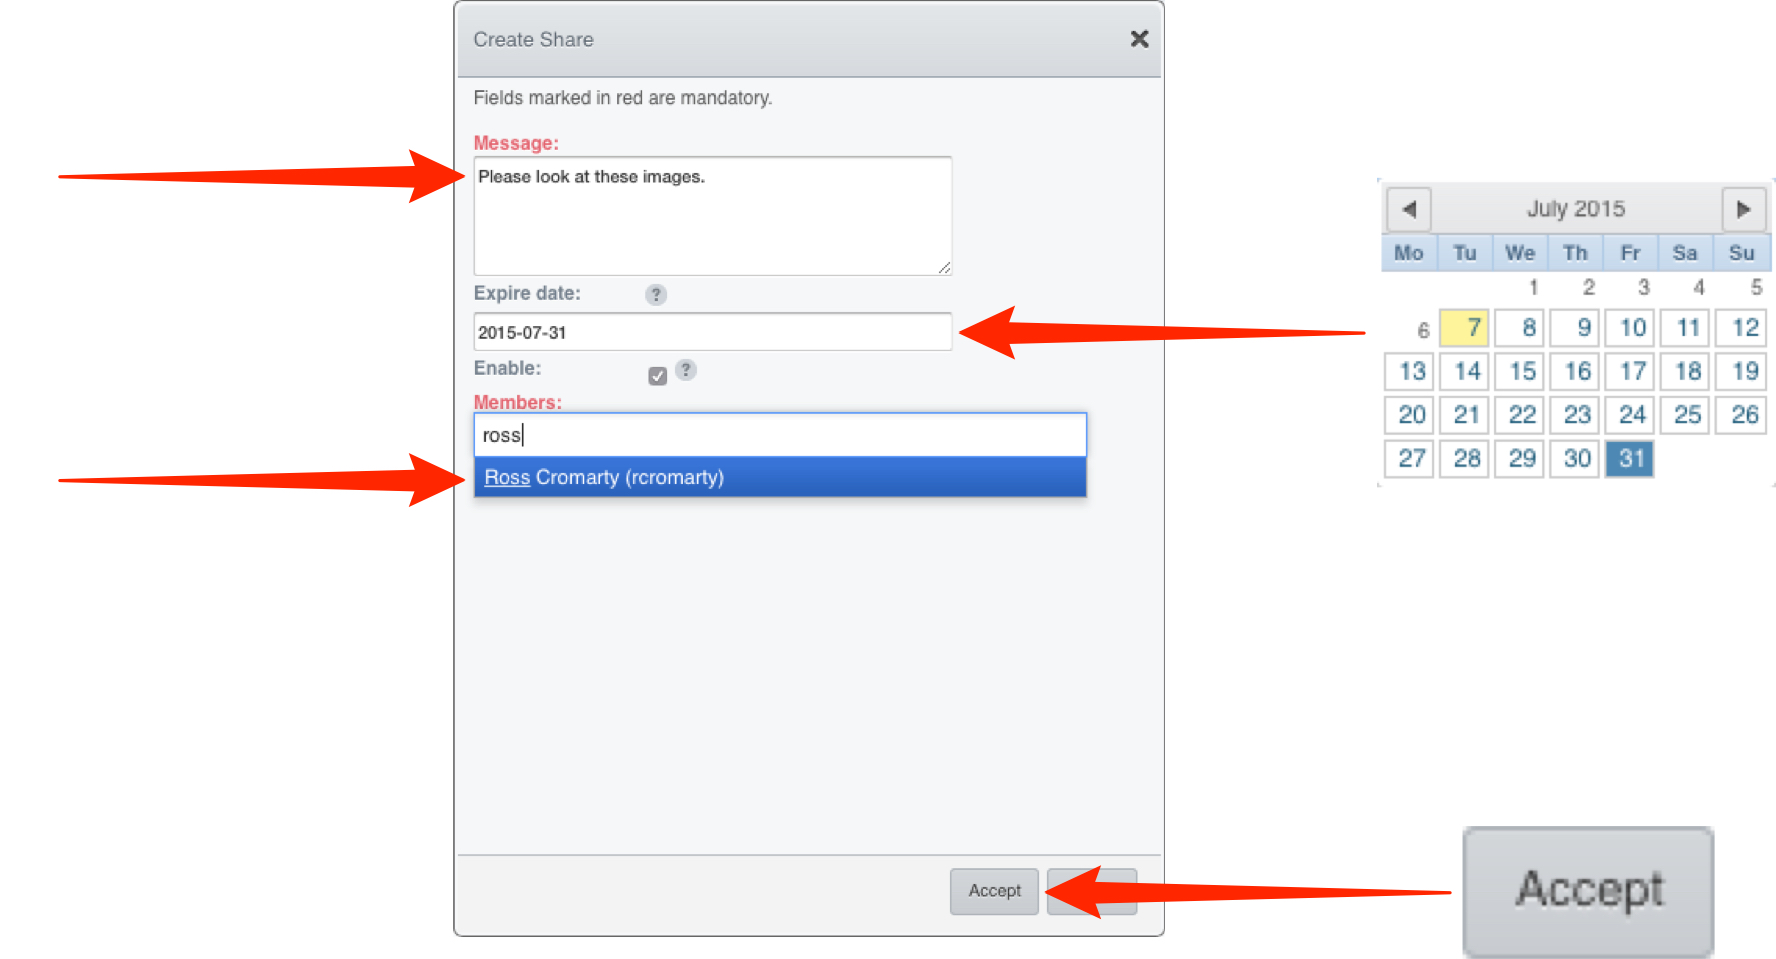
Enter a message in the Message field.
This message will be sent automatically via email to all share members.
An expiry date can be set.
Start typing the name of a user to add to the share in the Members field.
Select users to add to the share from the filtered list of matching users.
Click Accept to complete the creation of the share.
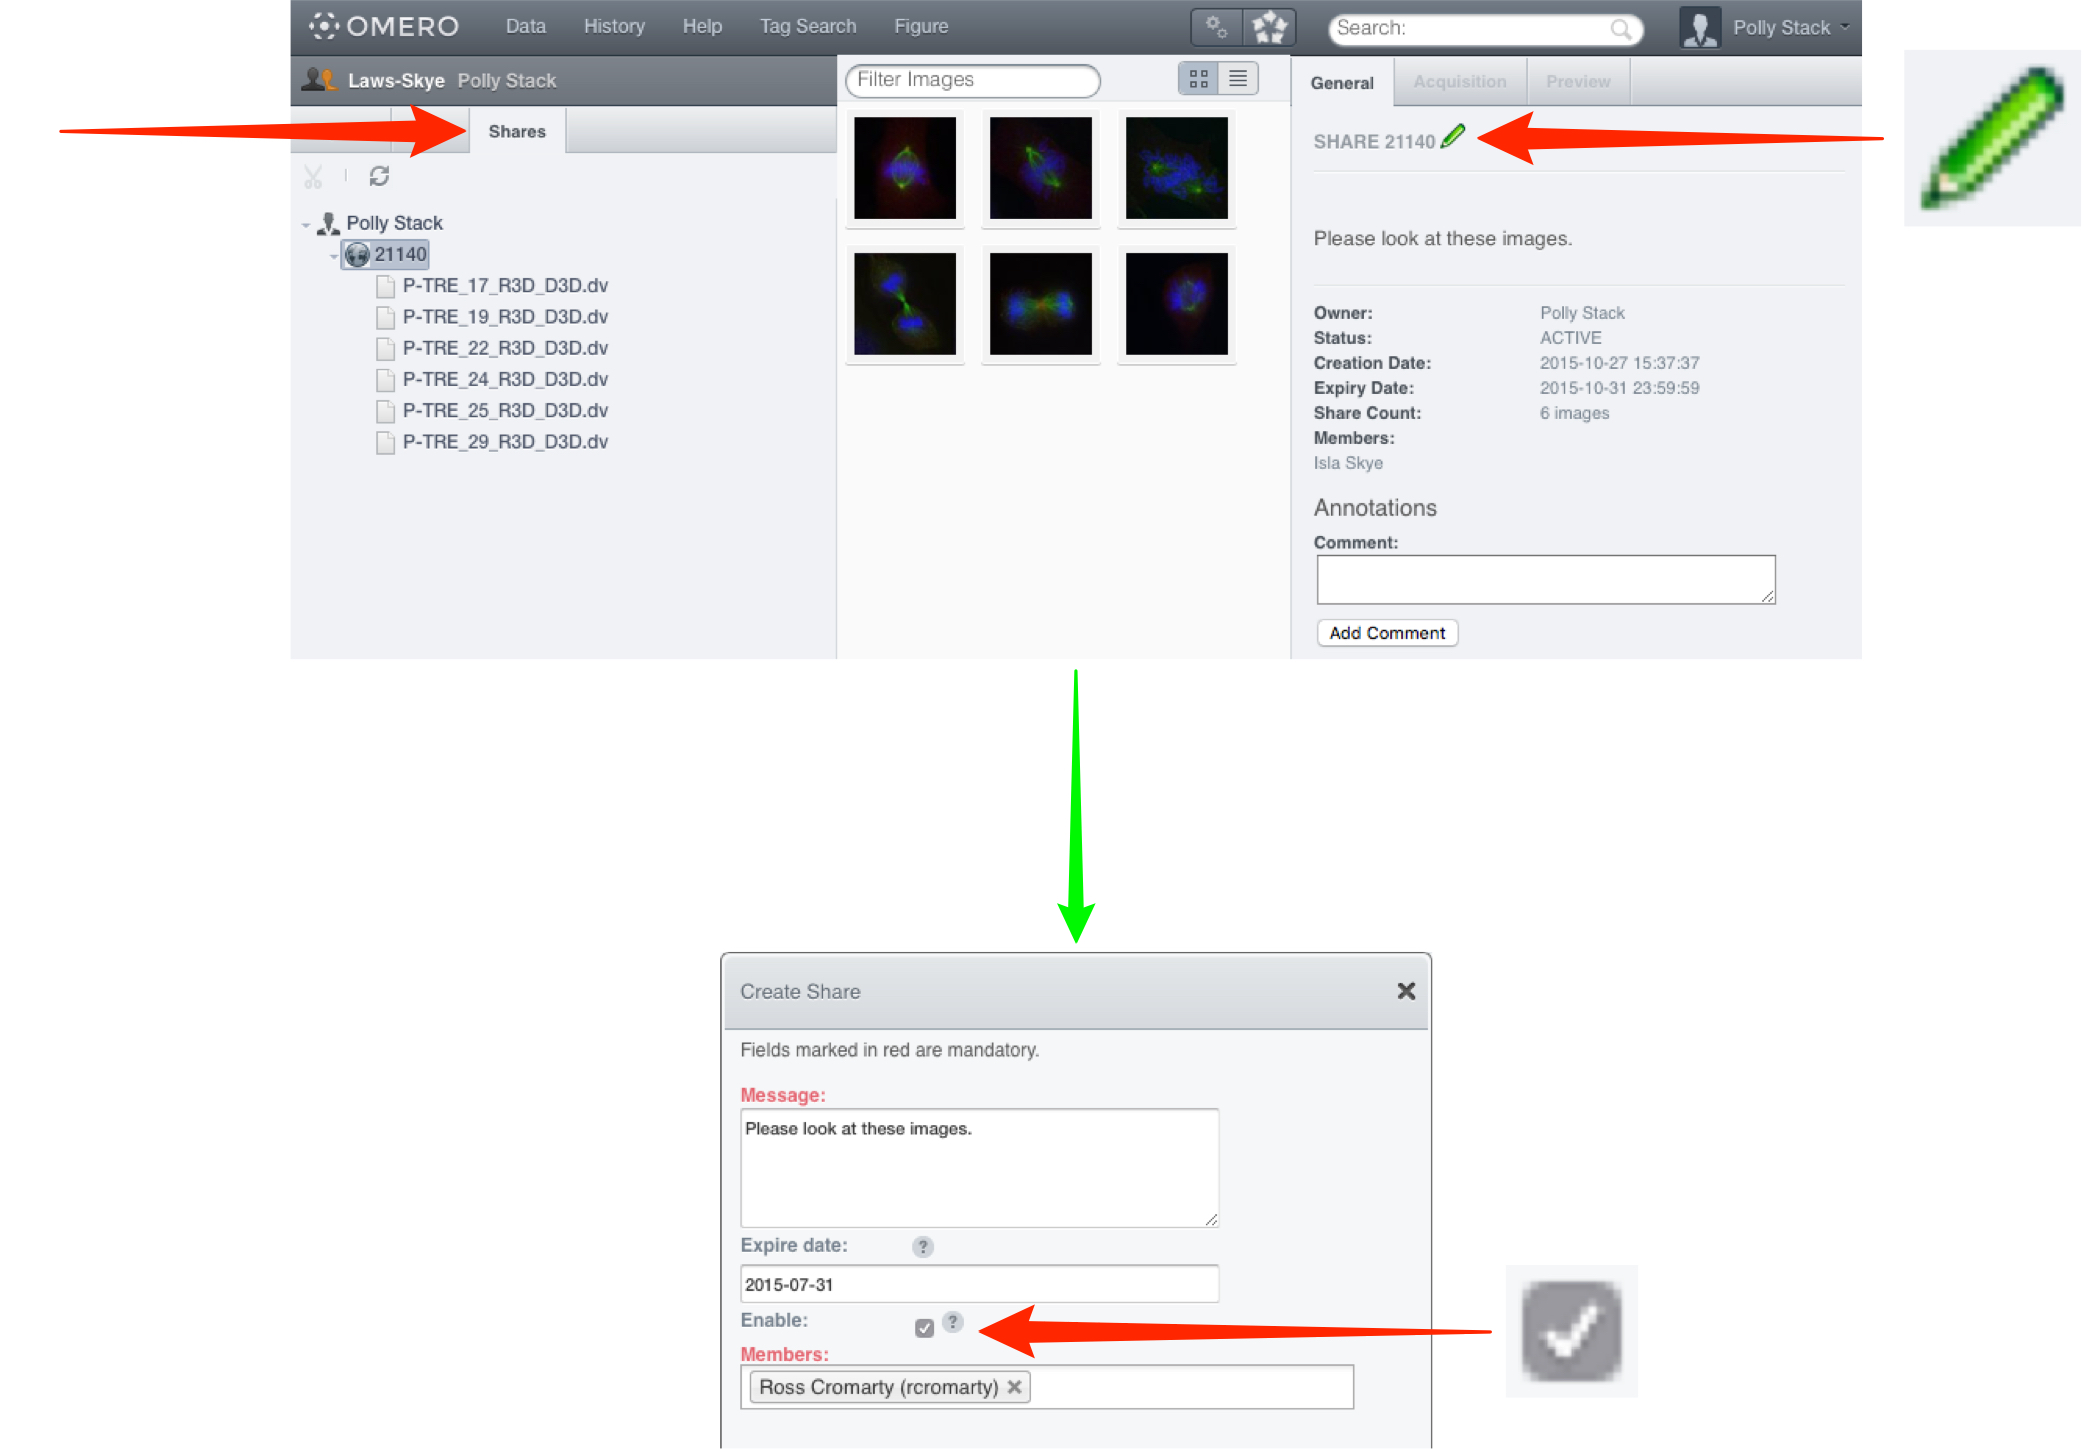
All the members of the share who have an email address set on OMERO.server will receive email notification of the share.
The share will appear in the Public tab.
The details of the share can be viewed in the right hand pane.
Click on the green Edit icon to change the message, expiry date, or add/remove users with access to the share.
Uncheck or check the Enable checkbox to disable and enable the share.
If another user makes you a member of their share, it will appear in your Public tab.
You will be able to view the images in the share, but not edit the share itself.
Managing groups as a Group Owner
As an owner of a group, you can:
- manage the membership of that group
- import data for other members of the group
- view disk space usage for the group and members.
Adding and removing members
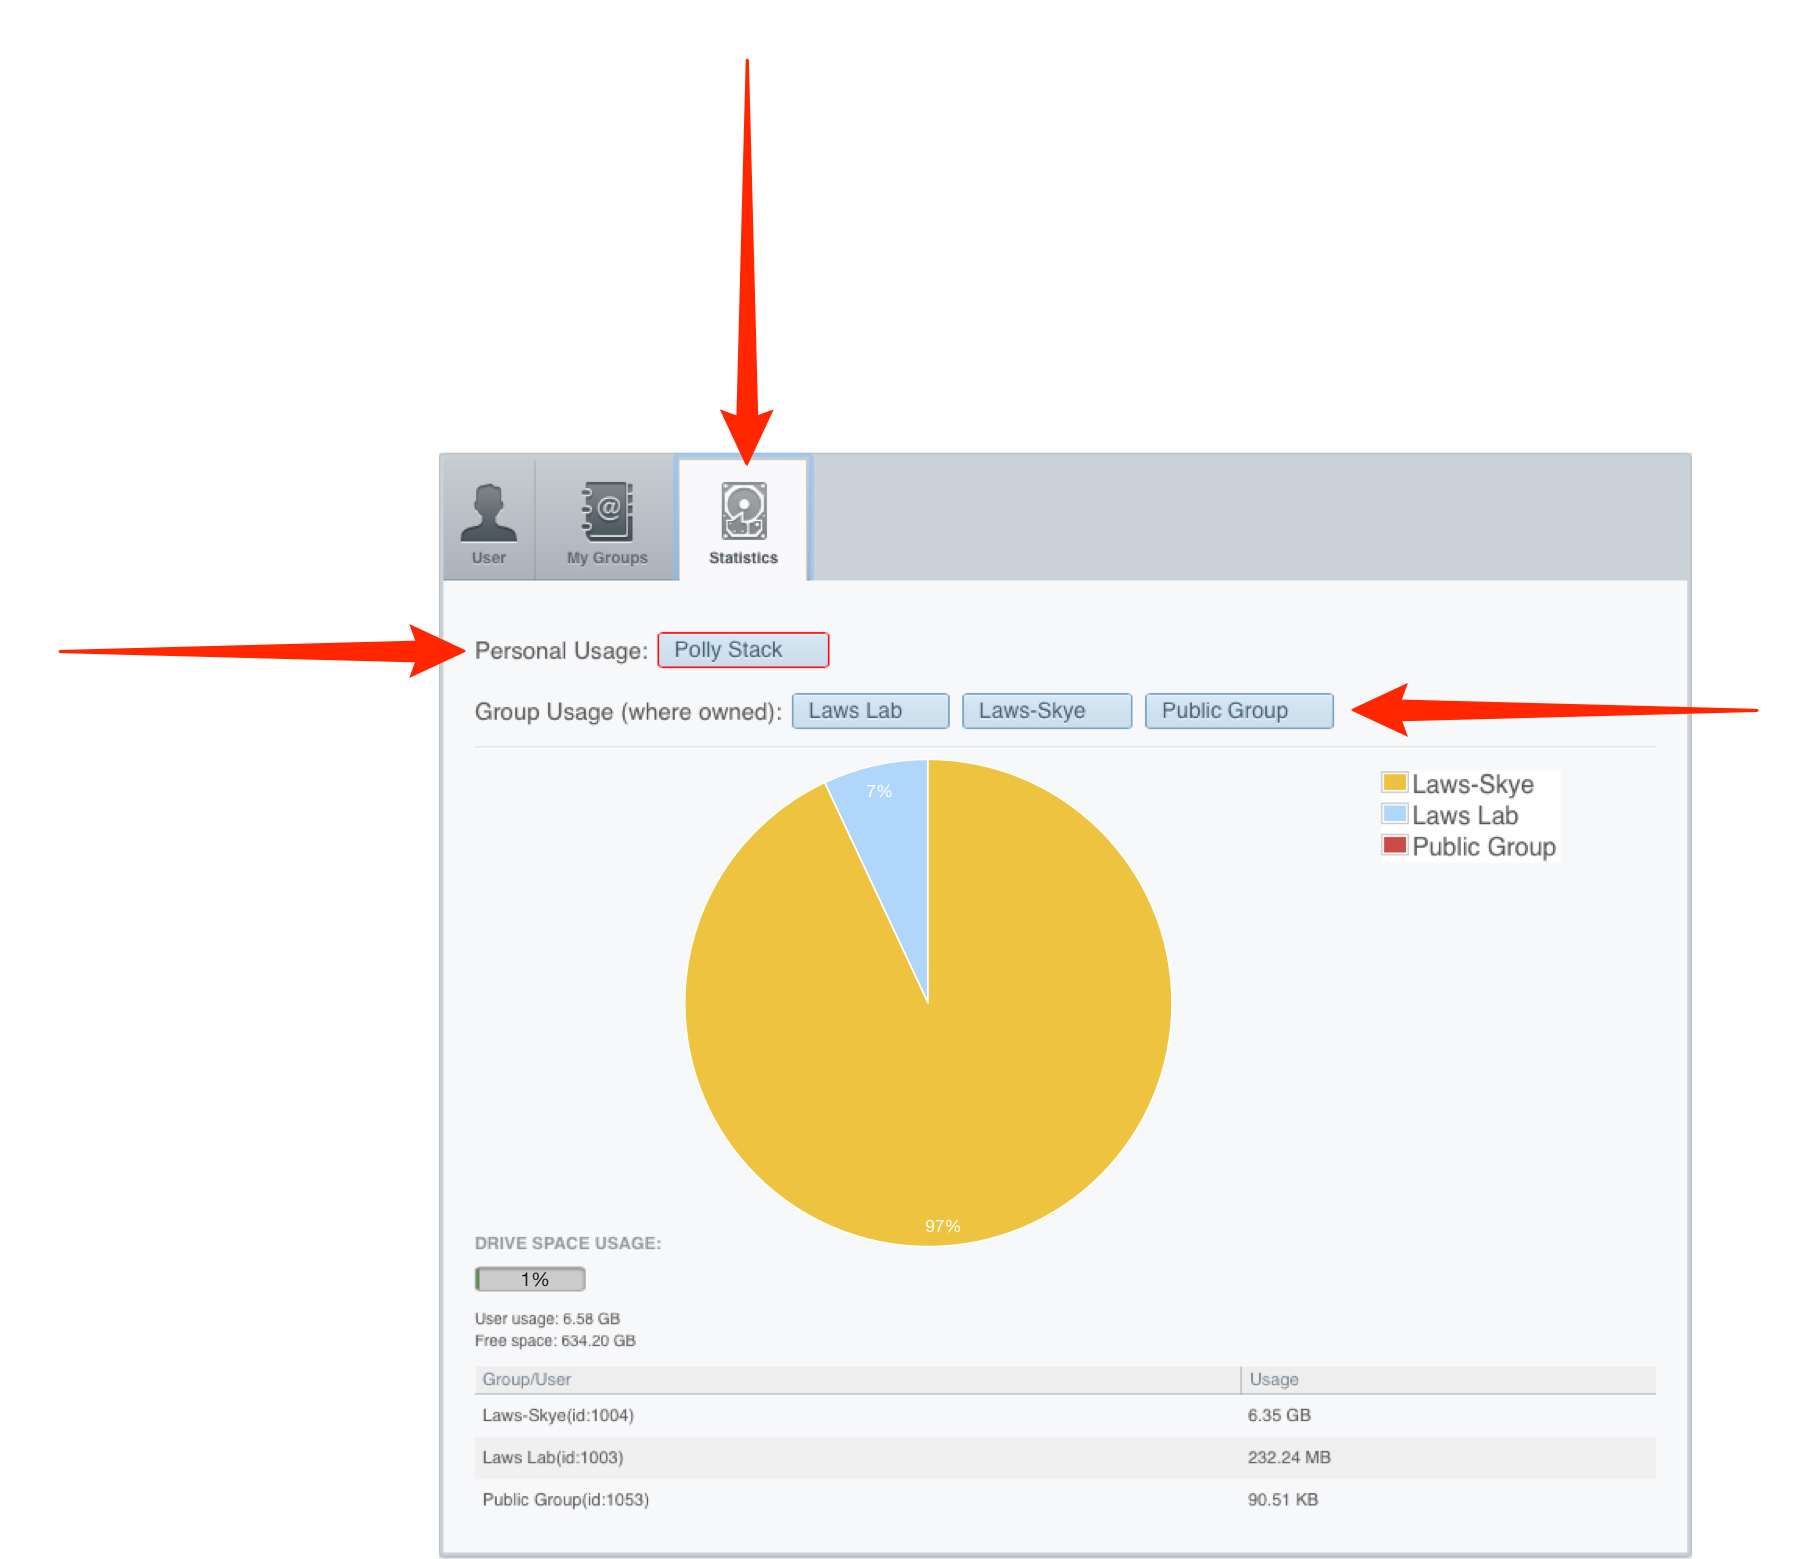
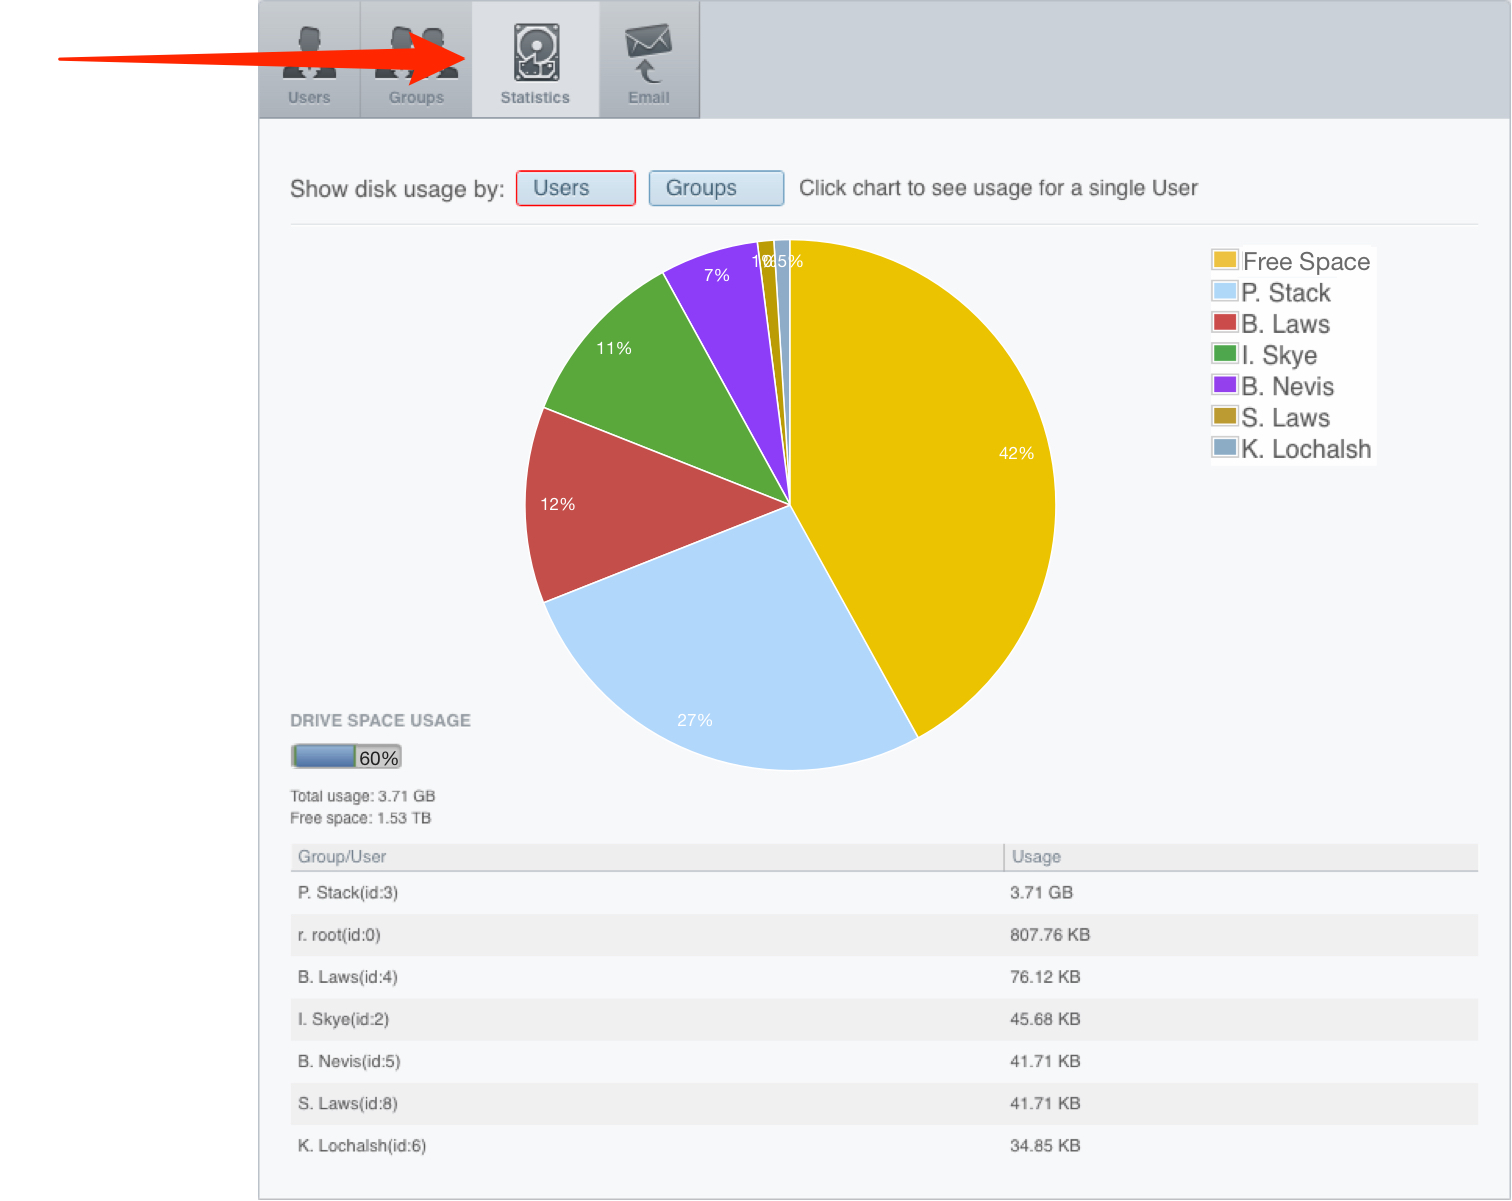
Group owners can use OMERO.web to see the disk space statistics for data usage in their groups.
Click on the Statistics tab in the User Settings window.
Use the buttons to select personal usage, according to group, or group usage for all users in the group.
Group usage statistics are only available to group owners.
OMERO.insight
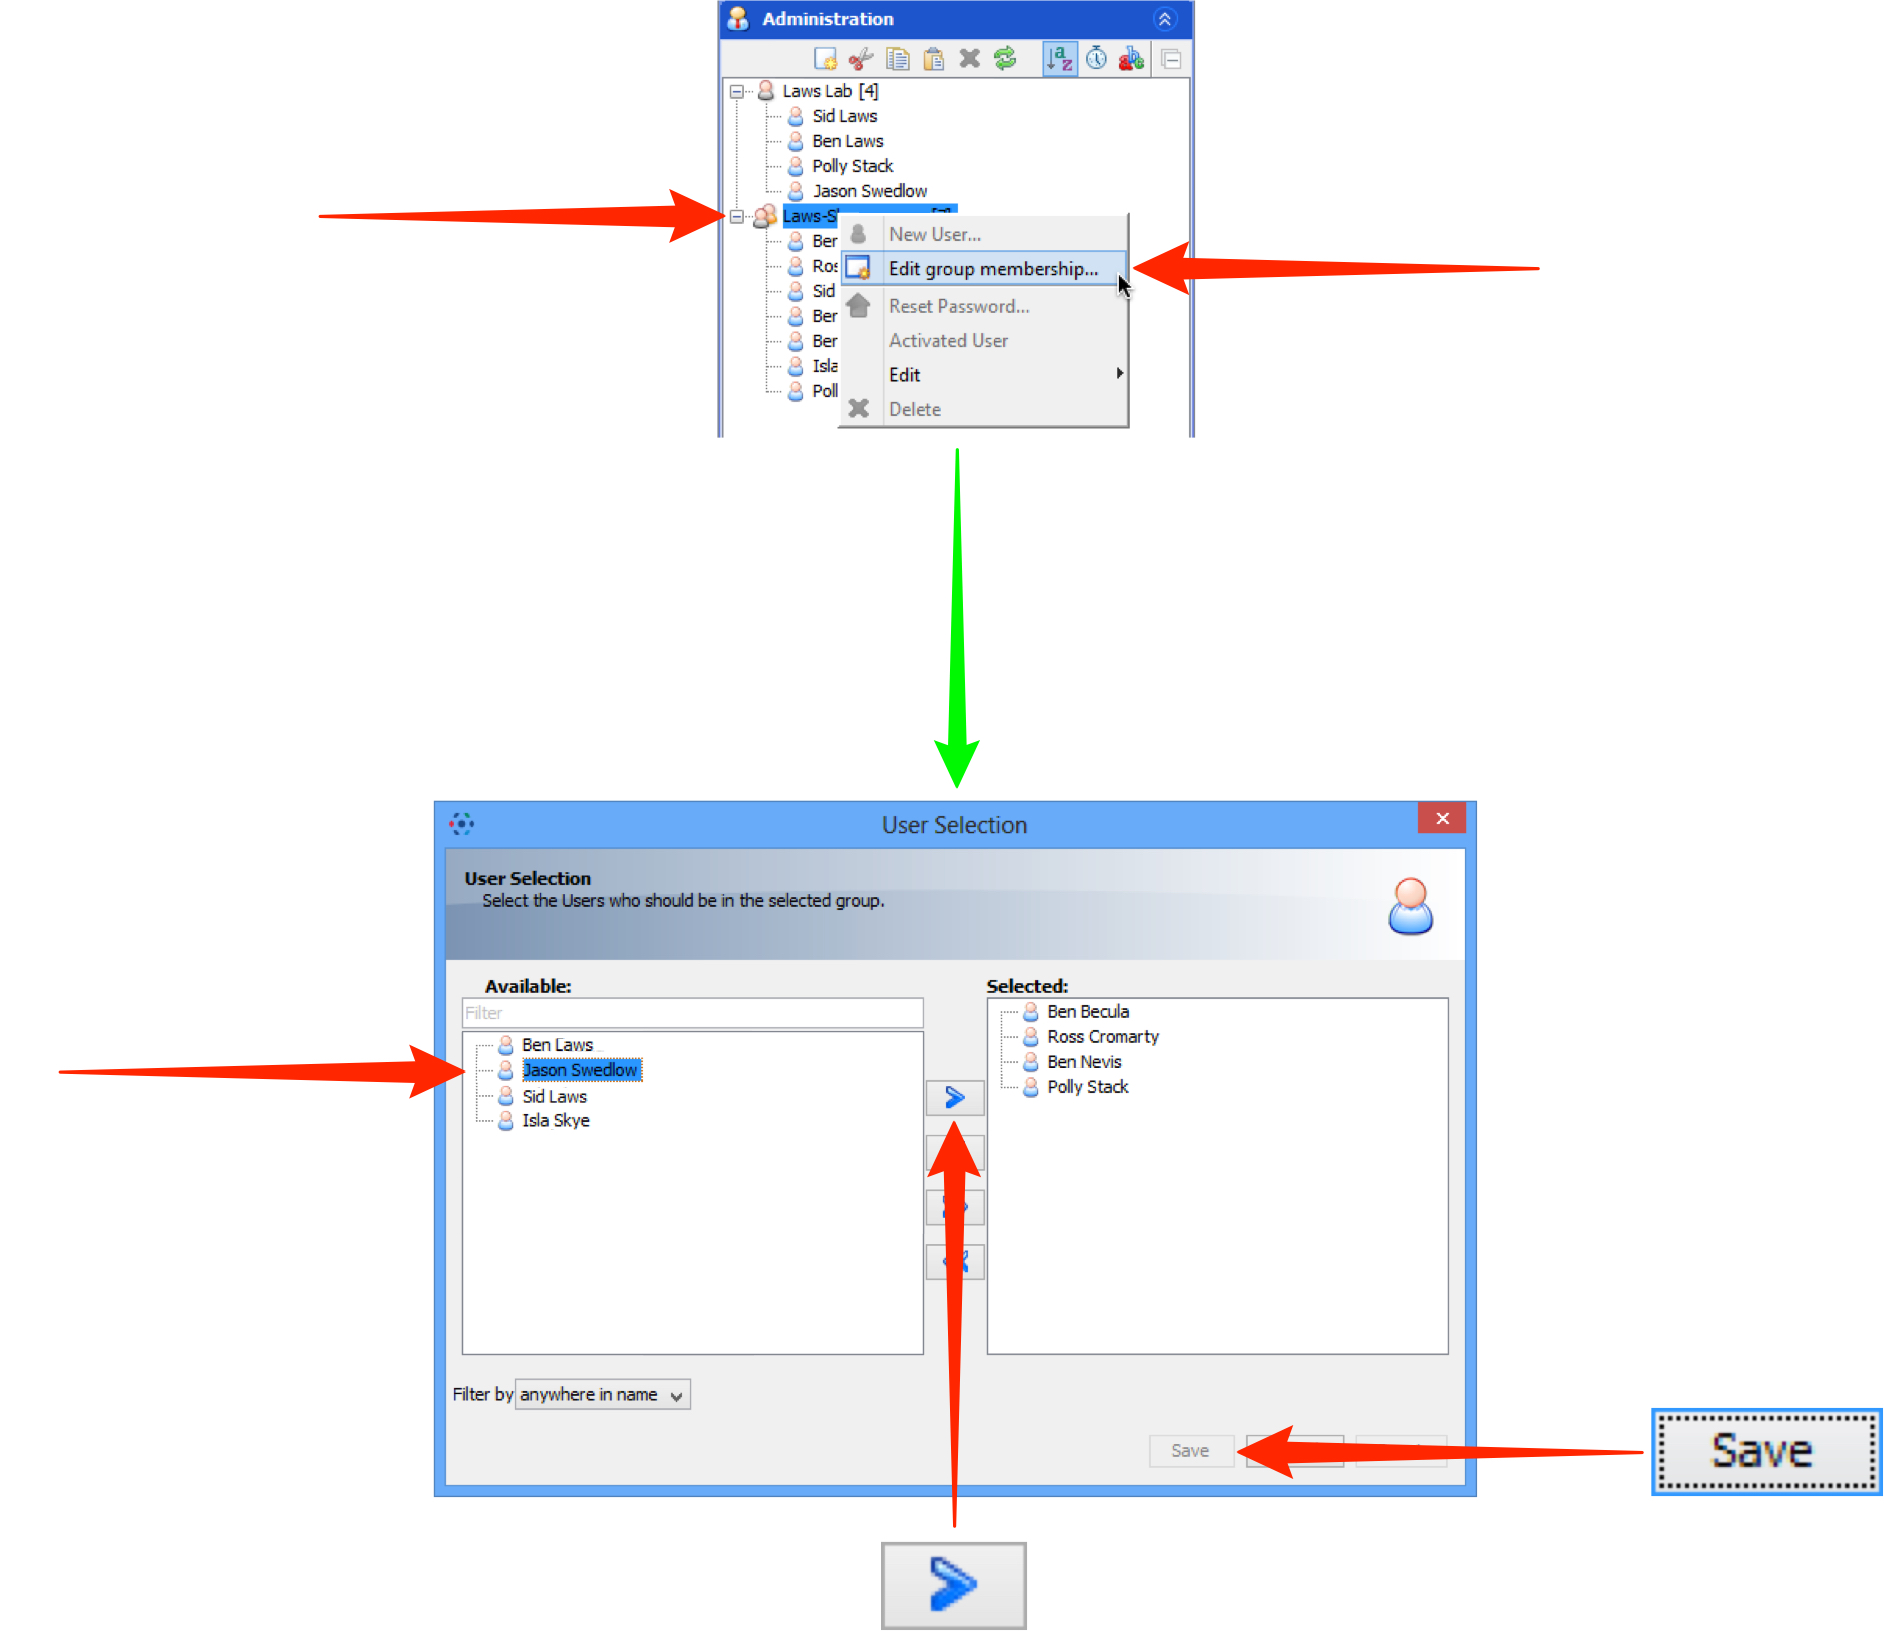
Right-click on the group in the Administration tab.
Select Edit group membership....
Select one or more users in the Available list box of the User Selection window.
Click the right arrow to add them to the group.
To remove a user from a group, select them in the Selected list and click the left arrow.
Click Save to make the changes and close the window.
Note
A user cannot be removed from the group if it is the only one they belong to.
OMERO.web
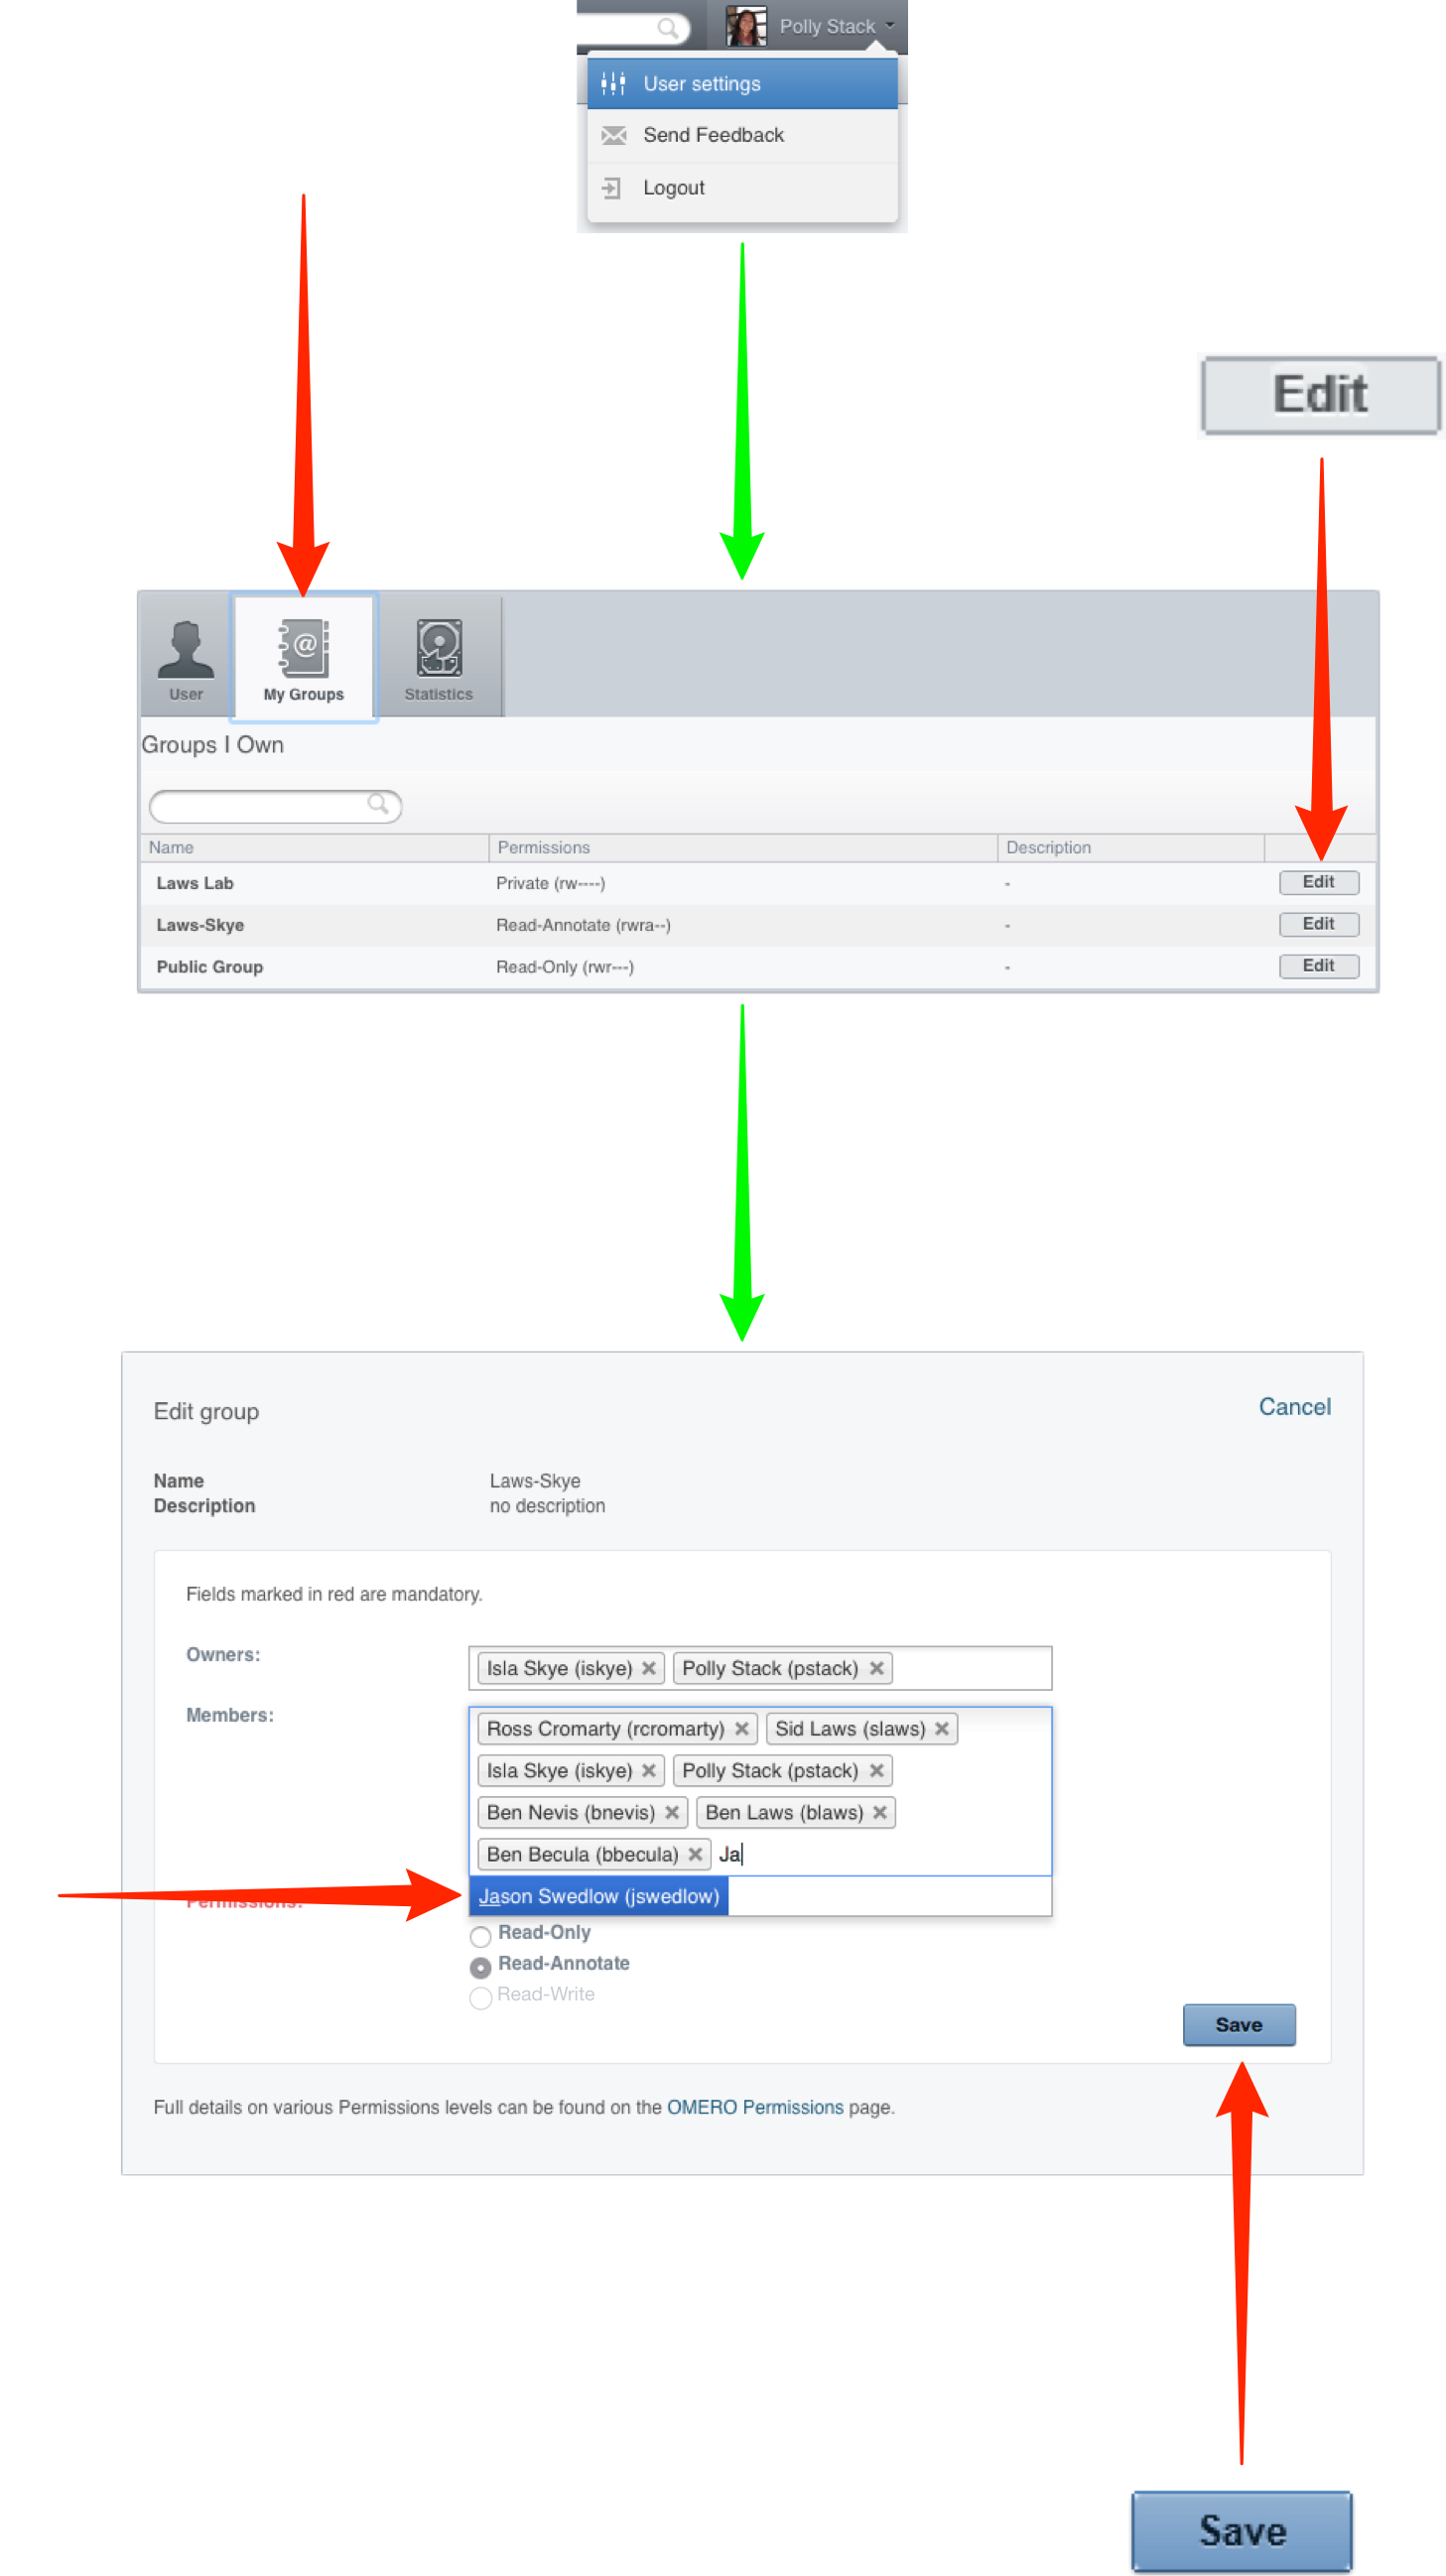
Select User settings from the drop-down menu in the top right-hand corner.
Click on the My Groups tab.
Click on the Edit button for the group you wish to edit.
Select one or more users in the Available list box of the User Selection window.
Click into the Members box and start typing the name of the user to add to the group.
A filtered list of users matching the letters typed will appear.
Select the user to add them to the group.
To remove a user from a group, click the x after their name.
Click Save to make the changes and close the window.
Note
The points described below apply only if you are an OMERO system Administrator.
Managing groups as an OMERO system Administrator
Administrators can:
- create new users and groups
- manage the membership of all groups
- view disk usage statistics for all groups and users
- email users or groups
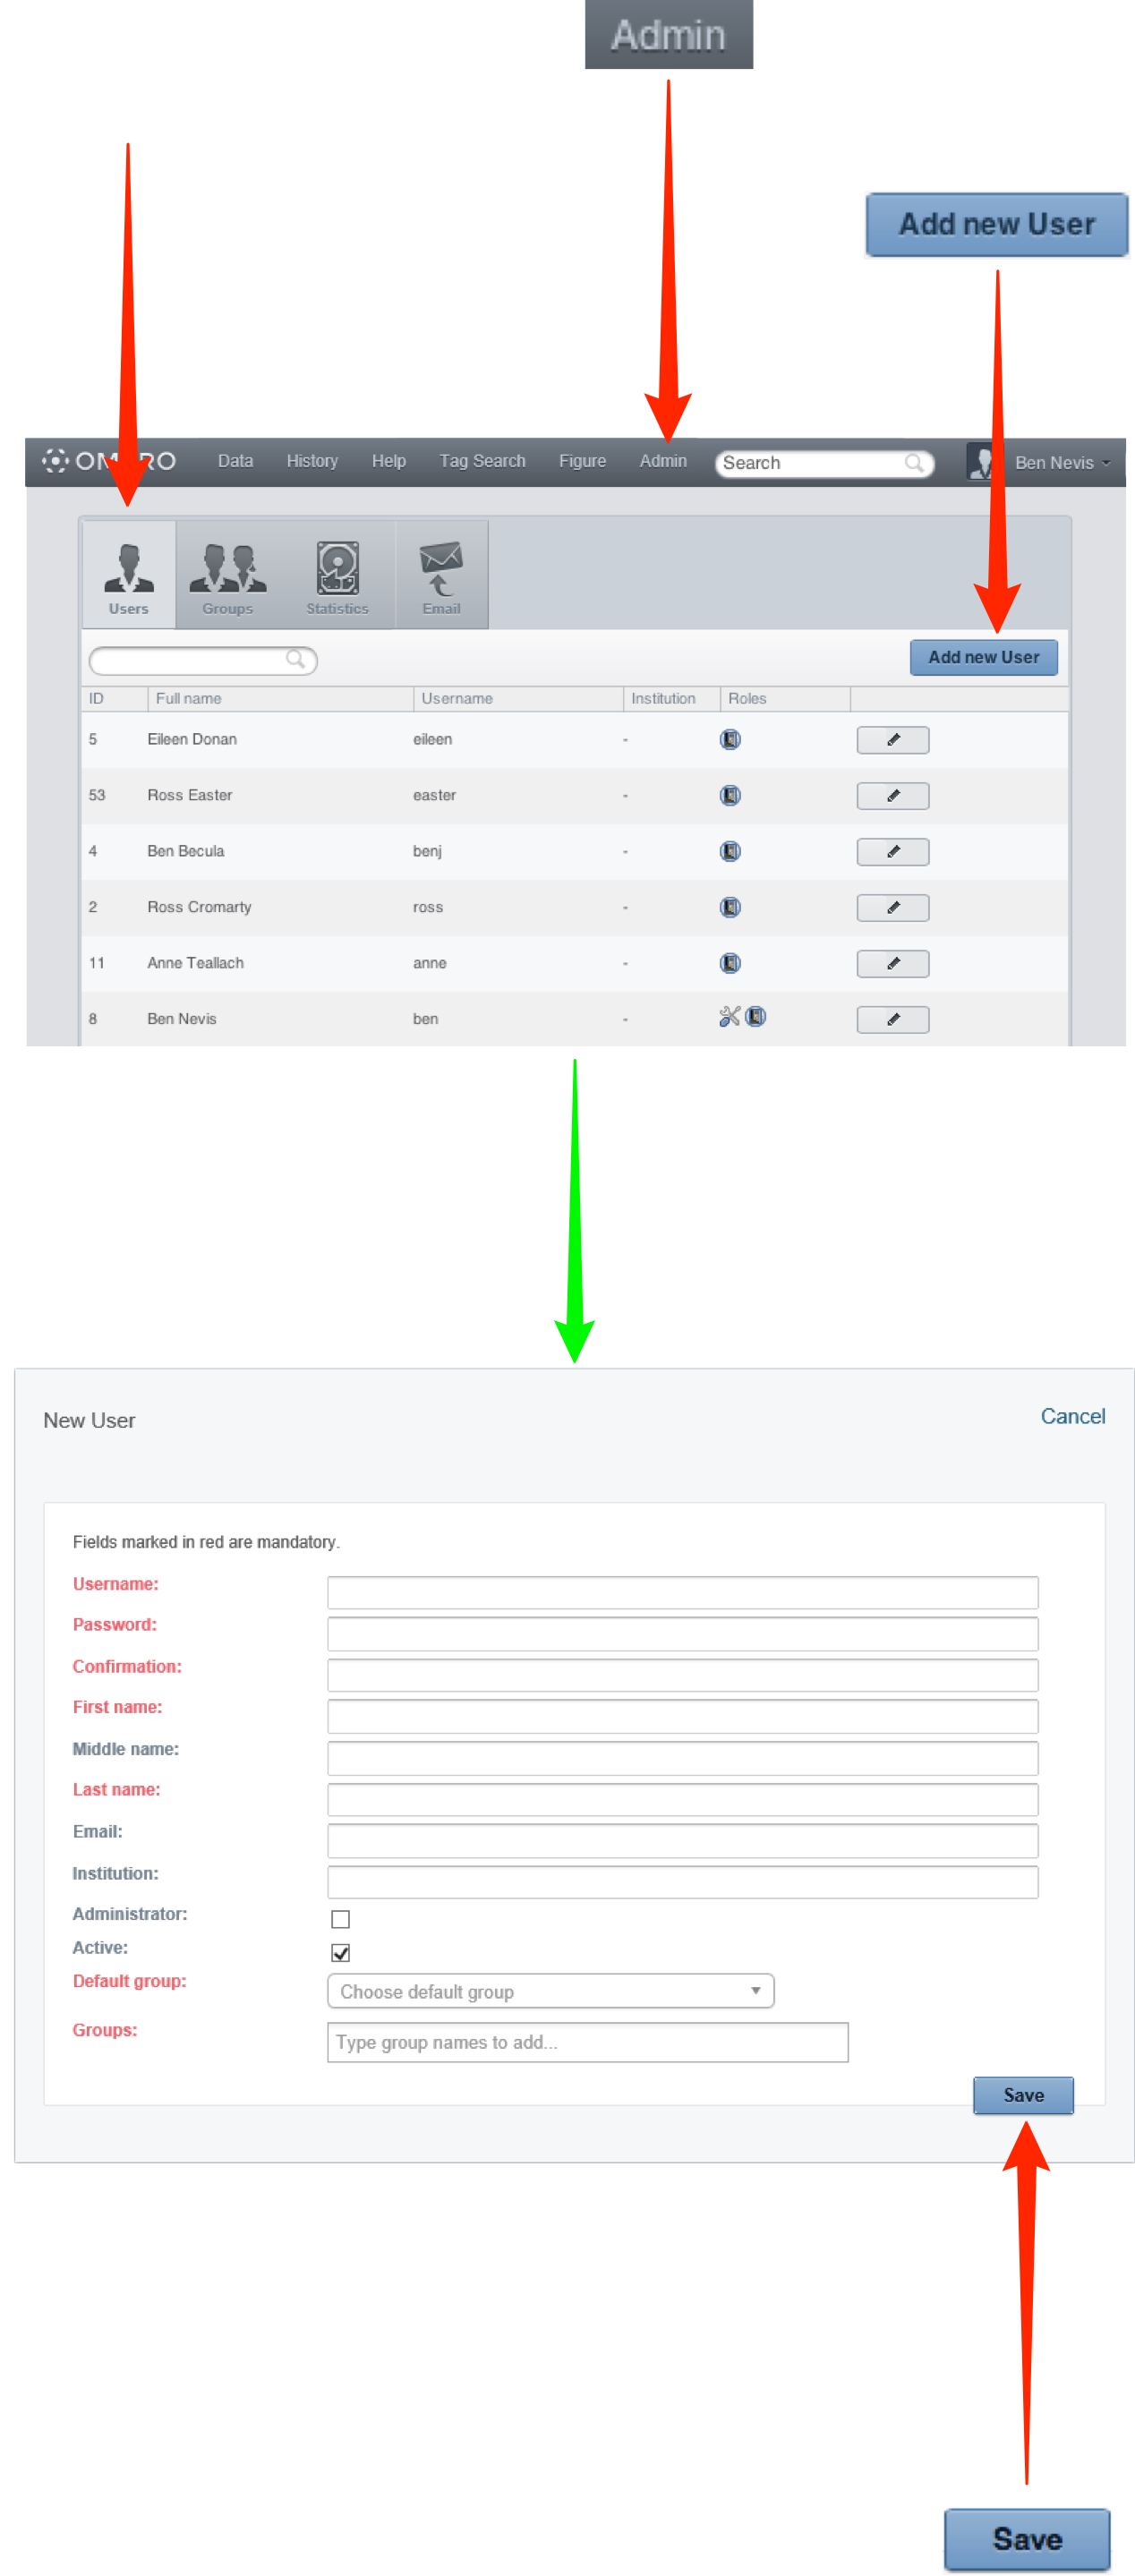
OMERO.web offers the best interface for Administrative tasks.
Click on the Admin button on the left in the top toolbar.
To create a new user, select the Users tab.
Click on Add New User to bring up the new user form.
Fill in the details and add the groups you wish the user to be in to the Groups box.
Click into the Groups box and start typing the name of the group.
A filtered list of groups matching the letters typed will appear.
Select the group to add the user to it.
To remove a user from a group, click the x after the group name.
After completing click Save.
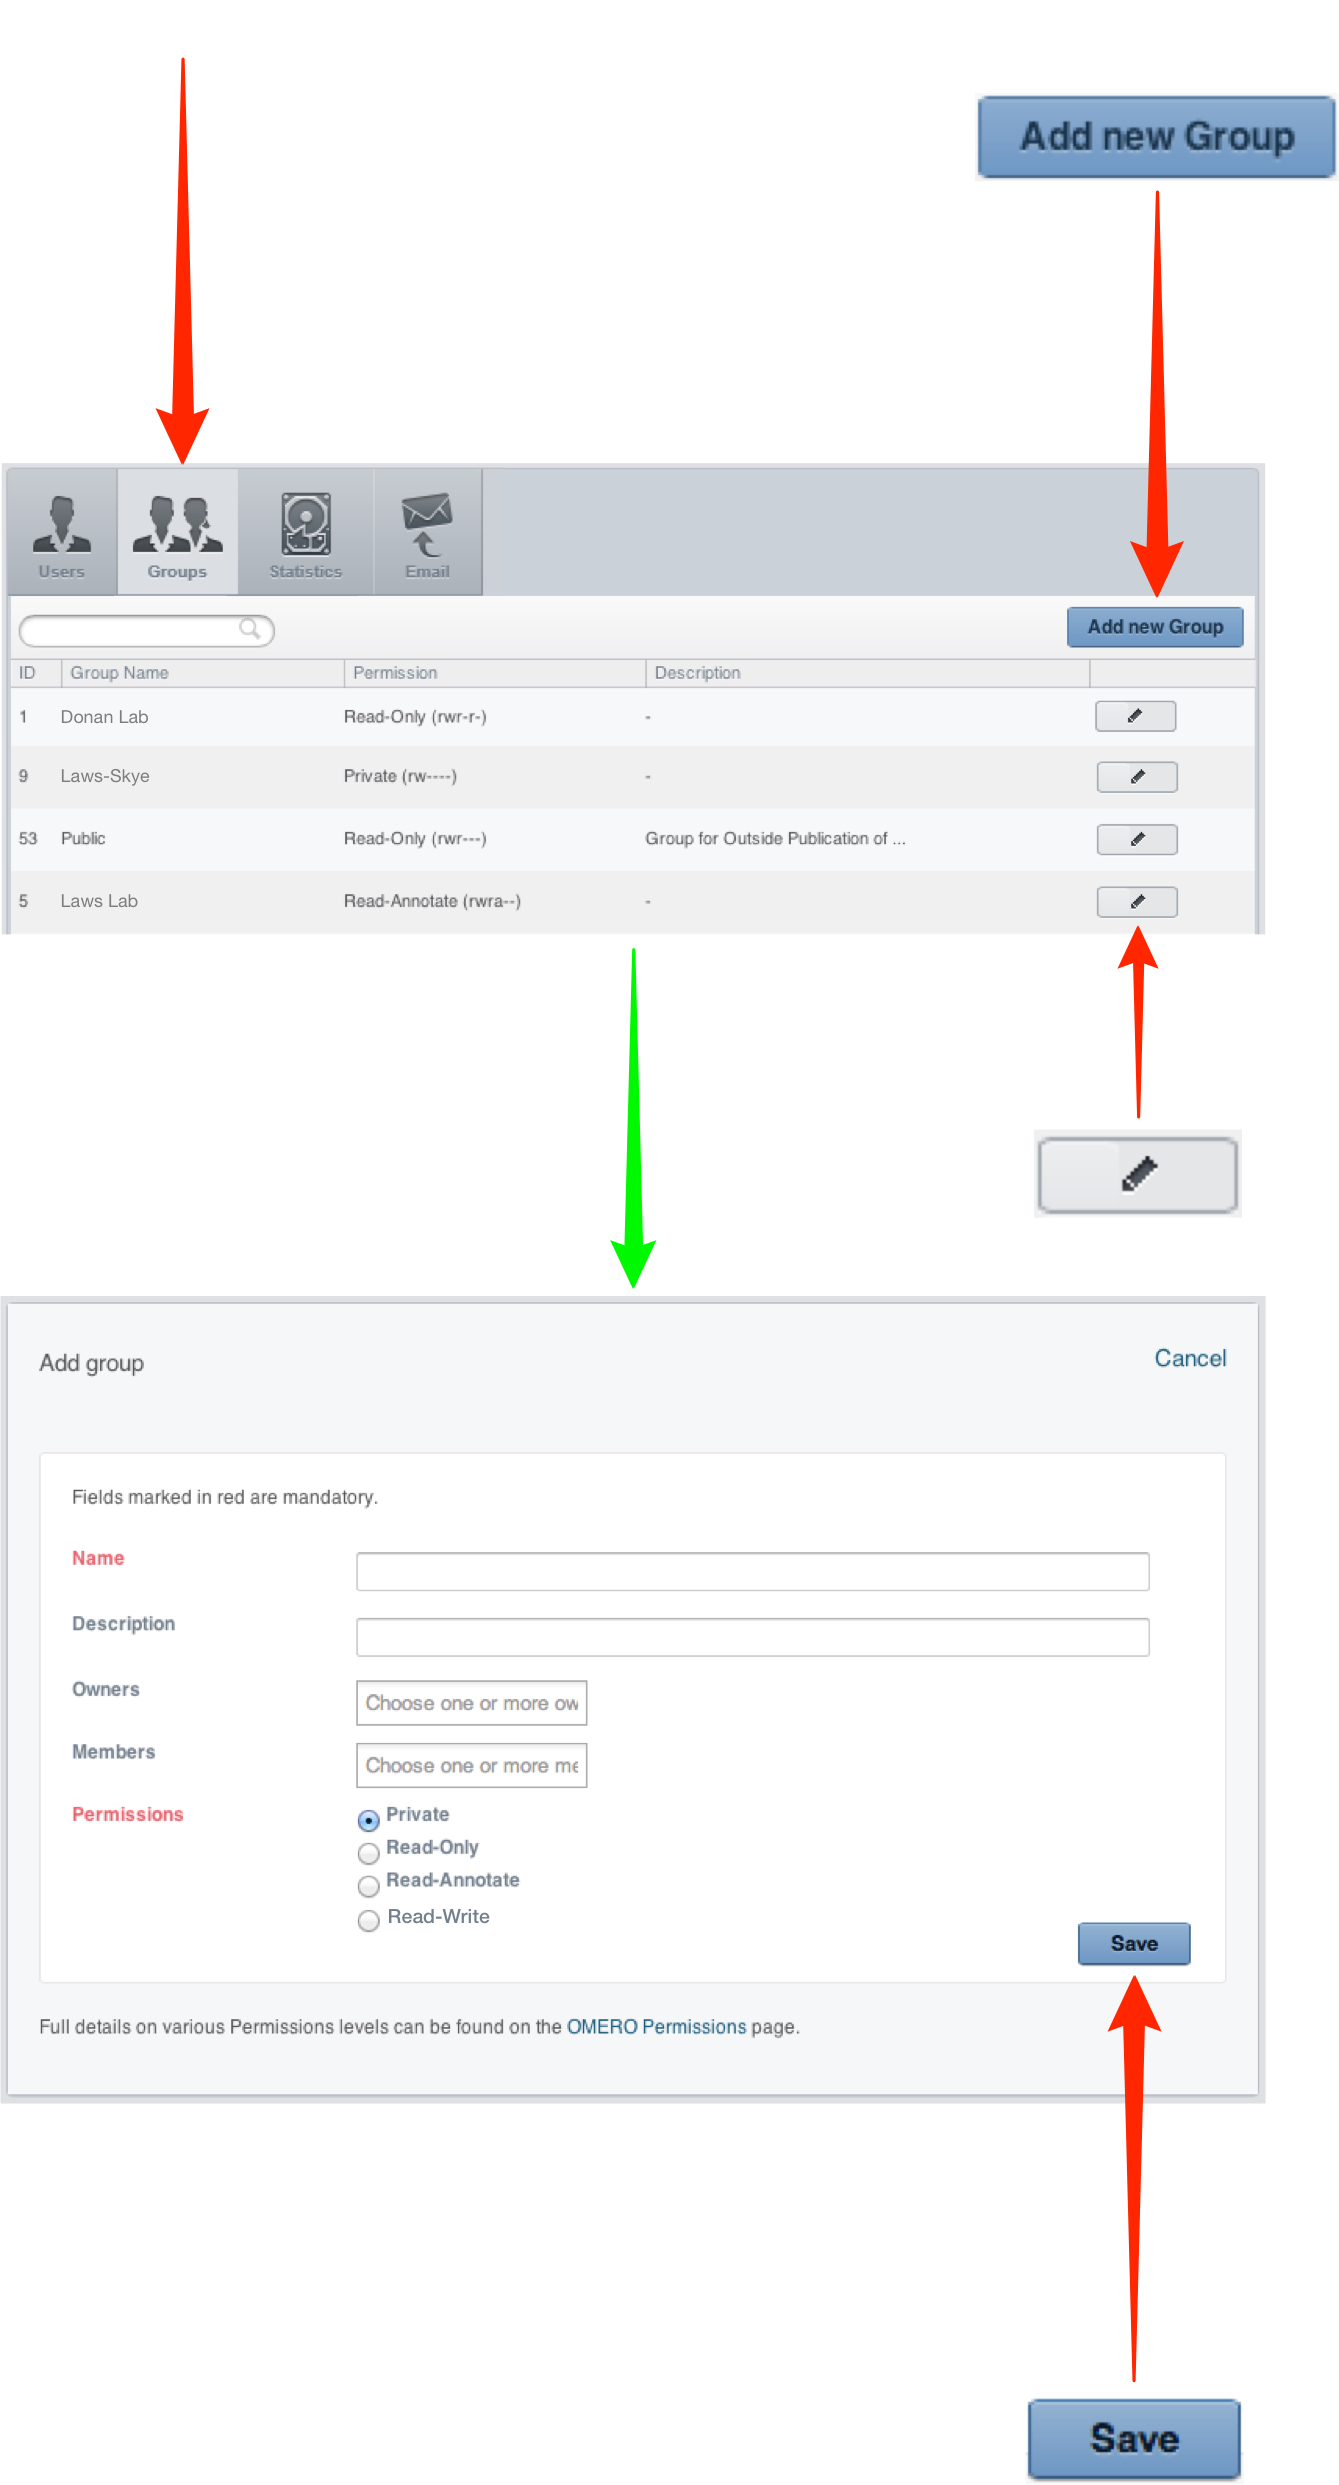
Click on the Group tab to create a new group.
Click on the Add New Group button.
Enter the details of the group.
Add any users to be owners to the Owners box.
Click into the Owners box and start typing the name of the user to add to the group.
A filtered list of users matching the letters typed will appear.
Select the user to make them an owner of the group.
To remove a user from a group, click the x after their name.
Add any users to be members to the Members box as described above.
To add a user to an existing group, click on the Edit icon and add users as above.
Individual members can also be added to an existing group via their user details page.
Click on the Statistics tab to see the disk usage for all users and groups on the OMERO server.
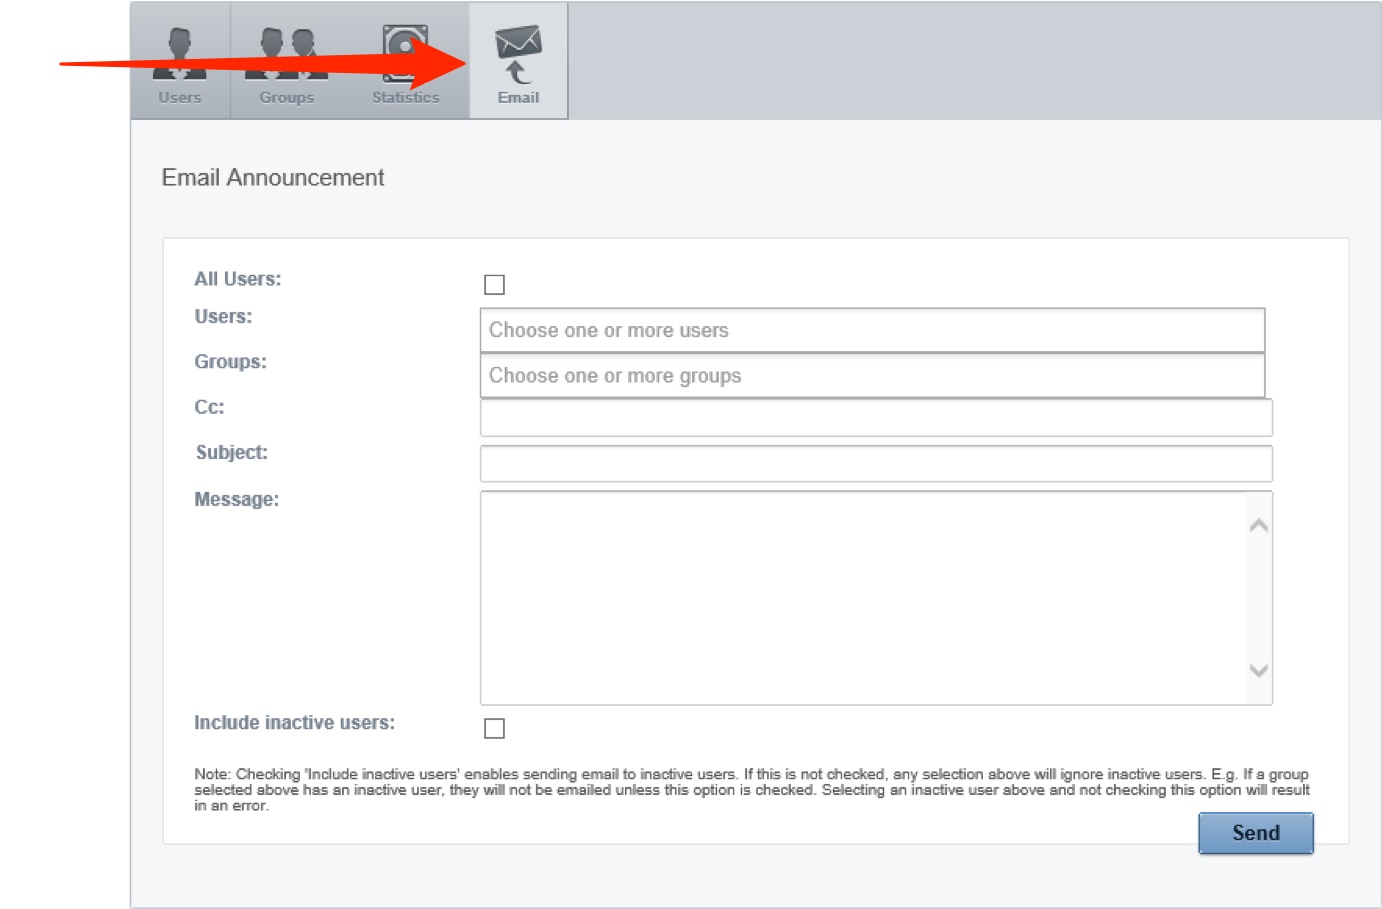
Click on the Email tab to send emails to OMERO users or groups.
All Tutorial Material is available on line at: help.openmicroscopy.org
The Main OME website is at: www.openmicroscopy.org