![]()
User Help
- User Help Home Page
-
 Quickstart User Guides
-
 Data Workflow User Guides
-
More Workflow User Guides
-
Other OMERO Applications
-
More

Using ImageJ with OMERO
Using ImageJ and Fiji with OMERO
This covers all OMERO versions from 5.1.0 and newer and assumes you have never installed ImageJ or Fiji before.
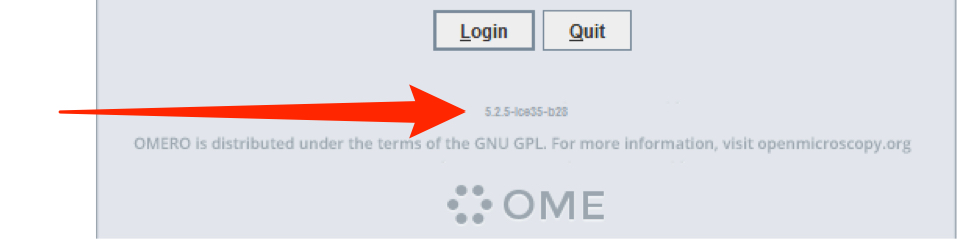
You can tell what version your OMERO is from the fine print at the bottom of the login screen.
In order to connect to an OMERO server and use the data stored there directly in ImageJ and Fiji, plugins have to be installed. The following instructions guide you through the download, installation and use of ImageJ, Fiji and the plugins.
Note
The OMERO.insight-ij plugin requires Java 1.7 or later to function.

Downloading and installing ImageJ
Download the latest version of ImageJ for your platform from the website:
http://rsbweb.nih.gov/ij/download.html
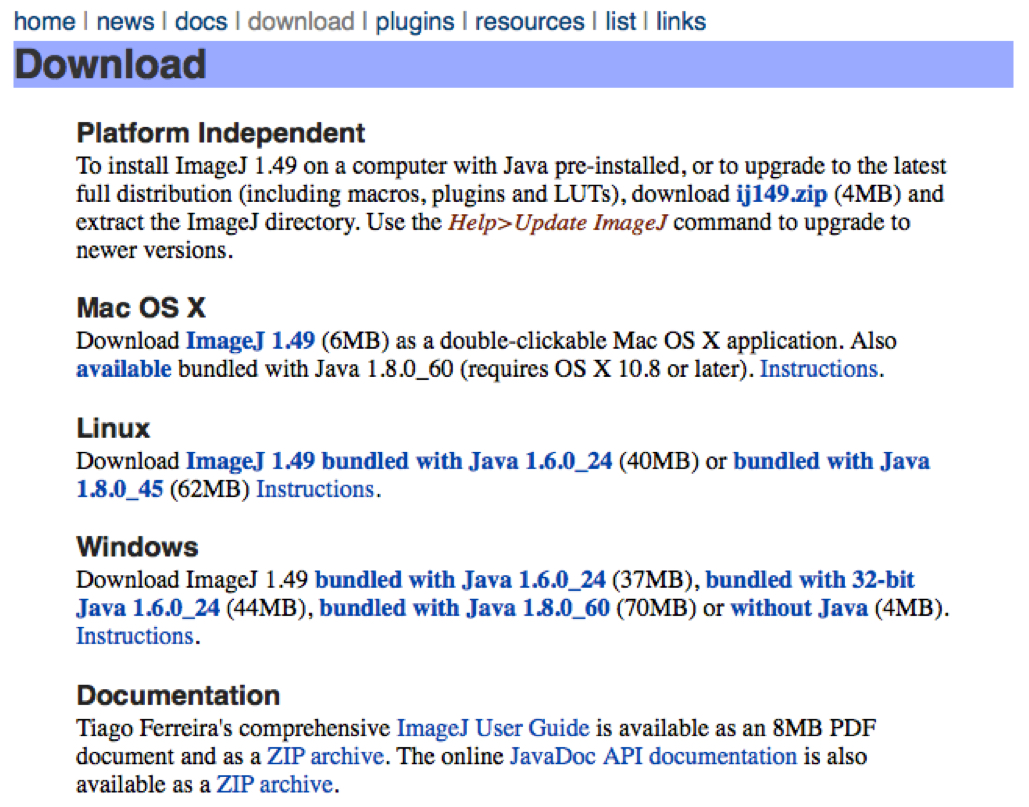
On Windows run the set-up programme (either from the Downloads folder or when prompted by the download Wizard) and follow instructions to install ImageJ.
On Mac OS X, extract the .zip archive and drag the ImageJ folder to your Applications folder.
On Linux extract the .gz archive and double click the “run” script.
Further installation instructions can be found on the ImageJ web site (URL above).
Downloading and Installing Fiji
Fiji (Fiji is Just ImageJ) is a distribution of ImageJ together with Java, Java3D and a lot of plugins organized into a coherent menu structure.
Download the latest version of Fiji for your platform from the website:
http://imagej.net/Fiji/Downloads
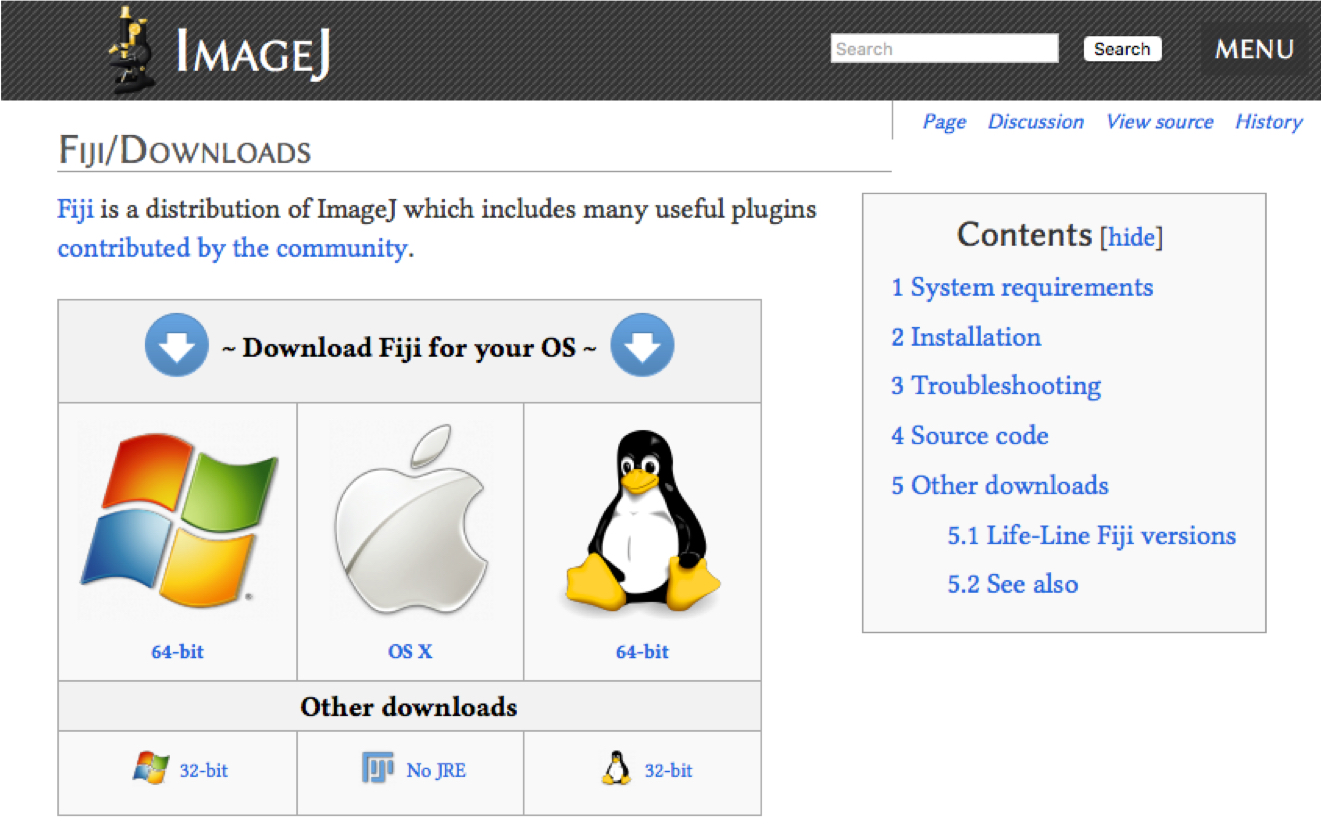
The Fiji downloads page includes installation instructions.
On Windows it is recommended you install the Fiji executable within your user space for example: C:\Users\[your name]\Fiji.app, not in the normal C:\Programs directory, otherwise future updating may fail.
On a Mac OS X, mount the .dmg and drag the Fiji folder to your applications folder.
On Linux extract the .gz archive and double click the “run” script.
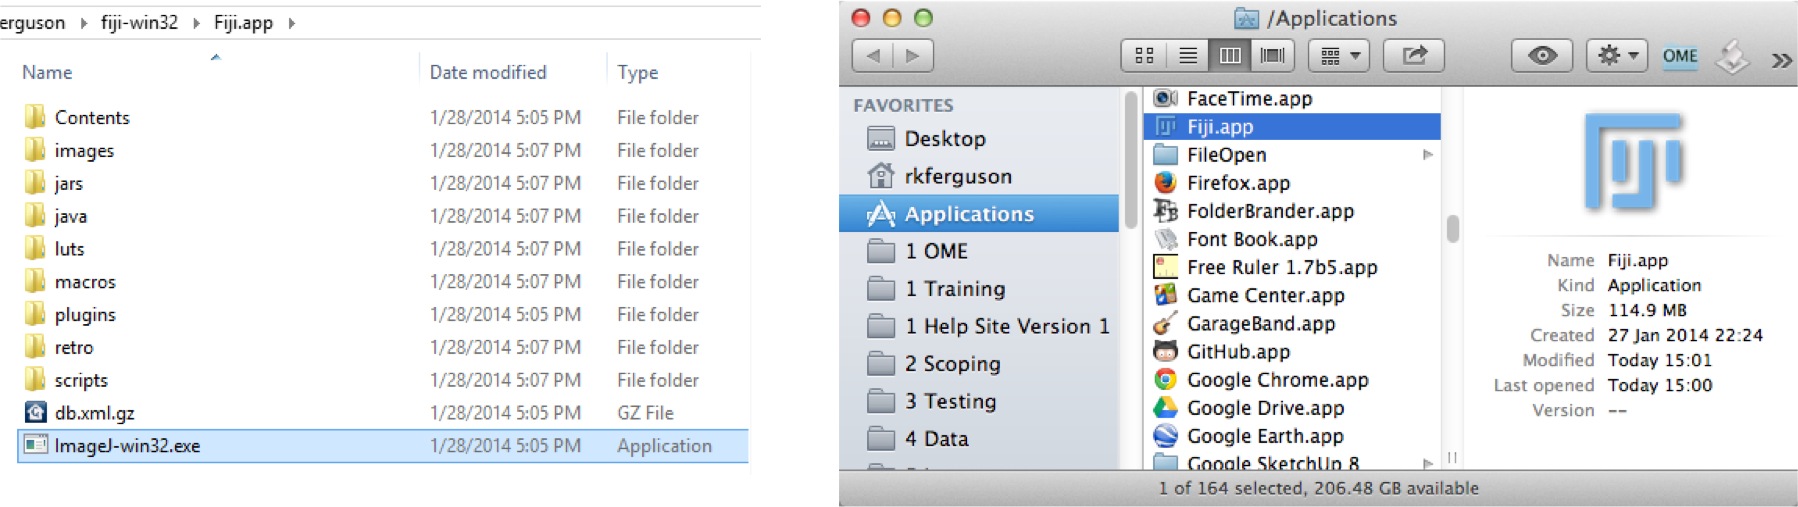
On Windows, depending on how the downloaded archive was expanded, the ImageJ executable can appear one level deeper in the Fiji.app folder than in ImageJ.
On Mac OS X, Fiji.app appears as a single .app.
Installing Plugins for ImageJ and Fiji
The location for the plugins in ImageJ and Fiji are essentially the same, with the following differences in gaining access to them:
- on Windows, Fiji sometimes has an additional level of hierarchy, depending on how the downloaded archive was expanded, for example:
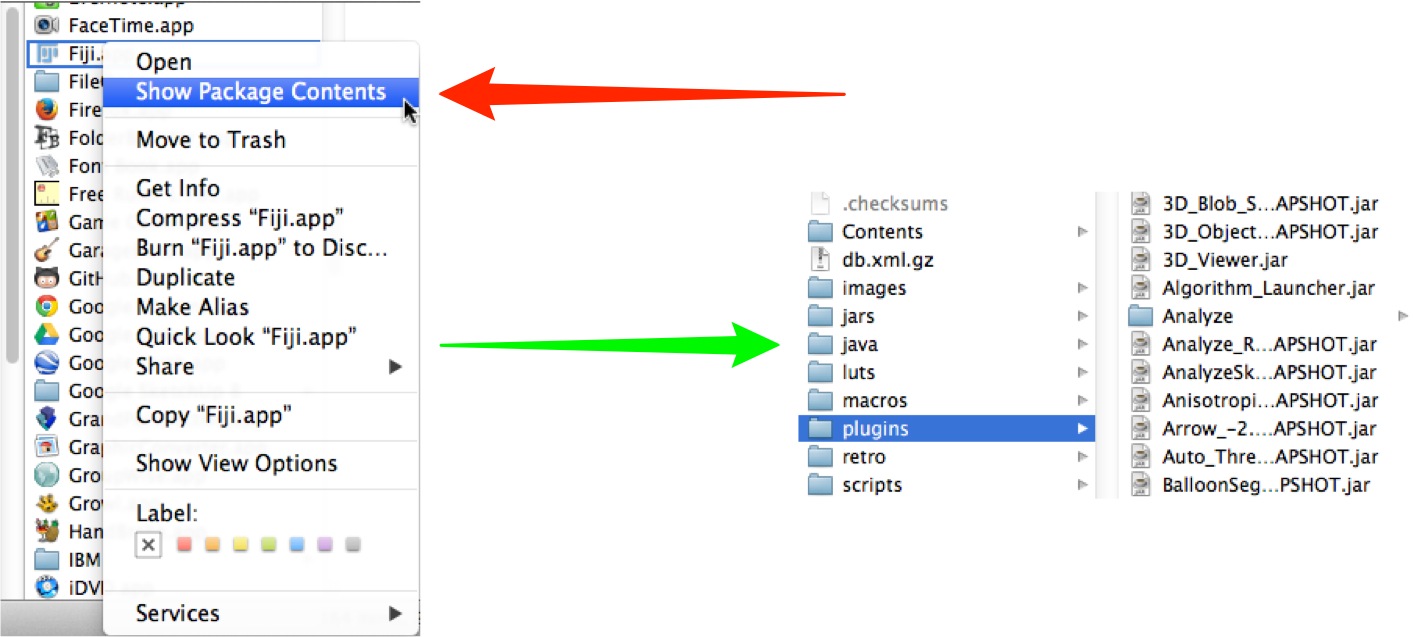
- on Mac OS X, Fiji is an .app package, so to see the plugins folder you must right-click the Fiji.app and select Show Package Contents:
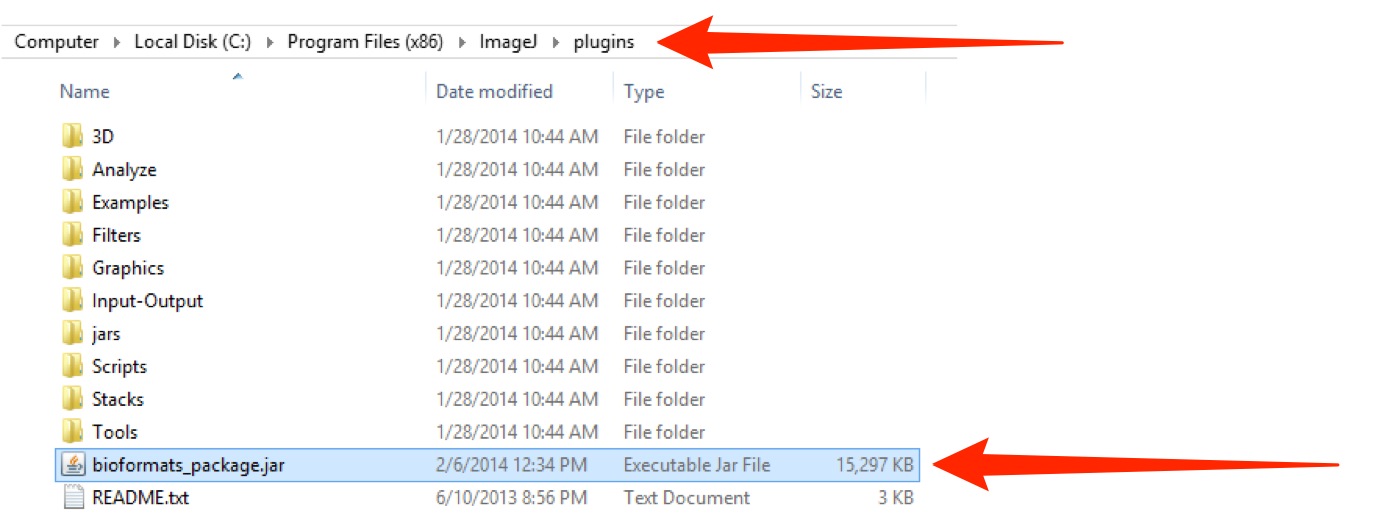
ImageJ - Windows (32 bit):
Local Disk (C:) > Program Files (x86) > ImageJ > plugins
Fiji - Windows (32 bit):
Local Disk (C:) > username > Fiji-win32 > Fiji.app > plugins

Note
After installing or upgrading plugins, you need to restart ImageJ or Fiji to be able to use the plugins.
Using ImageJ with OMERO
Two plugins are required:
- bioformats_package.jar
- OMERO.insight-ij
-
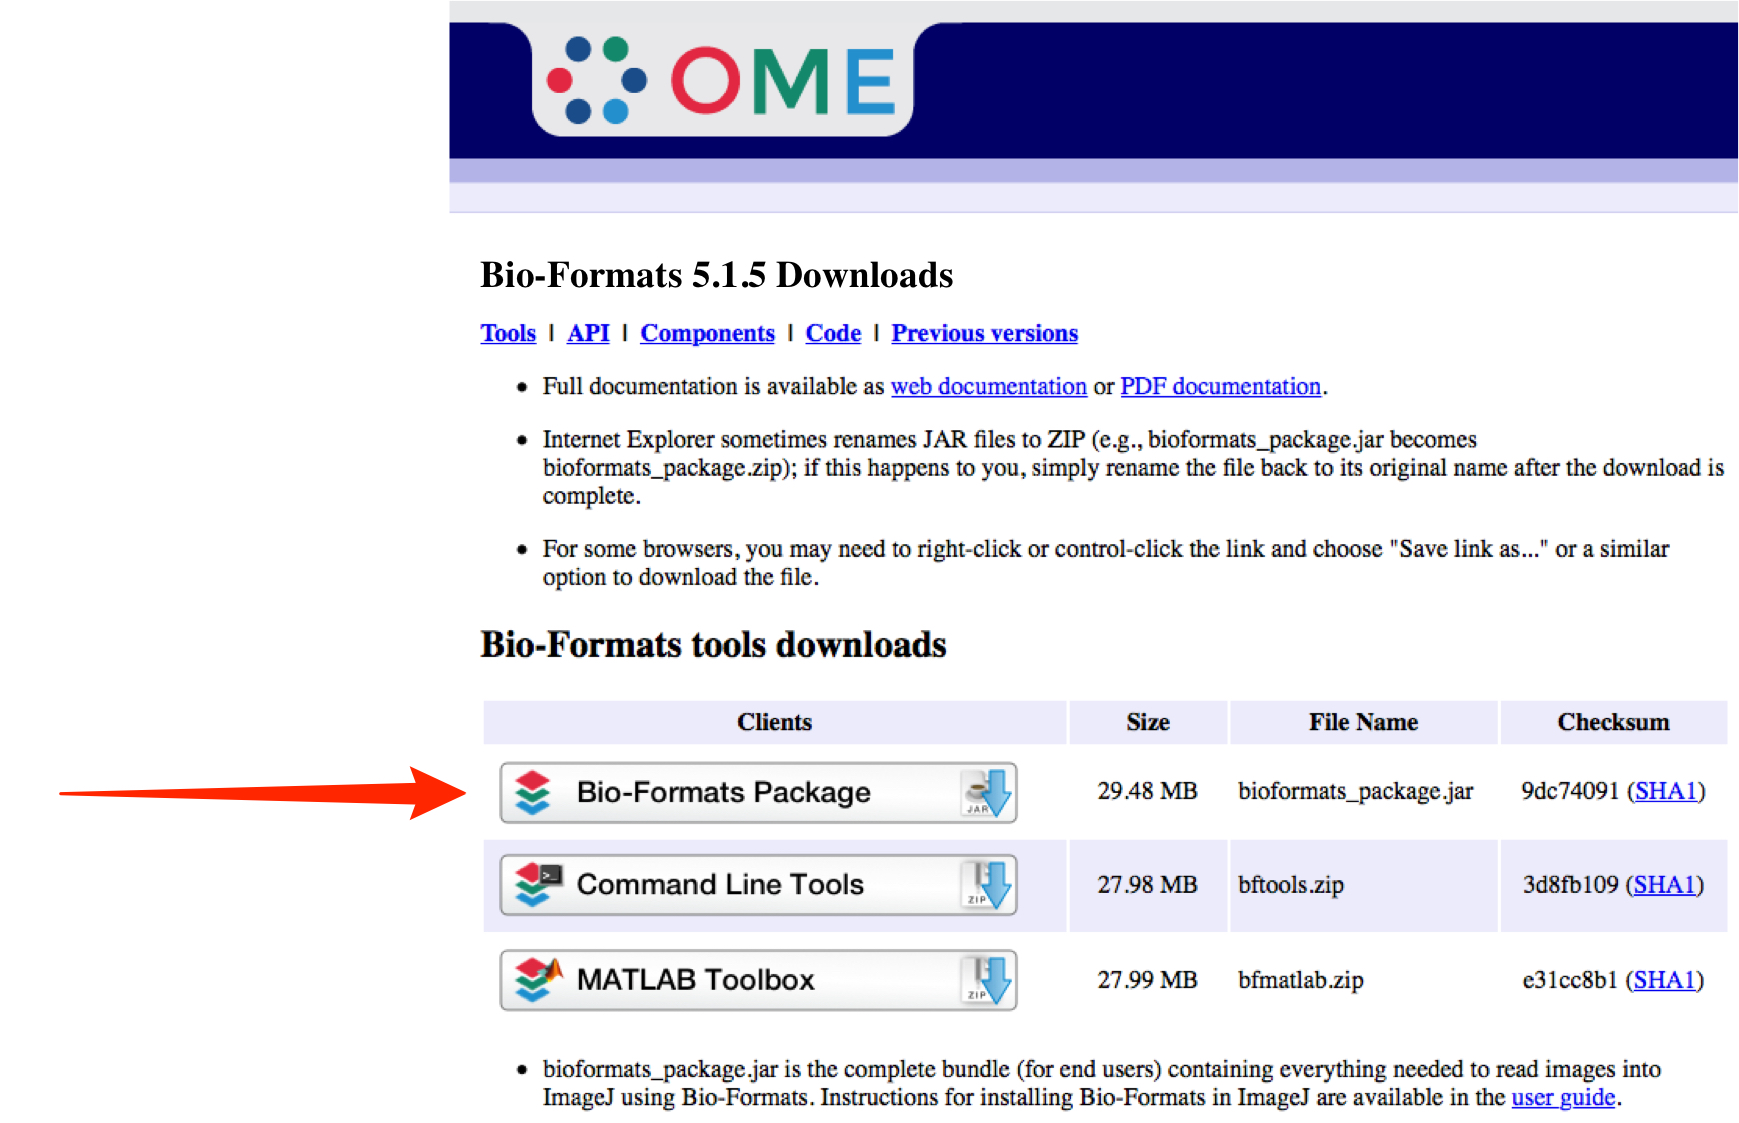
Download the latest 5.1.x version of the Bioformats Package plugin from:
http://downloads.openmicroscopy.org/latest/bio-formats5
Check there is a “Bio-Formats 5.1.x Downloads” heading on the page.
-
Save or move the downloaded file into the ImageJ > plugins folder.
-
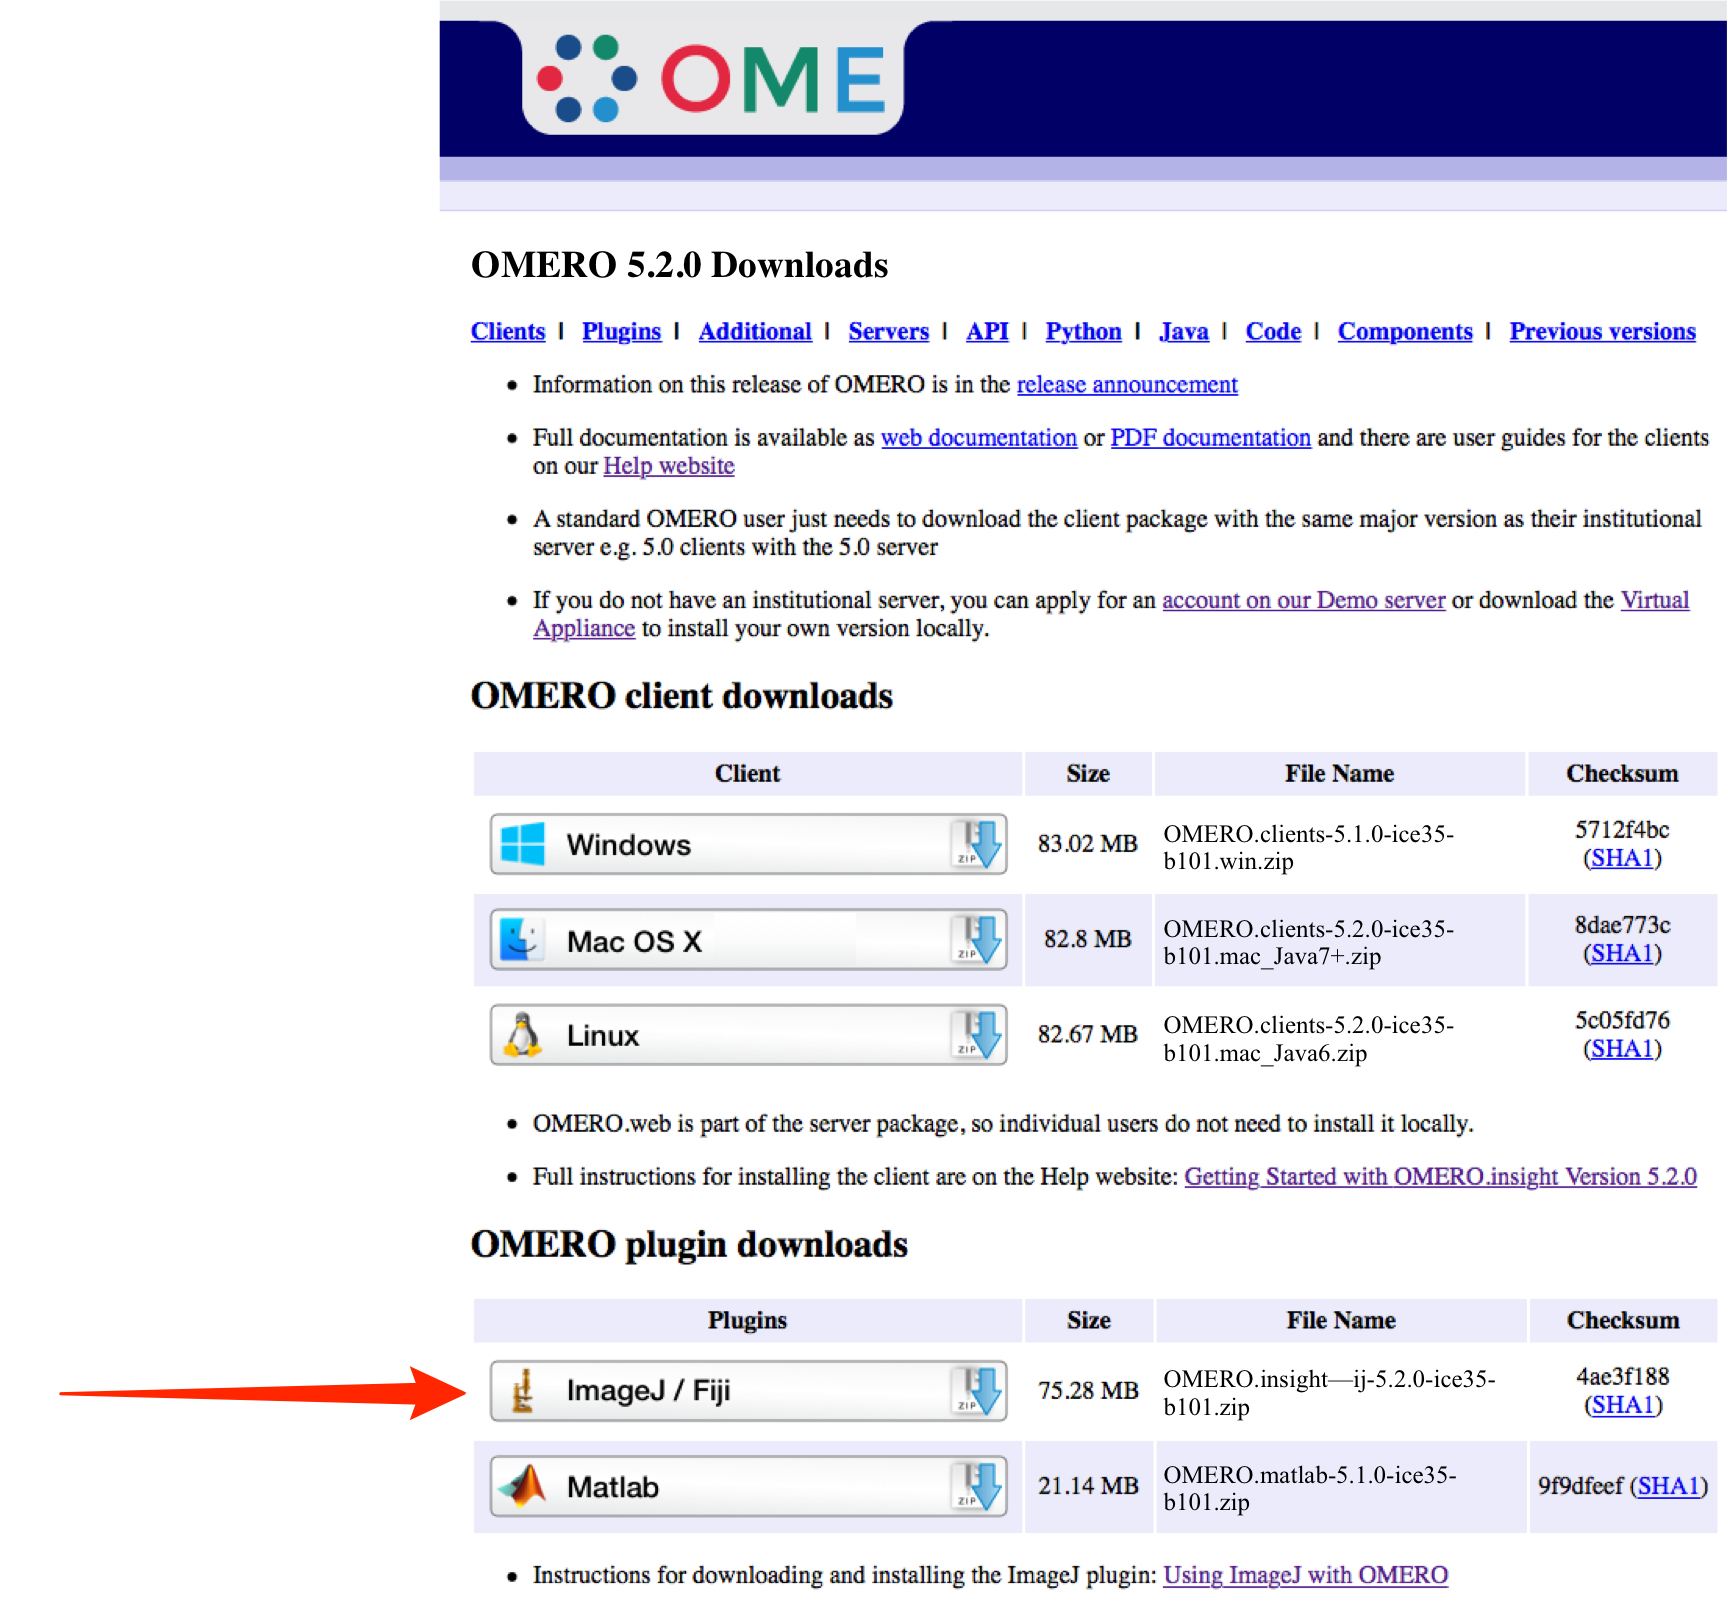
Download the latest 5.x.x version of the OMERO.insight-ij plugin from:
http://downloads.openmicroscopy.org/latest/omero5
Check there is a “OMERO 5.x.x Downloads” heading on the page.
-
Save or move the .zip archive to the ImageJ > plugins folder.
Extract the archive into the plugins folder to give a folder named “OMERO.insight-ij-x” where x is the version number.
Leave the complete OMERO.insight-ij plugin folder with its components in the ImageJ > plugins folder.
Note
Some Windows unzip apps create a double folder enclosing the plugin.
Check, and if this has happened, copy the inner OMERO.insight-ij-5.x.x folder into the ImageJ > plugins folder.
The OMERO.insight-ij-5.x.x.zip archive can be left in the plugins folder or deleted.
Using Fiji with OMERO version 5
As Fiji comes bundled with the components of Bioformats Package, there is no need to download and install this plugin.
Two actions are required for an installation:
- select the appropriate Bio-Formats jars using the update menu
- add the OMERO.insight-ij plugin
-
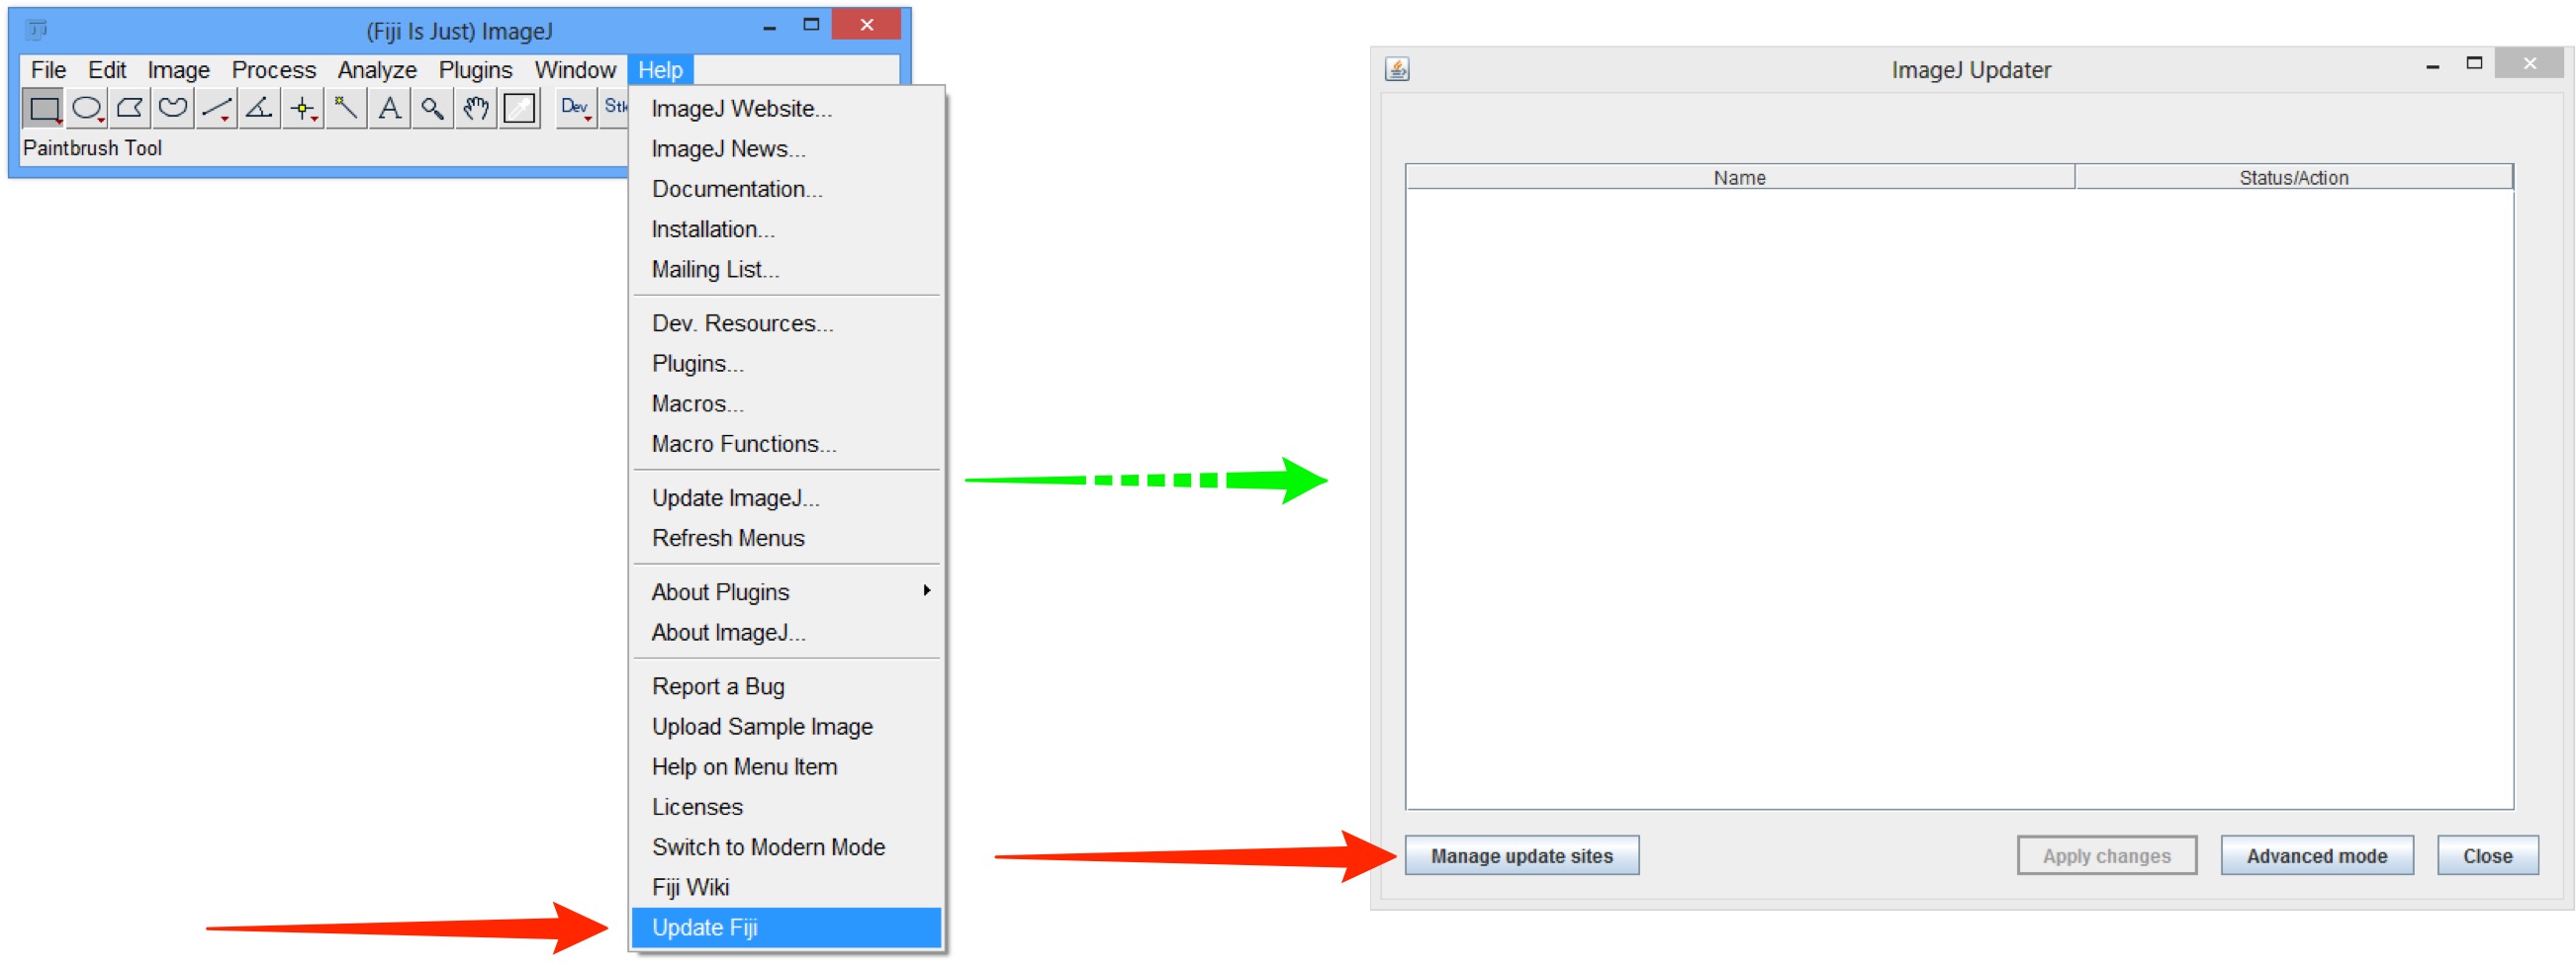
Select Help > Update Fiji.
Fiji will check for updates and after following prompts you will end up at the ImageJ Updater Window.
Click on Manage update sites.
-
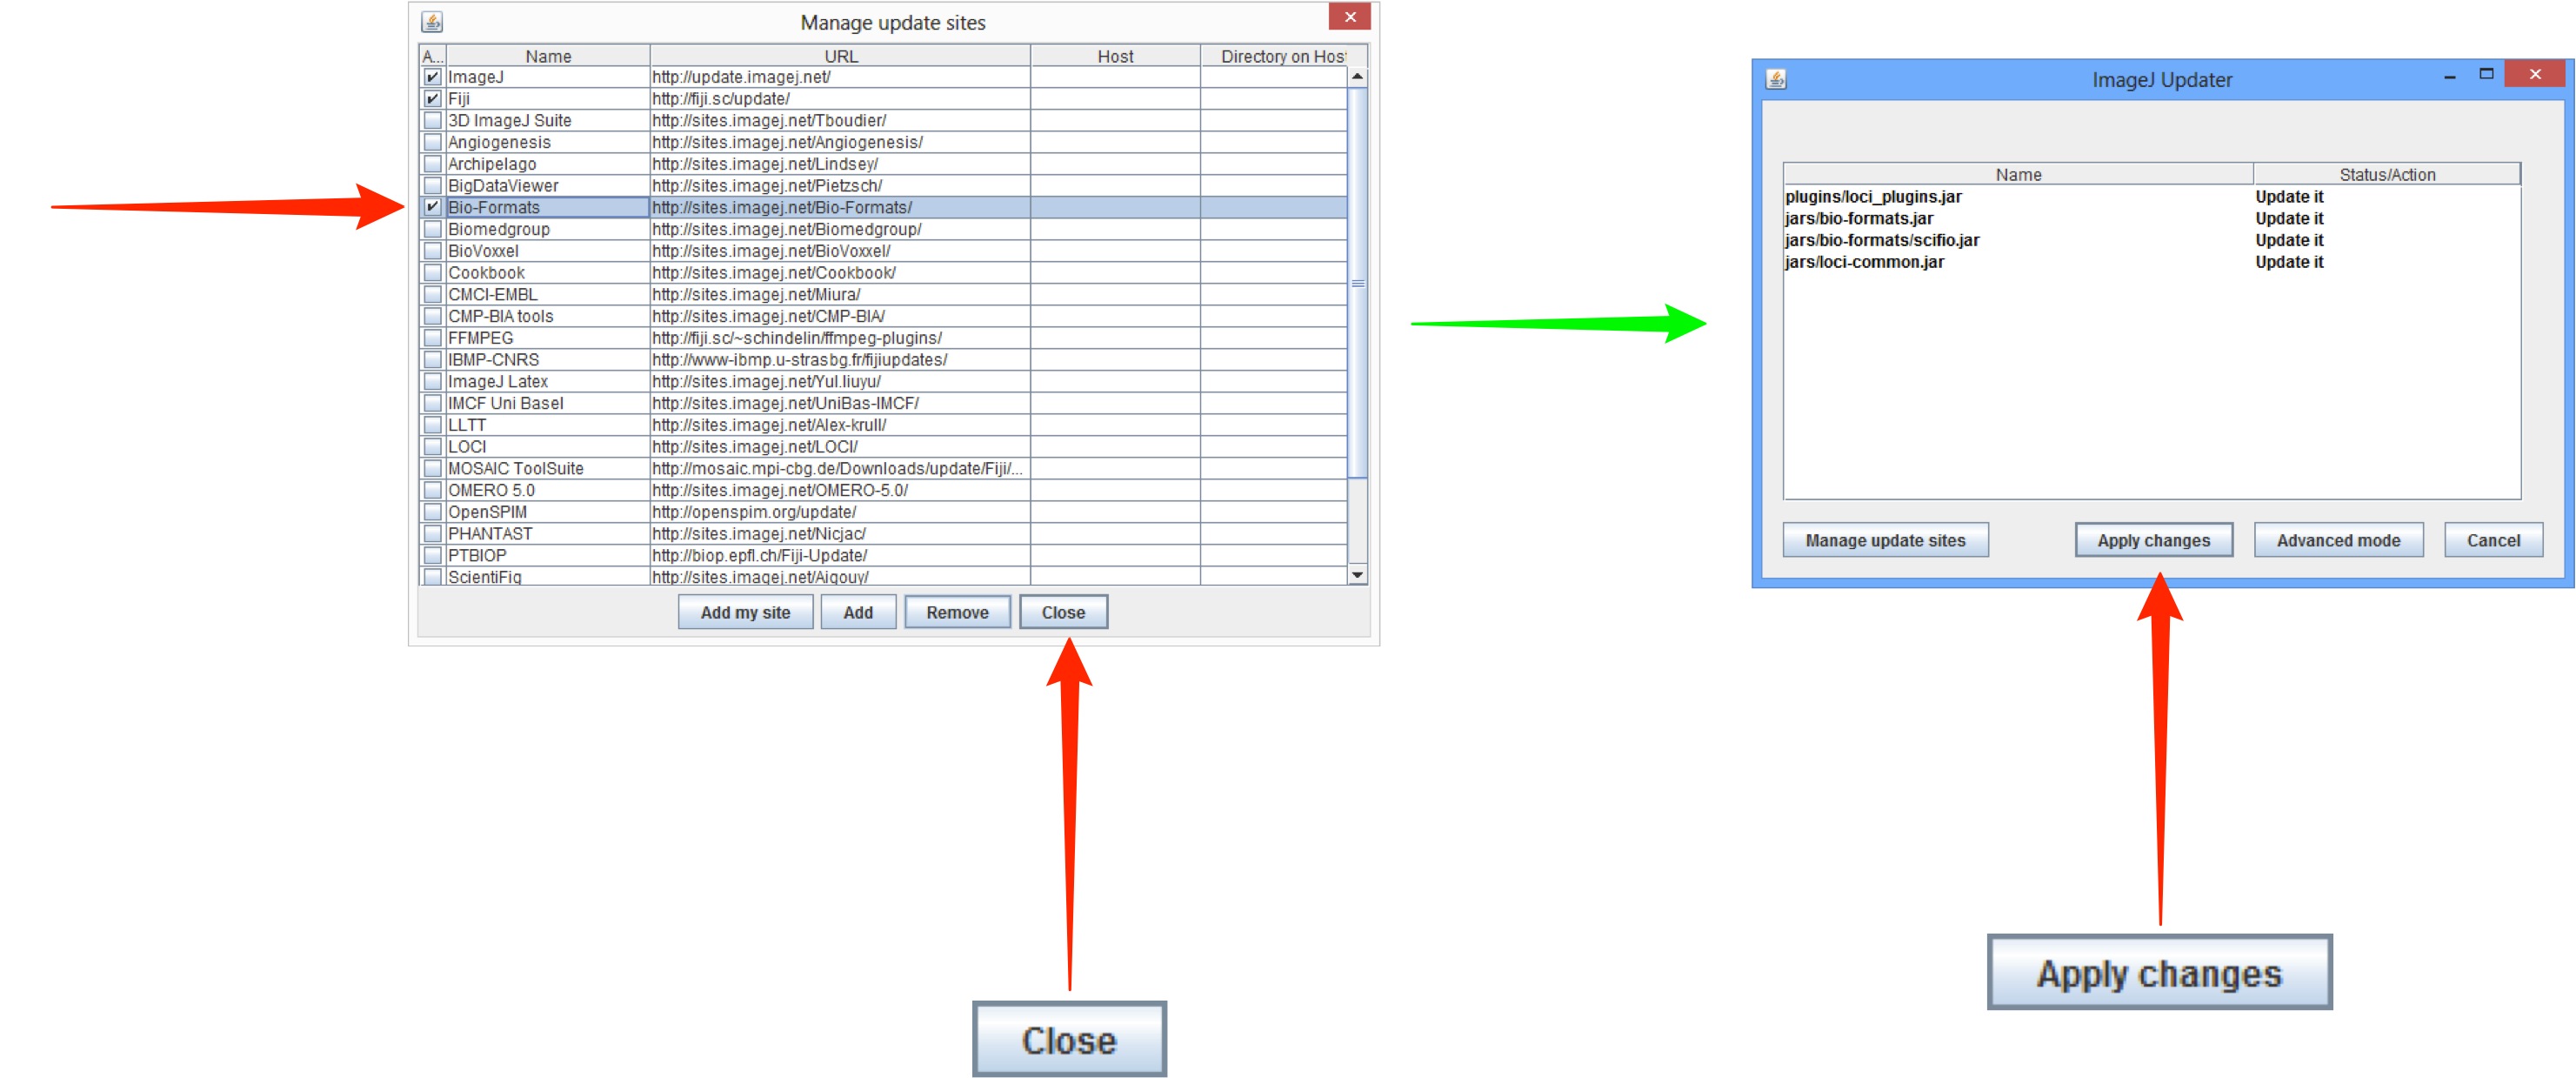
In the Manage update site window, select Bio-Formats 5.
Click Close.
Click Apply Changes.
Fiji will fetch and install the updates.
Download the latest 5.x.x version of the OMERO.insight-ij plugin from:
http://downloads.openmicroscopy.org/latest/omero5
Check there is a “OMERO 5.x.x Downloads” heading on the page.
-
Save or move the .zip archive to the Fiji.app > plugins folder.
If upgrading delete the 4.4.x version of OMERO.insight-ij.
Extract the archive into the plugins folder to give a folder named “OMERO.insight-ij-x” where x is the version number.
Leave the complete OMERO.insight-ij plugin folder with its components in the Fiji.app > plugins folder.
Note
Some Windows unzip apps create a double folder enclosing the plugin.
Check, and if this has happened, copy the inner OMERO.insight-ij-5.x.x folder into the Fiji.app > plugins folder.
Delete the OMERO.insight-ij-5.x.x.zip archive from the plugins folder.
Accessing OMERO using ImageJ and Fiji
-
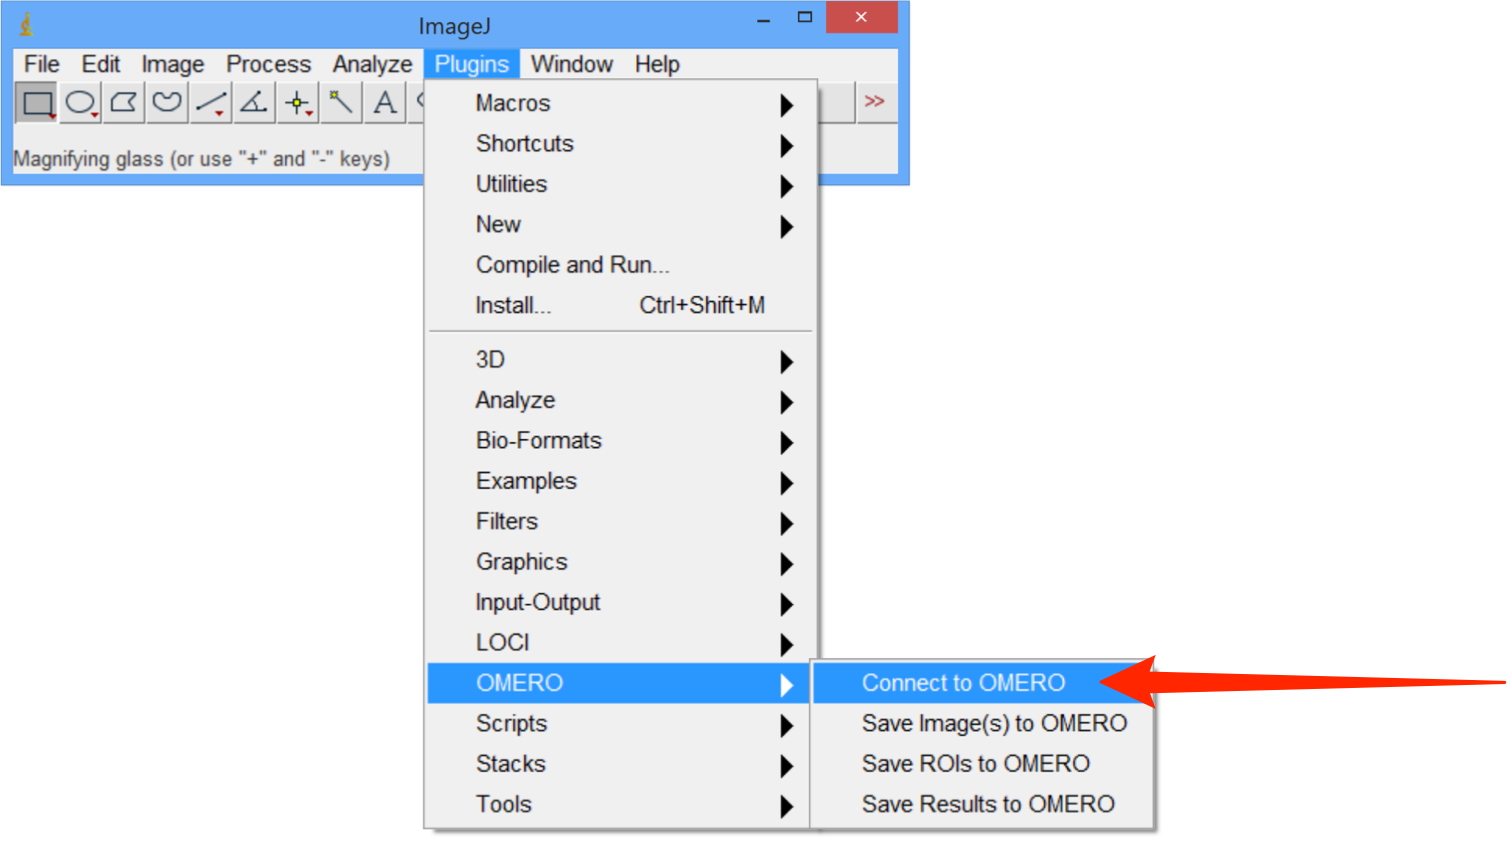
Launch the ImageJ or Fiji application and click on the Plugins menu.
Select OMERO > Connect to OMERO.
A version of OMERO.insight will open and can be used as normal.
-
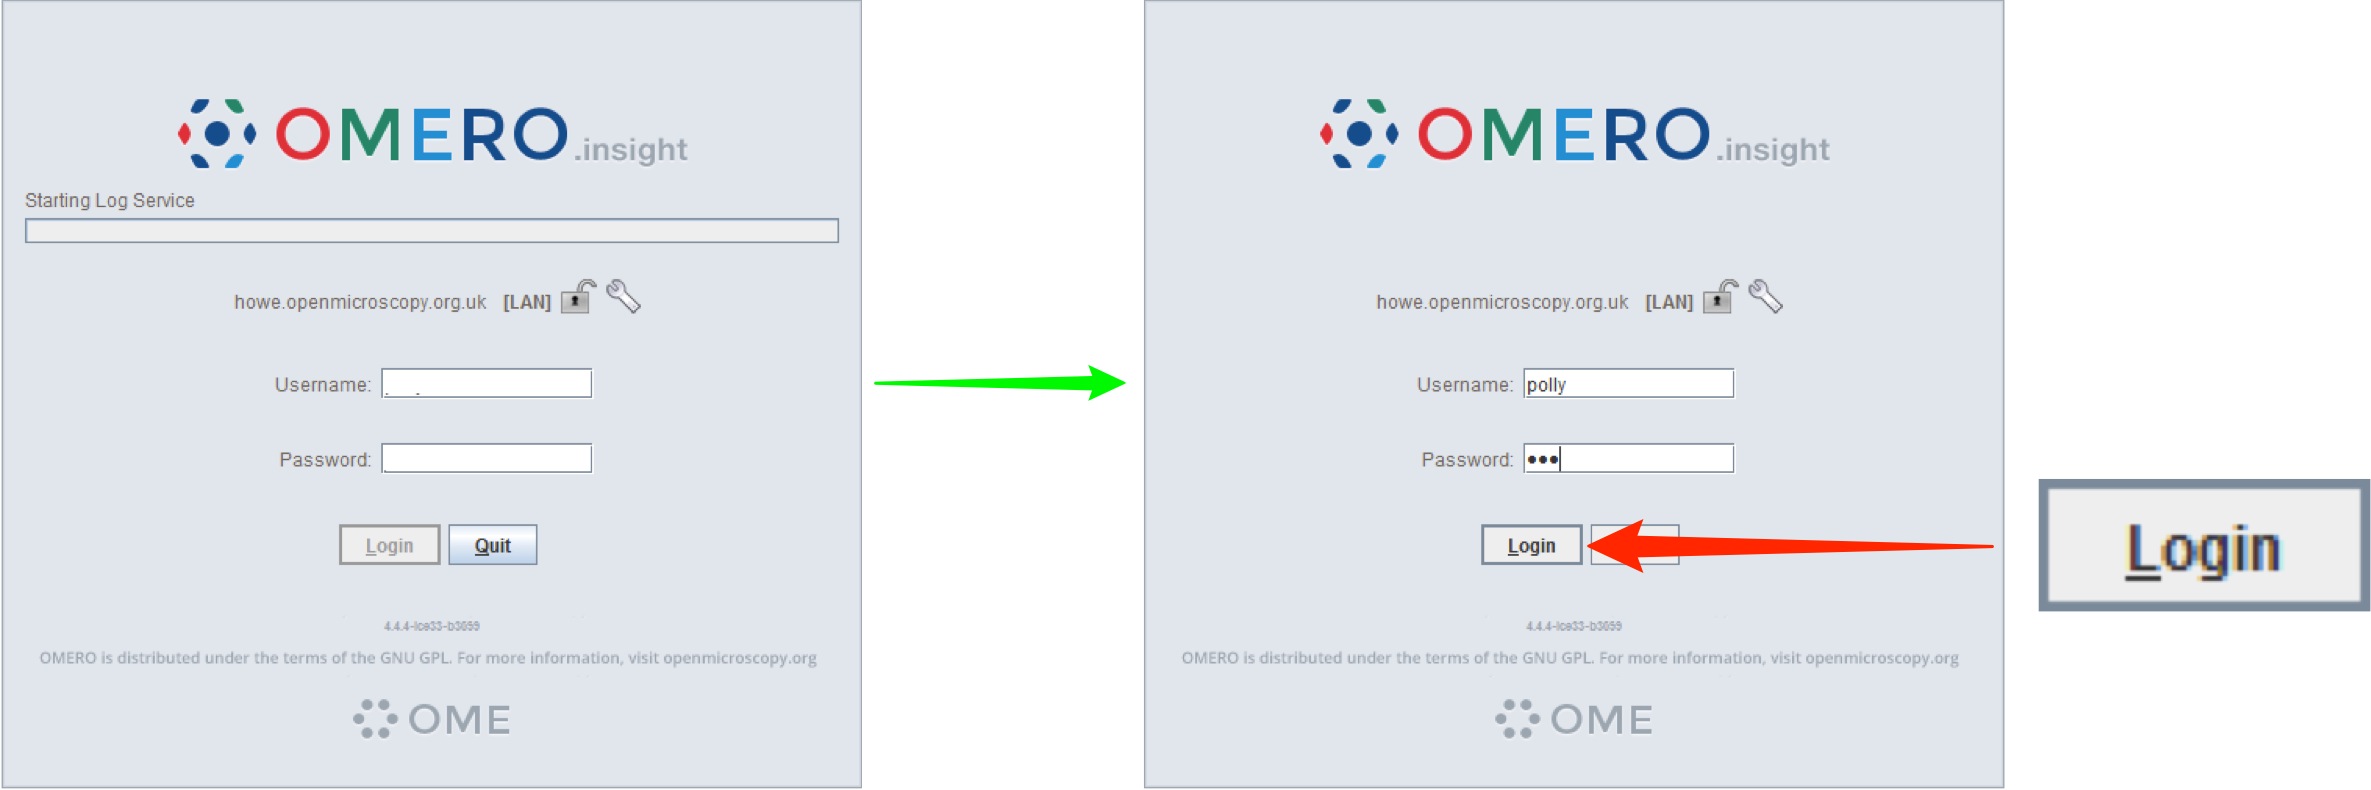
As ImageJ needs to load the plugin software, it can take a minute or two for the OMERO login screen to appear, and then another two or three minutes for the progress bar to start moving and complete.
Enter your OMERO server address, if needed, and Username and Password.
Click Login.
-
You will then be taken to the OMERO.insight Data Manager screen.
Note
If you quit OMERO.insight and then connect again during the same ImageJ session, logging in and launching the OMERO plugin will be much quicker. So if you intend using the OMERO plugin through ImageJ again soon, it may be worth leaving your ImageJ application running.
If you receive the following error message in a dialogue box, this indicates there is a different Java version being used by Fiji from the version required by the OMERO plugin.
(Fiji Is Just) ImageJ 2.0.0-rc-38/1.50b; Java 1.6.0_65 [64-bit]; Mac OS X 10.8.5; 33MB of 1171MB (2%)
java.lang.UnsupportedClassVersionError: org/openmicroscopy/shoola/MainIJPlugin : Unsupported major.minor version 51.0
This plugin requires Java 1.7 or later.
Update your operating system to the latest version of the Java Development Kit (JDK) using the Java Control Panel (Windows) or the Java System Preference Pane (Mac).
If the message persists after you have updated your operating system’s JDK, download the latest version of Fiji from the website and this should work with the latest OMERO.insight plugin.
-
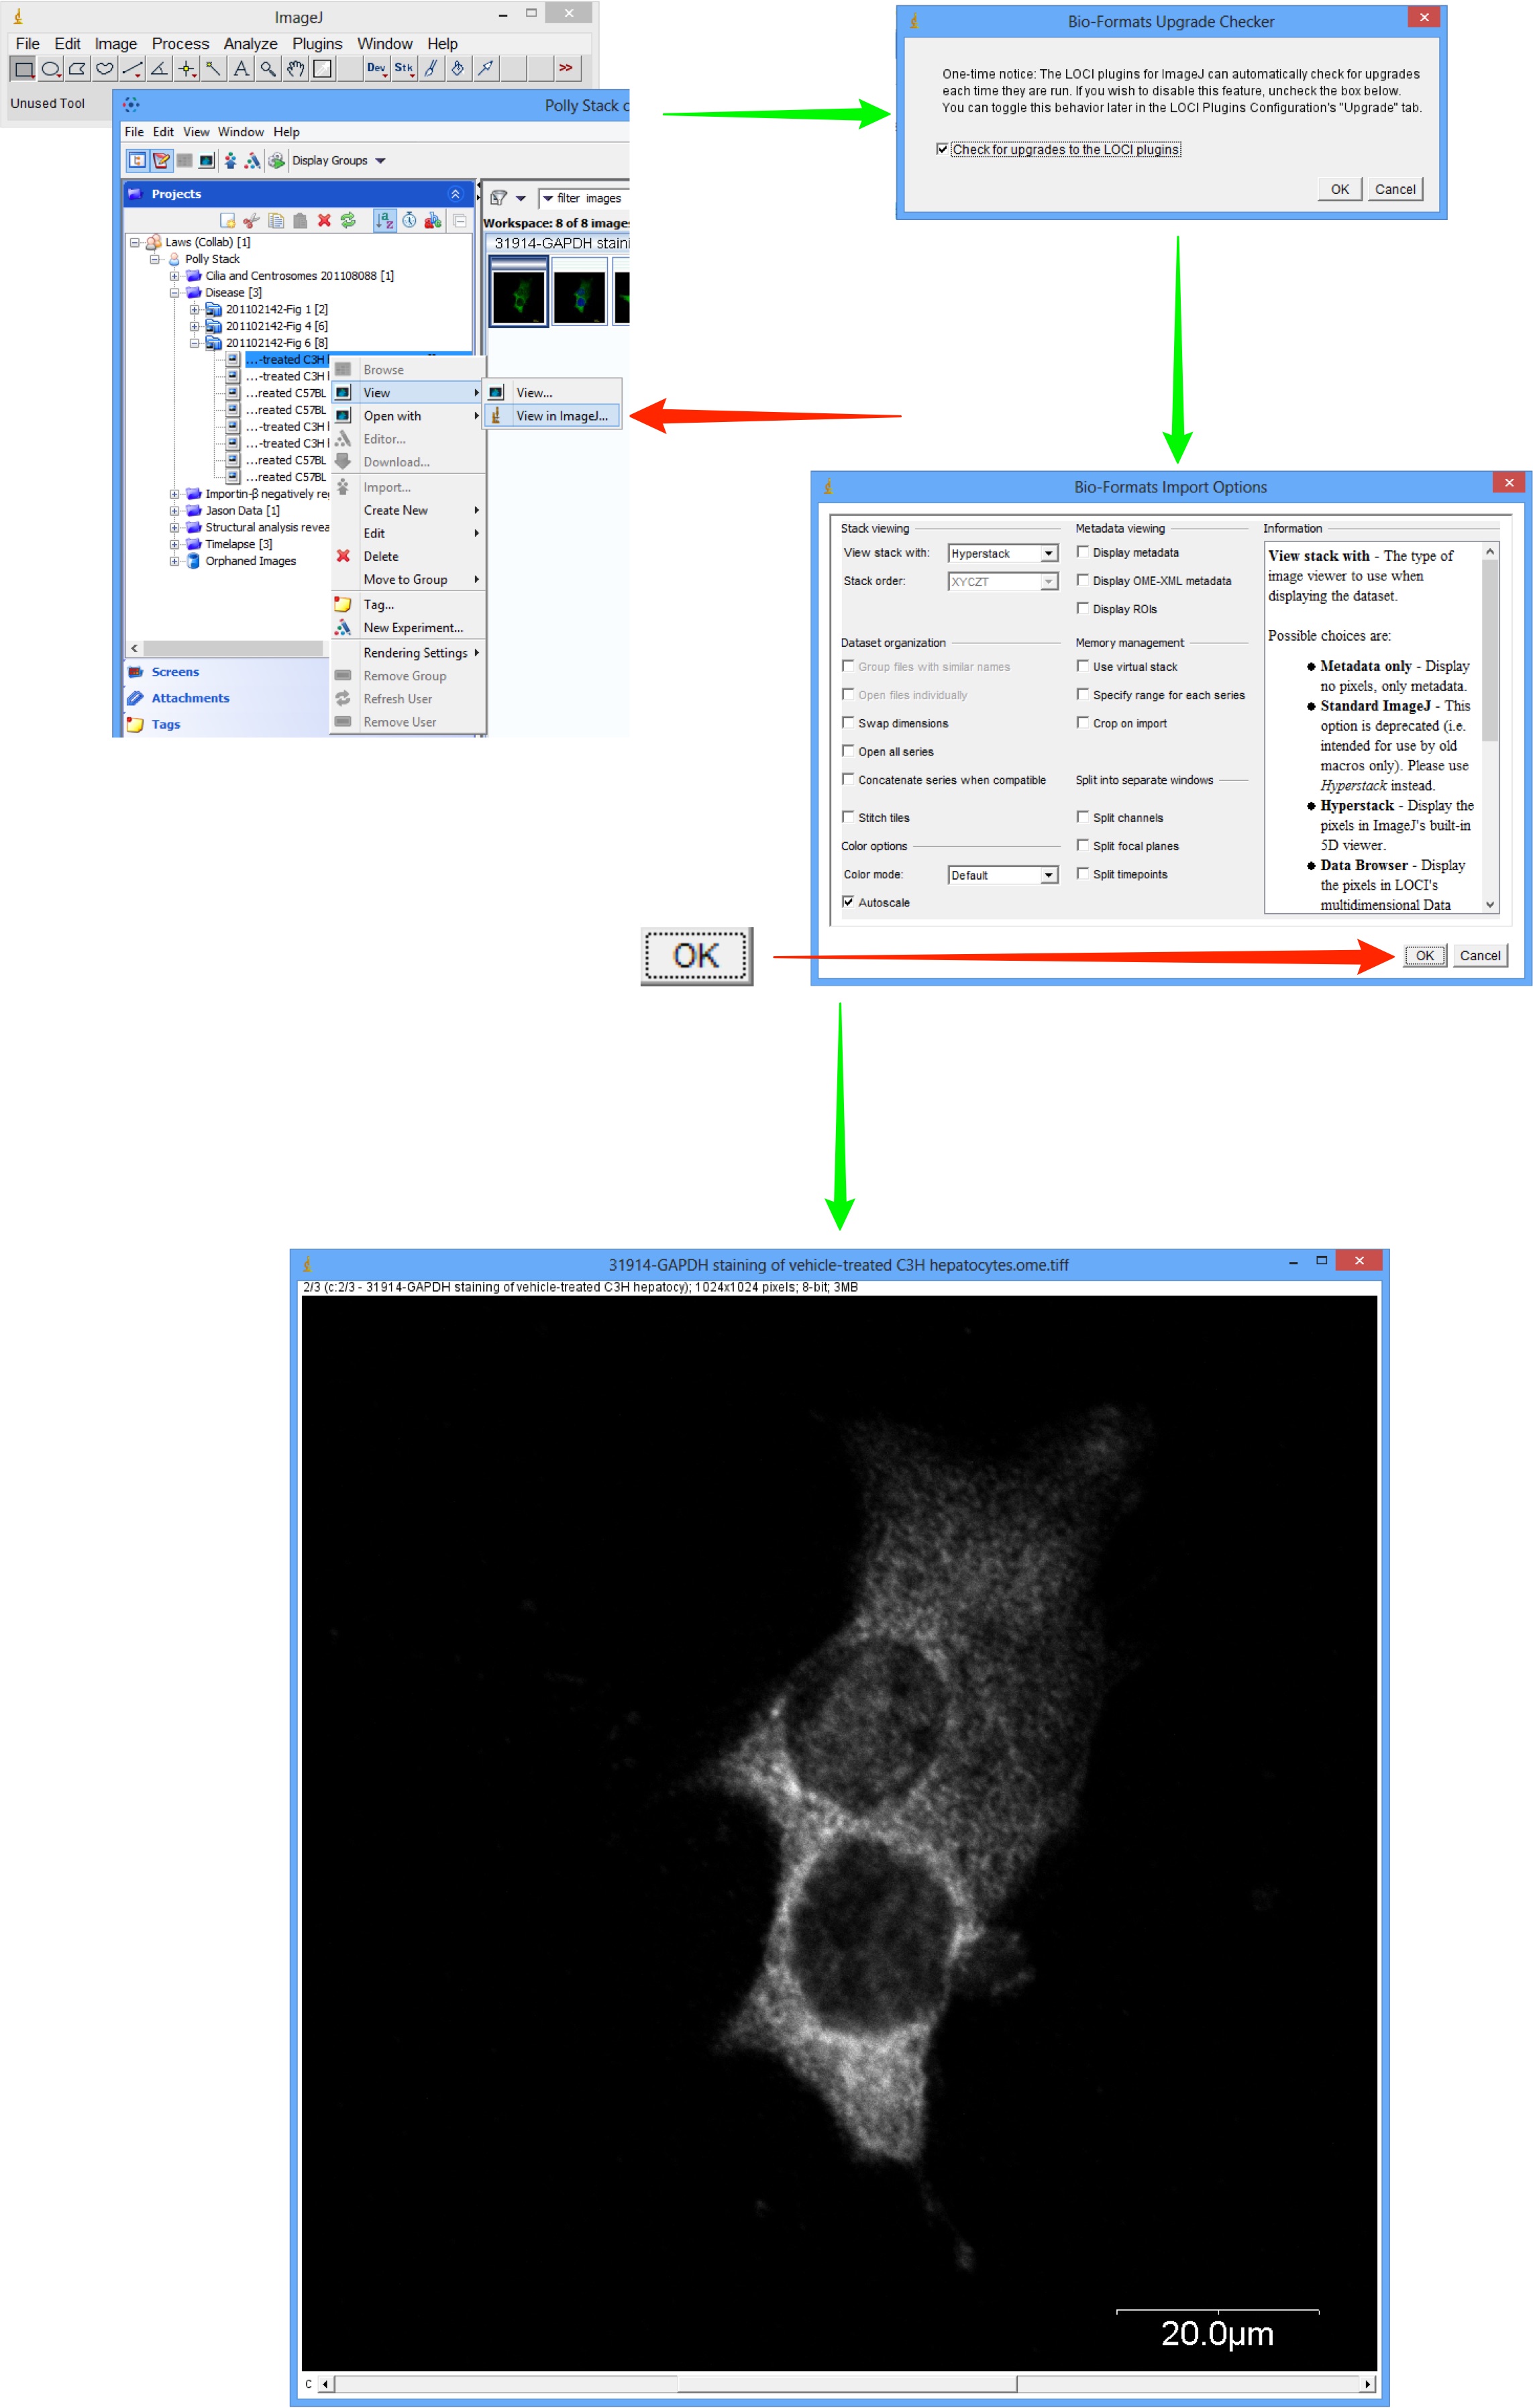
Double click on the image in the data tree or select the image and View > View in ImageJ in the contextual menu.
The Bio-Formats Import Options window opens.
Select the check box to set Bio-Formats to automatically check for updates.
Select parameters and click OK.
Click OK and the Bio-Formats Import Options window opens.
Select parameters and click OK.
Your image will open in the ImageJ viewer.
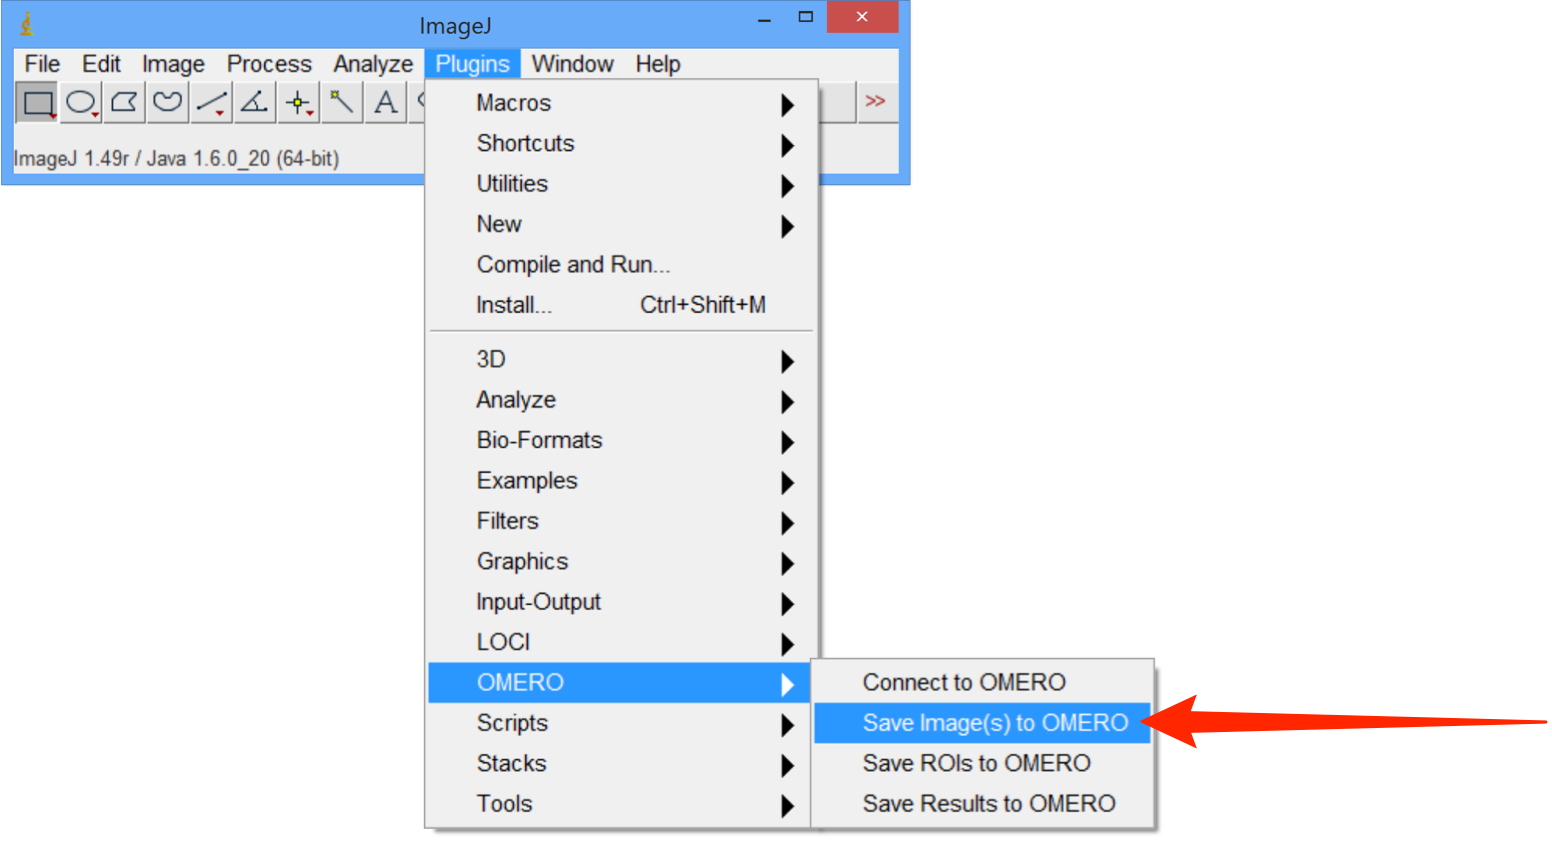
Saving images from ImageJ to OMERO
With OMERO version 5.1.0 and newer, it is possible to save images directly from ImageJ or Fiji to your OMERO server.
Use ImageJ or Fiji to open an image from a local disk.
Select:
Plugins > OMERO > Save Image(s) to OMERO.
A version of OMERO.insight will open automatically.
The image will be imported into OMERO
If the image has been modified, e.g. cropped, it will be imported as an OME-TIFF.
Note
Normal ImageJ conventions with respect to overlays and ROIs are respected when saving to the OMERO server.
Saving ROIs drawn in ImageJ to OMERO
Use ImageJ or Fiji to open an image from a local disk or from the OMERO server as described above.
Draw ROIs in ImageJ or Fiji as normal.
If the image is from a local disk select:
Plugins > OMERO > Save Image(s) to OMERO.
A version of OMERO.insight will open automatically and the image, including the ROIs, will be imported.
If the image is from the OMERO.server select:
Plugins > OMERO > Save ROIs to OMERO.
Once saved to the OMERO.server the ROIs become standard OMERO ROIs and can be used as normal.
Any existing ROIs on an image in the OMERO server will be displayed and can be manipulated as normal in ImageJ.
To save the Results Table back to OMERO select:
Plugins > OMERO > Save Results to OMERO.
The results will be uploaded and attached to the image in OMERO as a CSV file.

Note
There is no duplication of data, new or existing ROIs are saved back to the original image on the OMERO server.
Videos demonstrating Fiji-OMERO workflows
Videos are available demonstrating the Fiji-OMERO workflows:
All Tutorial Material is available on line at: help.openmicroscopy.org
The Main OME website is at: www.openmicroscopy.org