![]()
User Help
- User Help Home Page
-
 Quickstart User Guides
-
Data Workflow User Guides
-
 More Workflow User Guides
-
Other OMERO Applications
-
More

Managing Data
Introduction
Using OMERO.insight to manage image data.
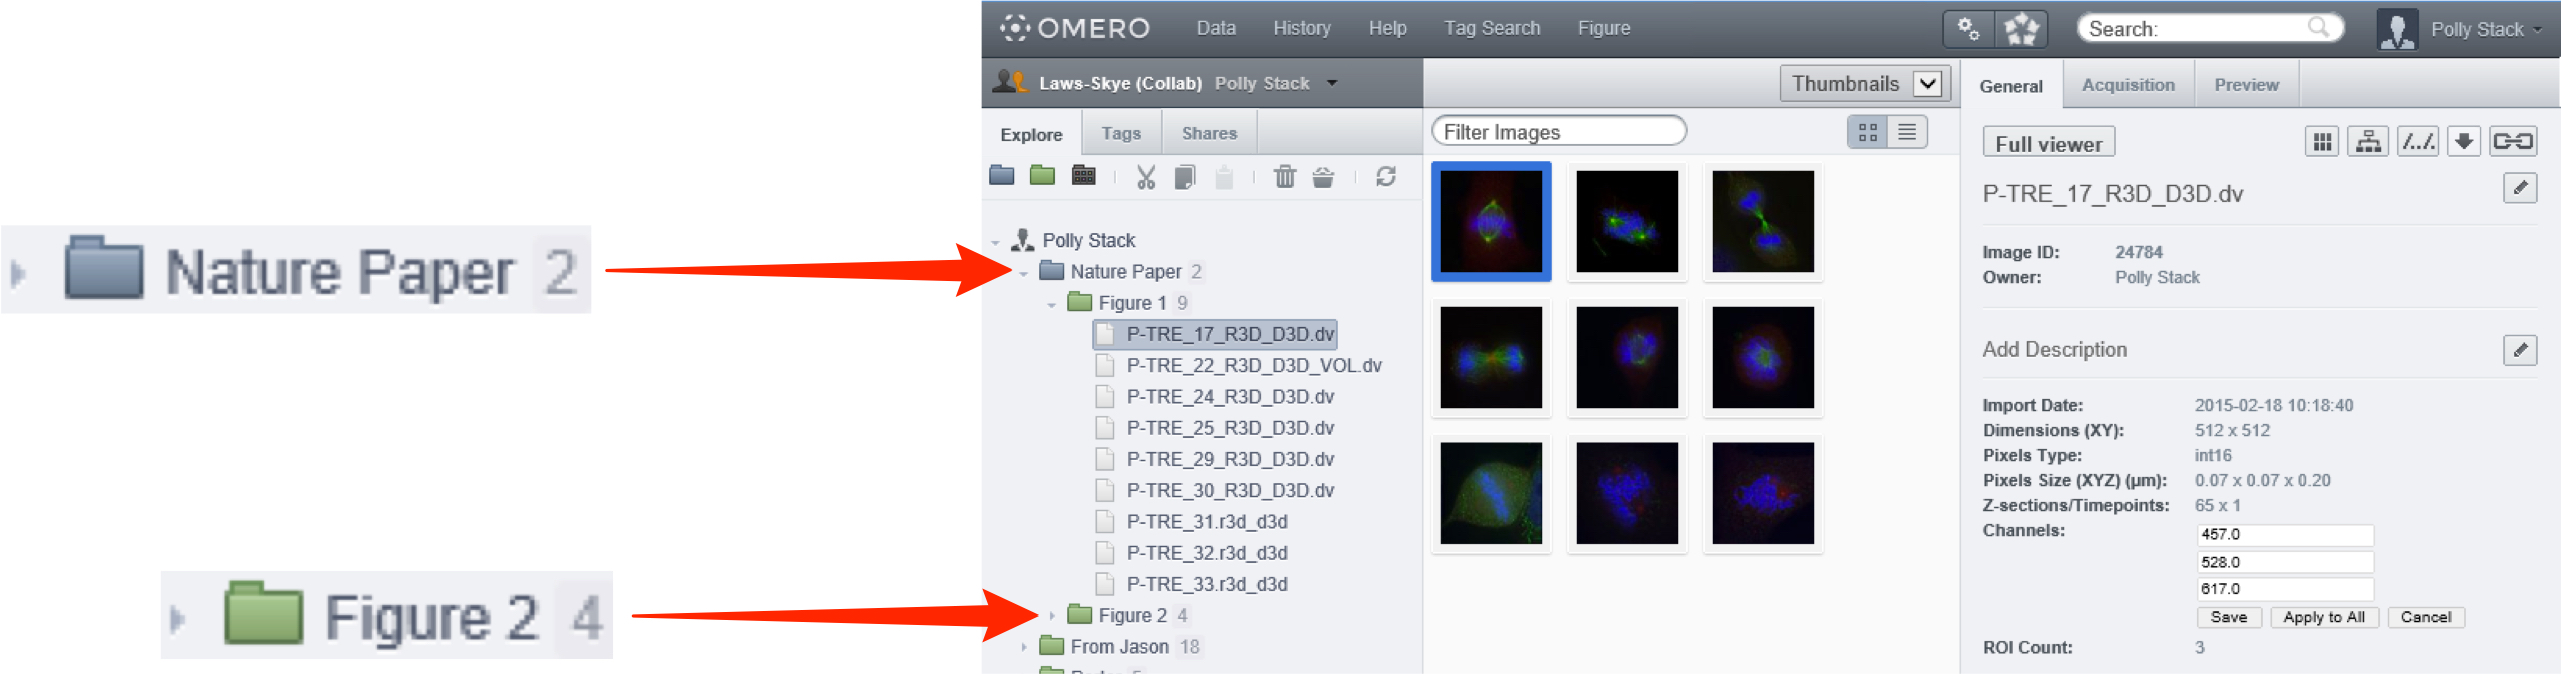
Creating and viewing Projects and Datasets
Click on the icons to create new Projects or Datasets.
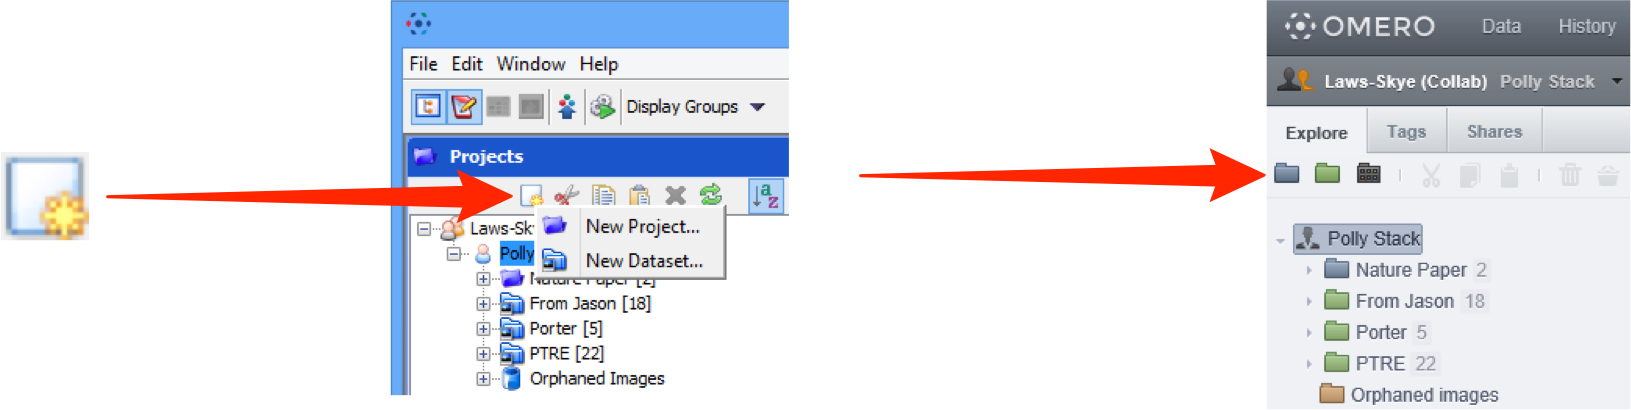
Click on the + or arrow to expand a Project in the data tree in left hand pane.
Click on the + or arrow in front of a Dataset to expand the dataset and view images.
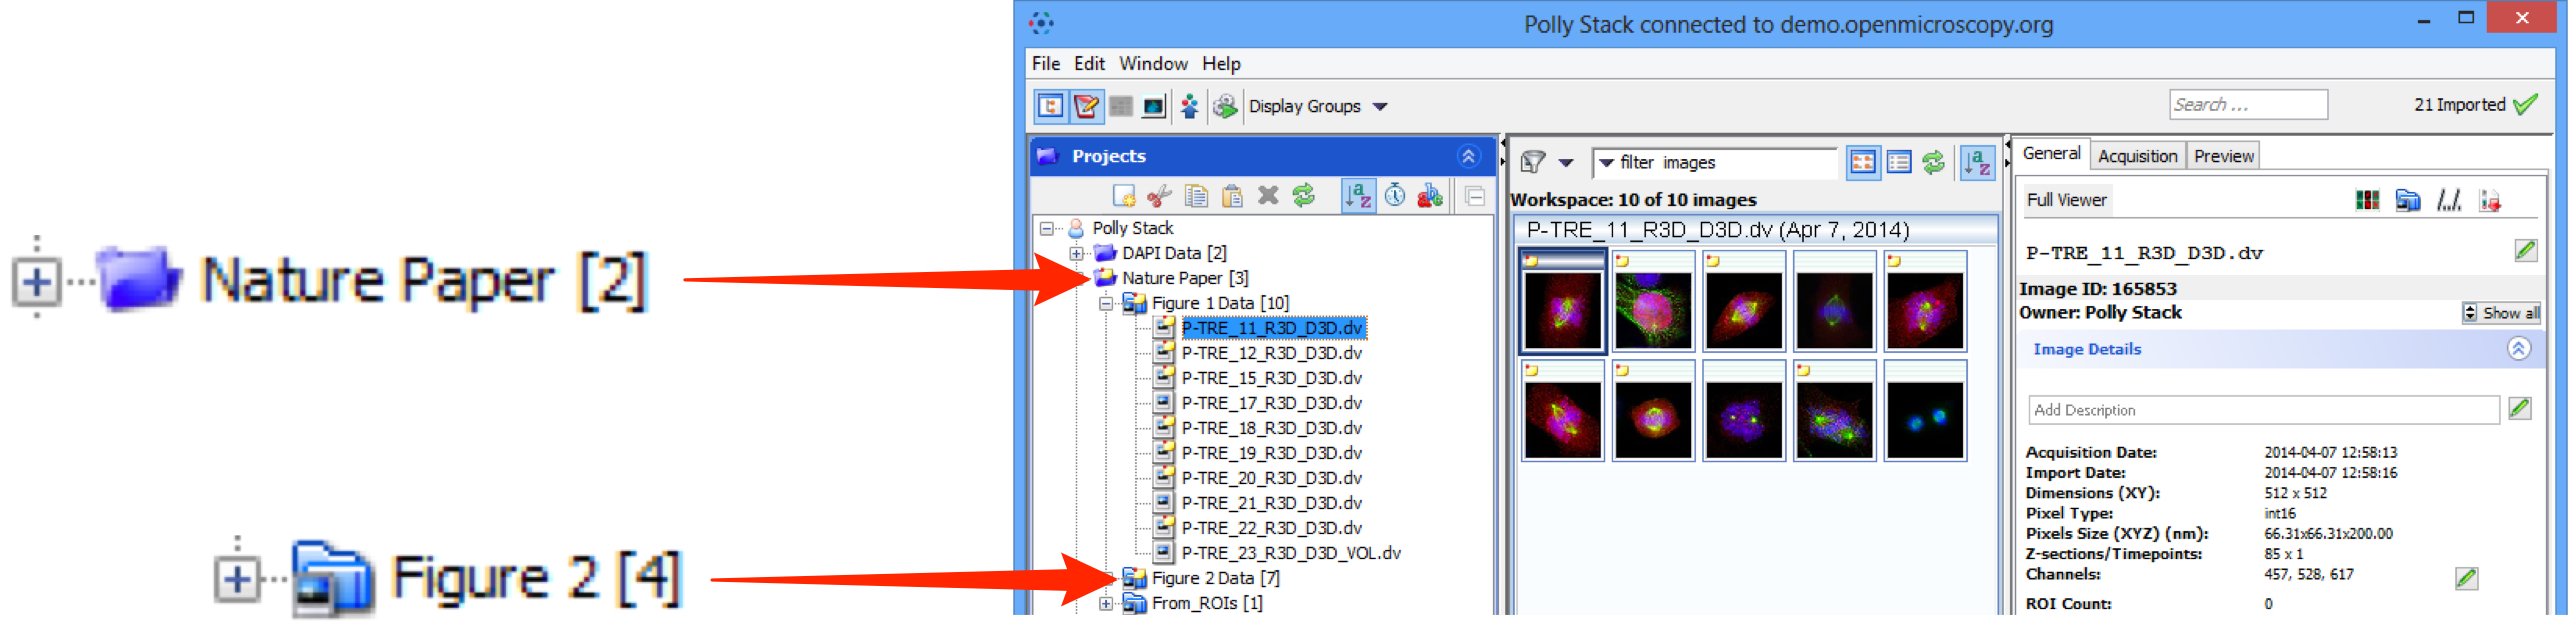
Thumbnails of images in a dataset are seen in the centre pane.
Select an image in the data tree to show detailed information in the General tab of the right hand pane.
OMERO.insight
OMERO.web

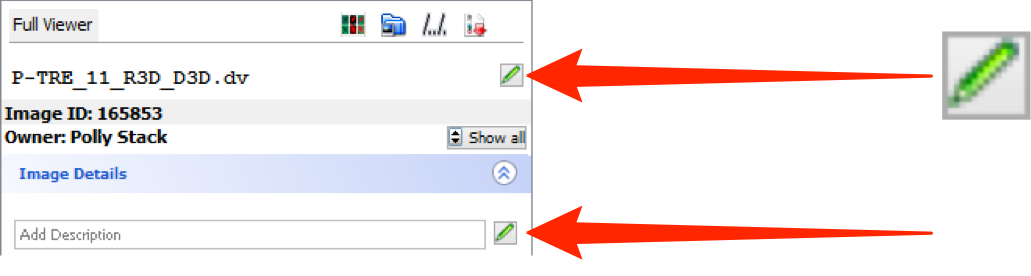
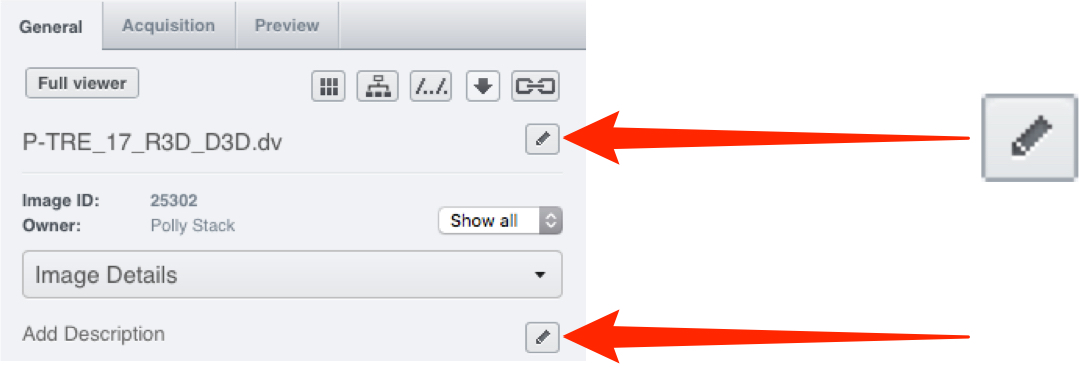
Editing names, descriptions and channel names
Click on the Pen icons to edit the image name or description.
OMERO.insight
OMERO.web
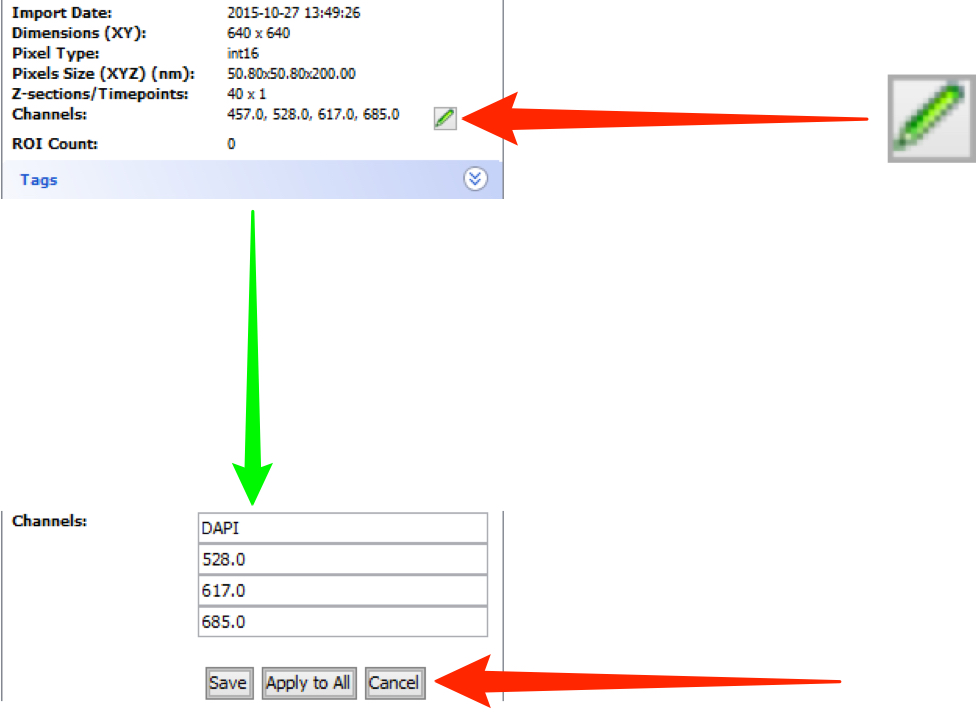
Below the description in the General tab is a summary of information on the image.
To edit the channel names, click on the Pen button.
Click Save to make the changes to the selected image.
Click Apply to All to save the changes to all images in the dataset.
This functionality is the same in OMERO.insight and OMERO.web.
Using annotations
Click on the appropriate accordion tab in the right hand General pane to access the functionality associated with annotations.
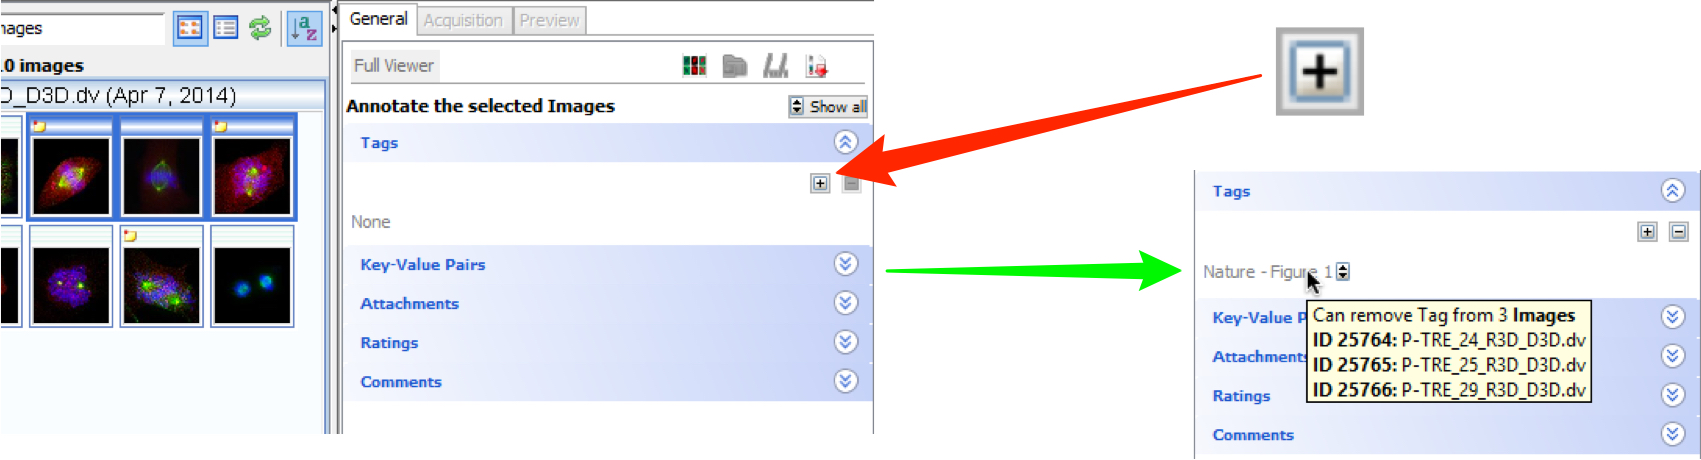
Click on the + to add a tag to an image.
In the Tag Selection window:
- select an existing tag and use the right arrow to add it to the image
- or create a New Tag in the text field and click Add.
Click Accept to add the tags and close the window.

Select more than one image in the data tree or using thumbnails, and click on the + to batch tag them.
The Tag Selection window is used in the same way.
Mouse-over the annotations to see information on the annotations associated with selected images.
-
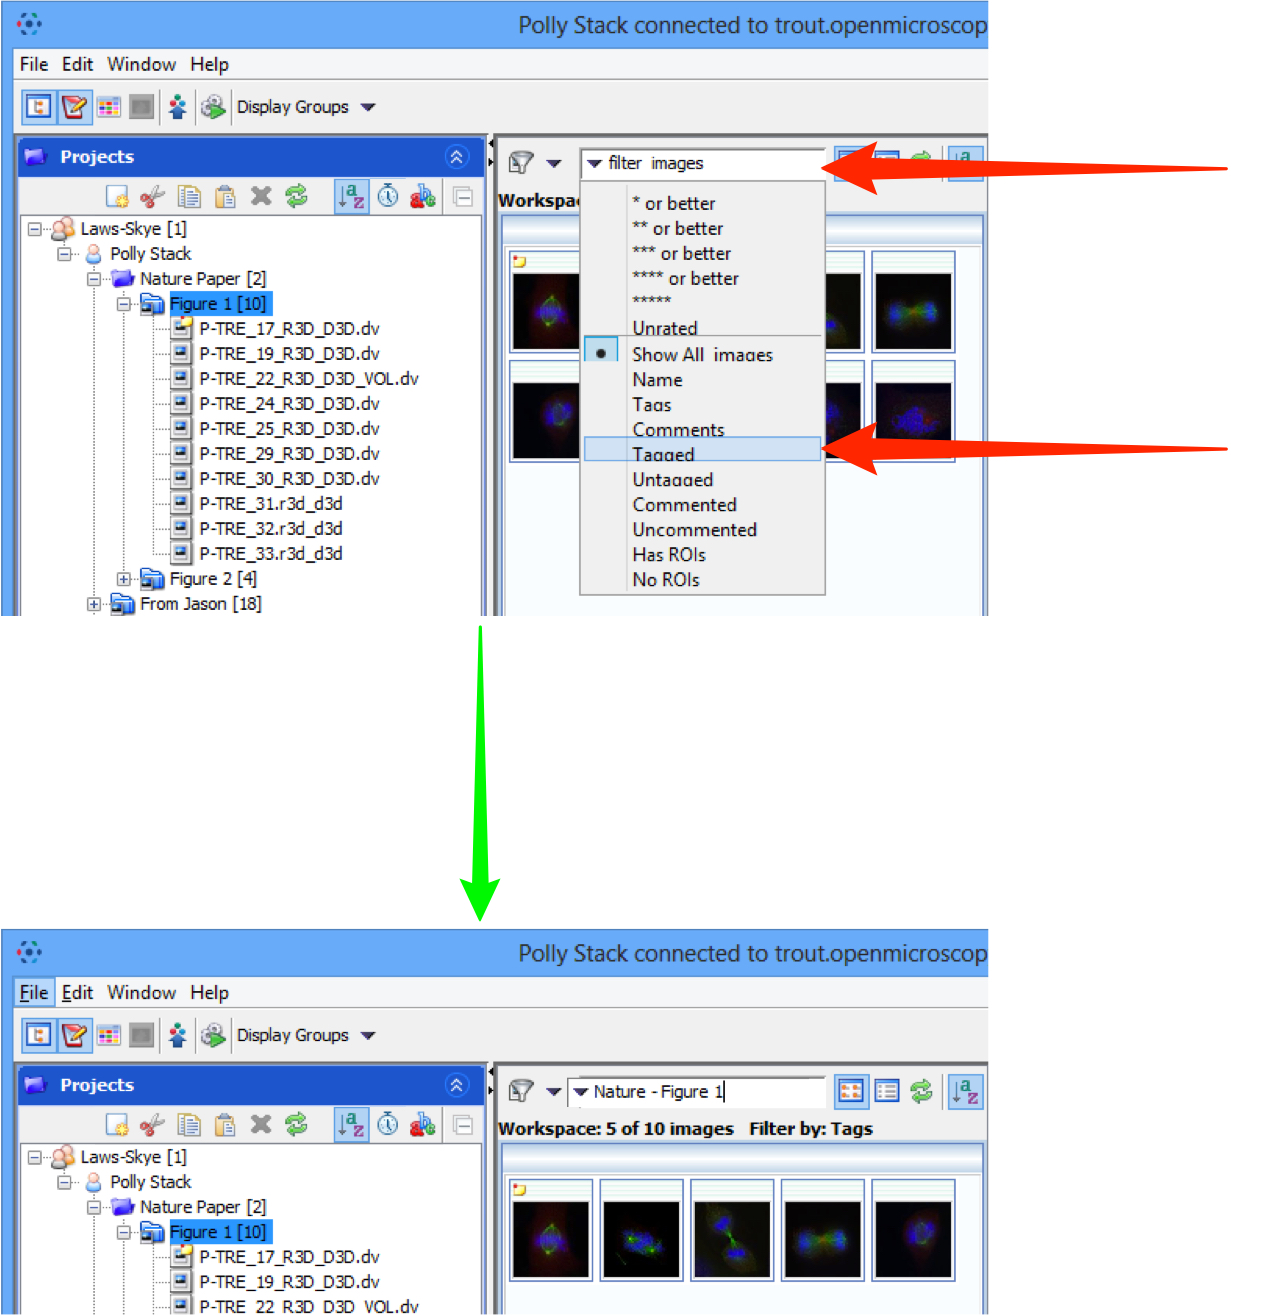
To filter images, select an expanded dataset and use the Filter images drop-down menu to select attributes to filter by, such as Tags.
Type in the name of a tag and select from autocomplete.
Return will filter the image thumbnails shown in the centre pane according to the tag selected.
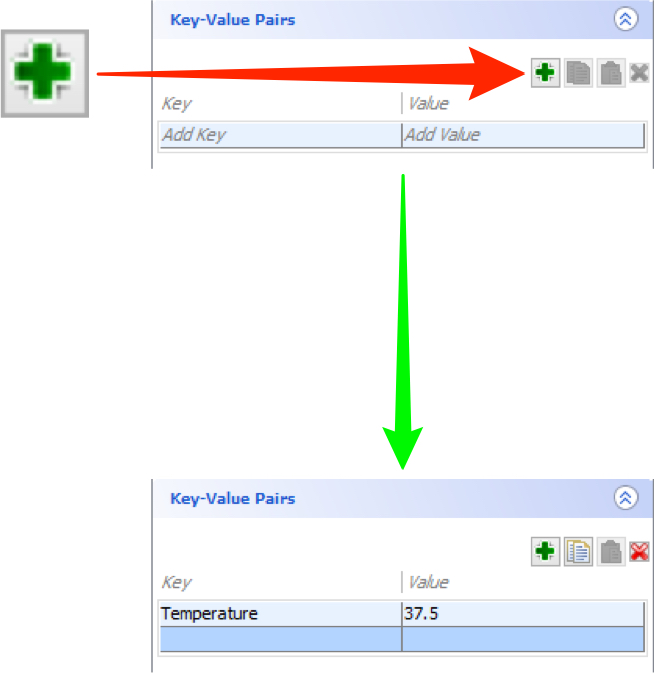
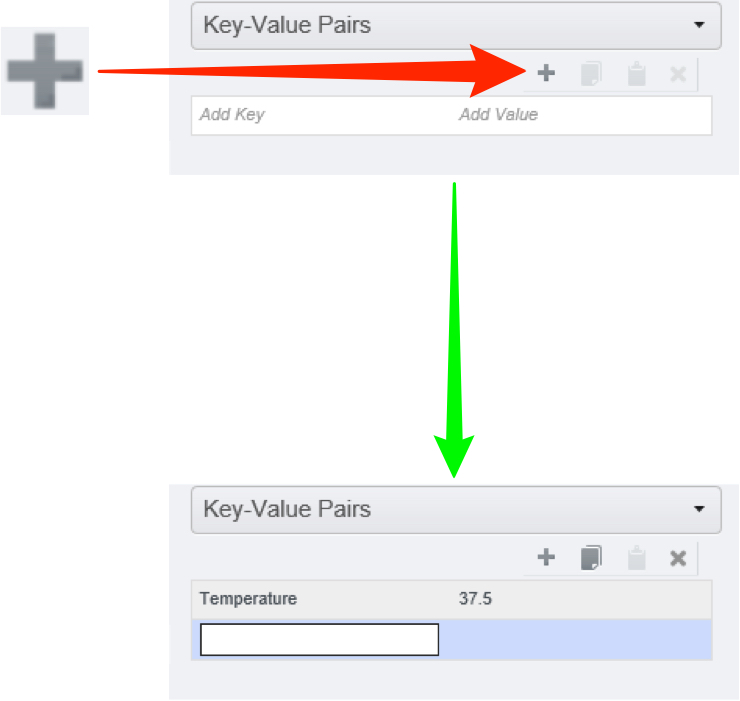
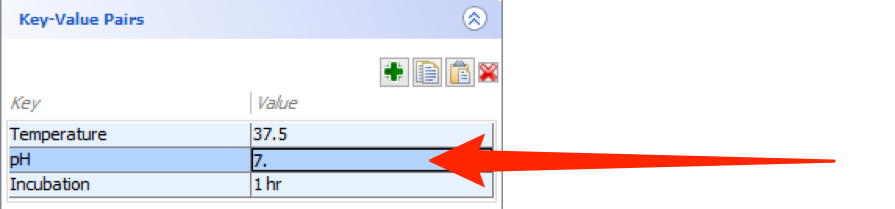
The Key-Value pairs table is located in the Annotations section of the General pane on the right hand side.
Click the + button or click on an empty cell in the table to add a Key-Value pair.
Enter text for the key and use Return or Tab to move to the value field.
Use Return, Tab or click the + button to add another Key-Value pair.
The Key-Value pairs are saved automatically.
OMERO.insight
OMERO.web
To copy and paste Key-Value pairs, select one or more rows from the table.
Click the Copy button.
Select another Project, Dataset or Image.
Click the Paste button to add the copied Key-Value pairs to a new or existing table.
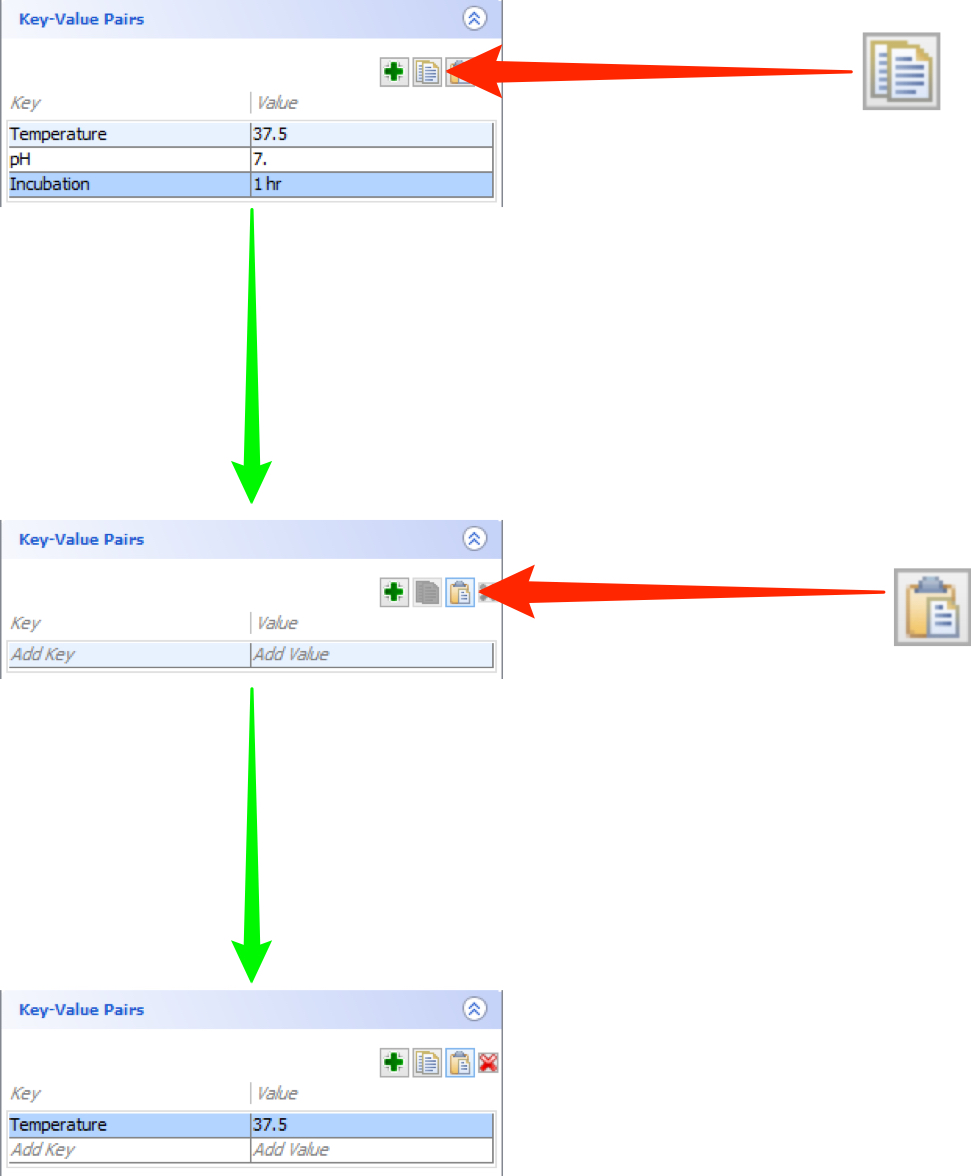
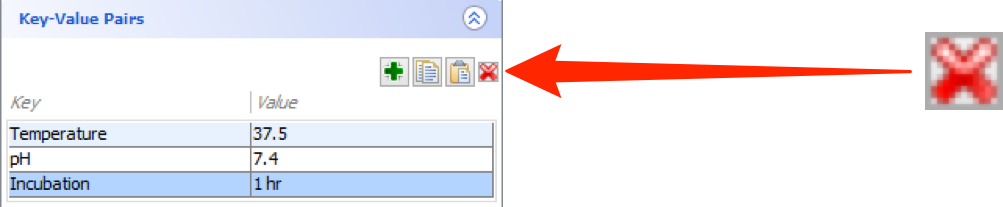
To delete a Key-Value pair, select a row and click Delete.
Click on any key or value field to edit the text.
To rearrange the order of Key-Value pairs:
OMERO.insight:
- drag and drop rows in the desired order.
OMERO.web:
- copy the pair to be moved
- select the row above where you wish to move it and paste
- delete the old copy.
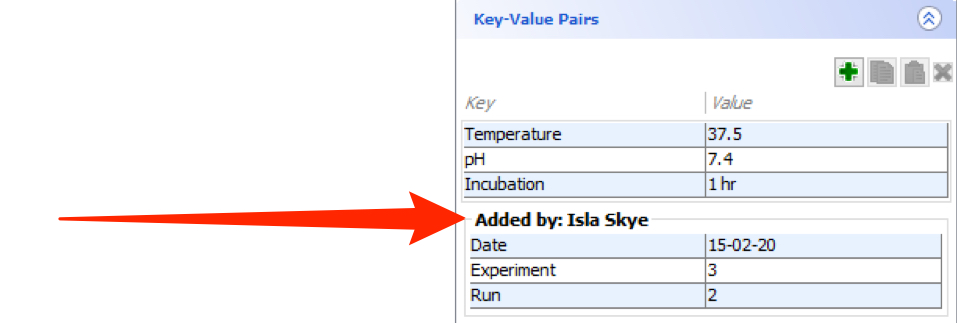
In read-annotate and read-write groups, users can add Key-Value pairs to any container or image belonging to other users.
These appear as a separate table with a label indicating the user who added them.
The owner of the object cannot edit or delete Key-Value pairs added by another user in read-annotate groups.
-
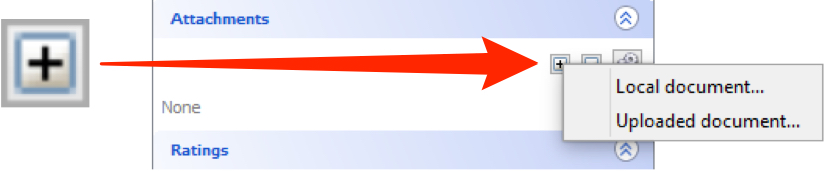
Click on the + button to attach a file to an image or other object.
Select Local document ... from the menu to upload a file from your local hard drive.
Uploaded document ... allows you to attach a file already on the server.
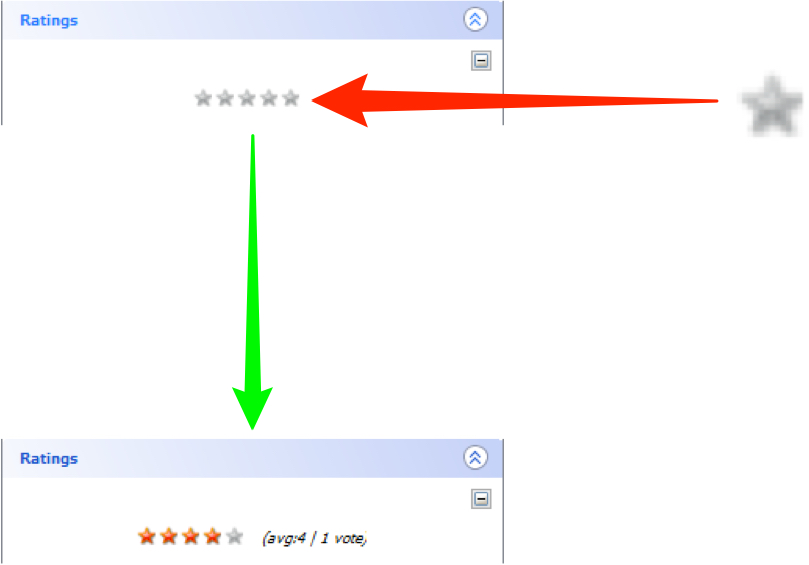
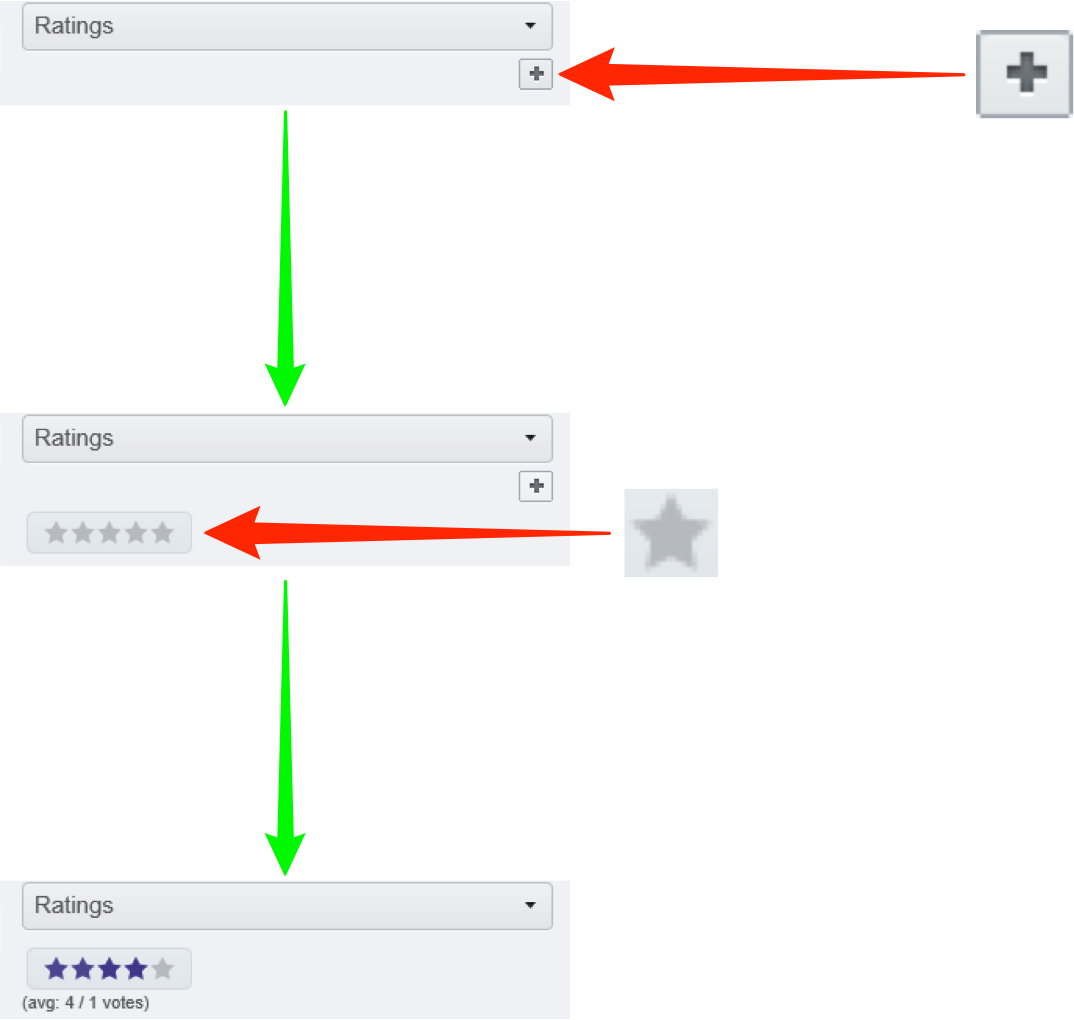
Images can be rated from 1 to 5 in the annotations section of the General pane.
OMERO.insight:
- click on the stars to set your rating
- click on the - button to remove your rating.
OMERO.web:
- click on the + button
- click on the stars to set your rating
- mouse over the rating and click the x to remove your rating.
OMERO.insight
OMERO.web
Adding Tags
Filtering images using Tags
Using Key-Value pairs
OMERO allows you to annotate Projects, Datasets, Screens, Plates, Runs and Images with Key-Value pairs. The Key-Value pairs are indexed by OMERO.server, so are fully searchable.
This functionality is exactly the same for OMERO.insight and OMERO.web.
Attaching files
Adding Ratings
Rendering settings
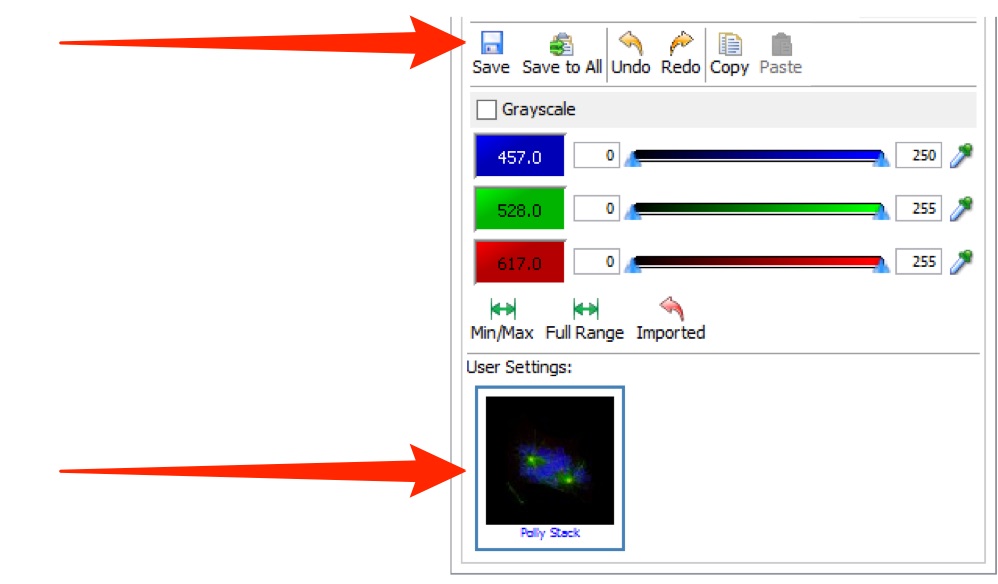
Use the Preview tab to change the rendering settings for the image.
This functionality is exactly the same in OMERO.insight and OMERO.web.
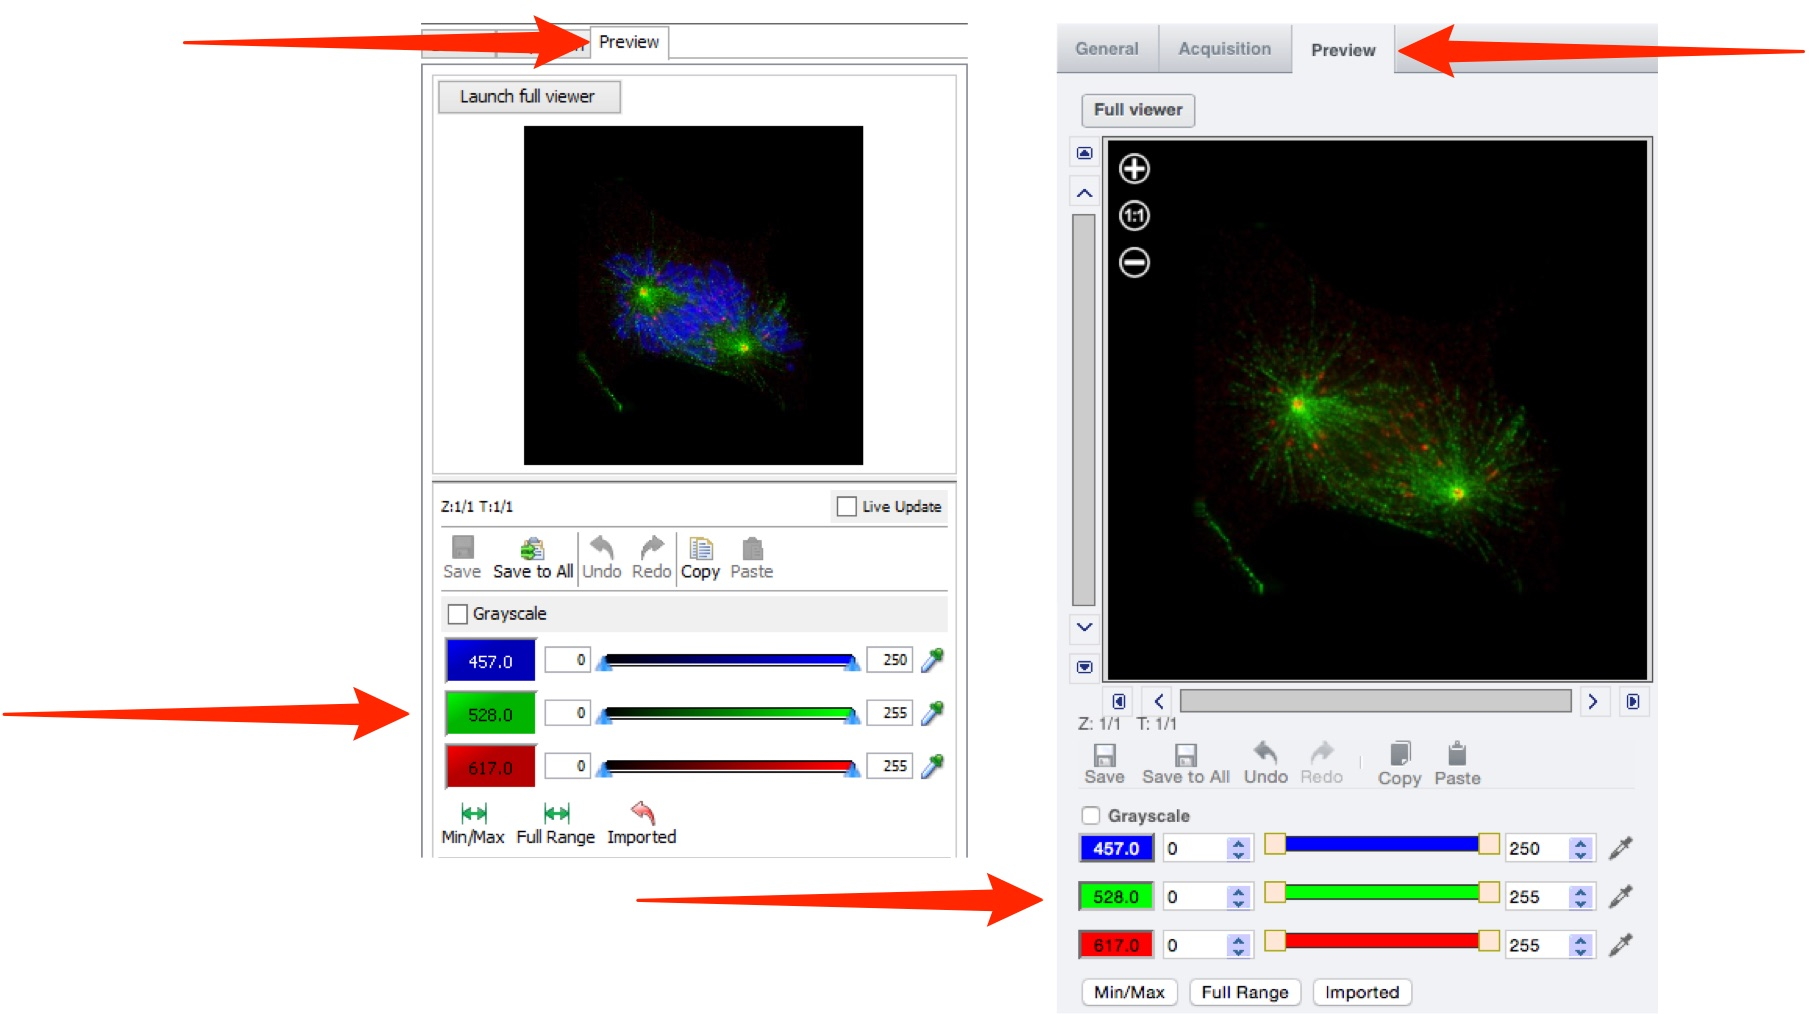
Click Save to save any changes you make to the image rendering settings.
Click on the thumbnail under User Settings to view saved settings.
Click on Apply to All to apply the new rendering settings to all images in a dataset or plate, or to the selected images.
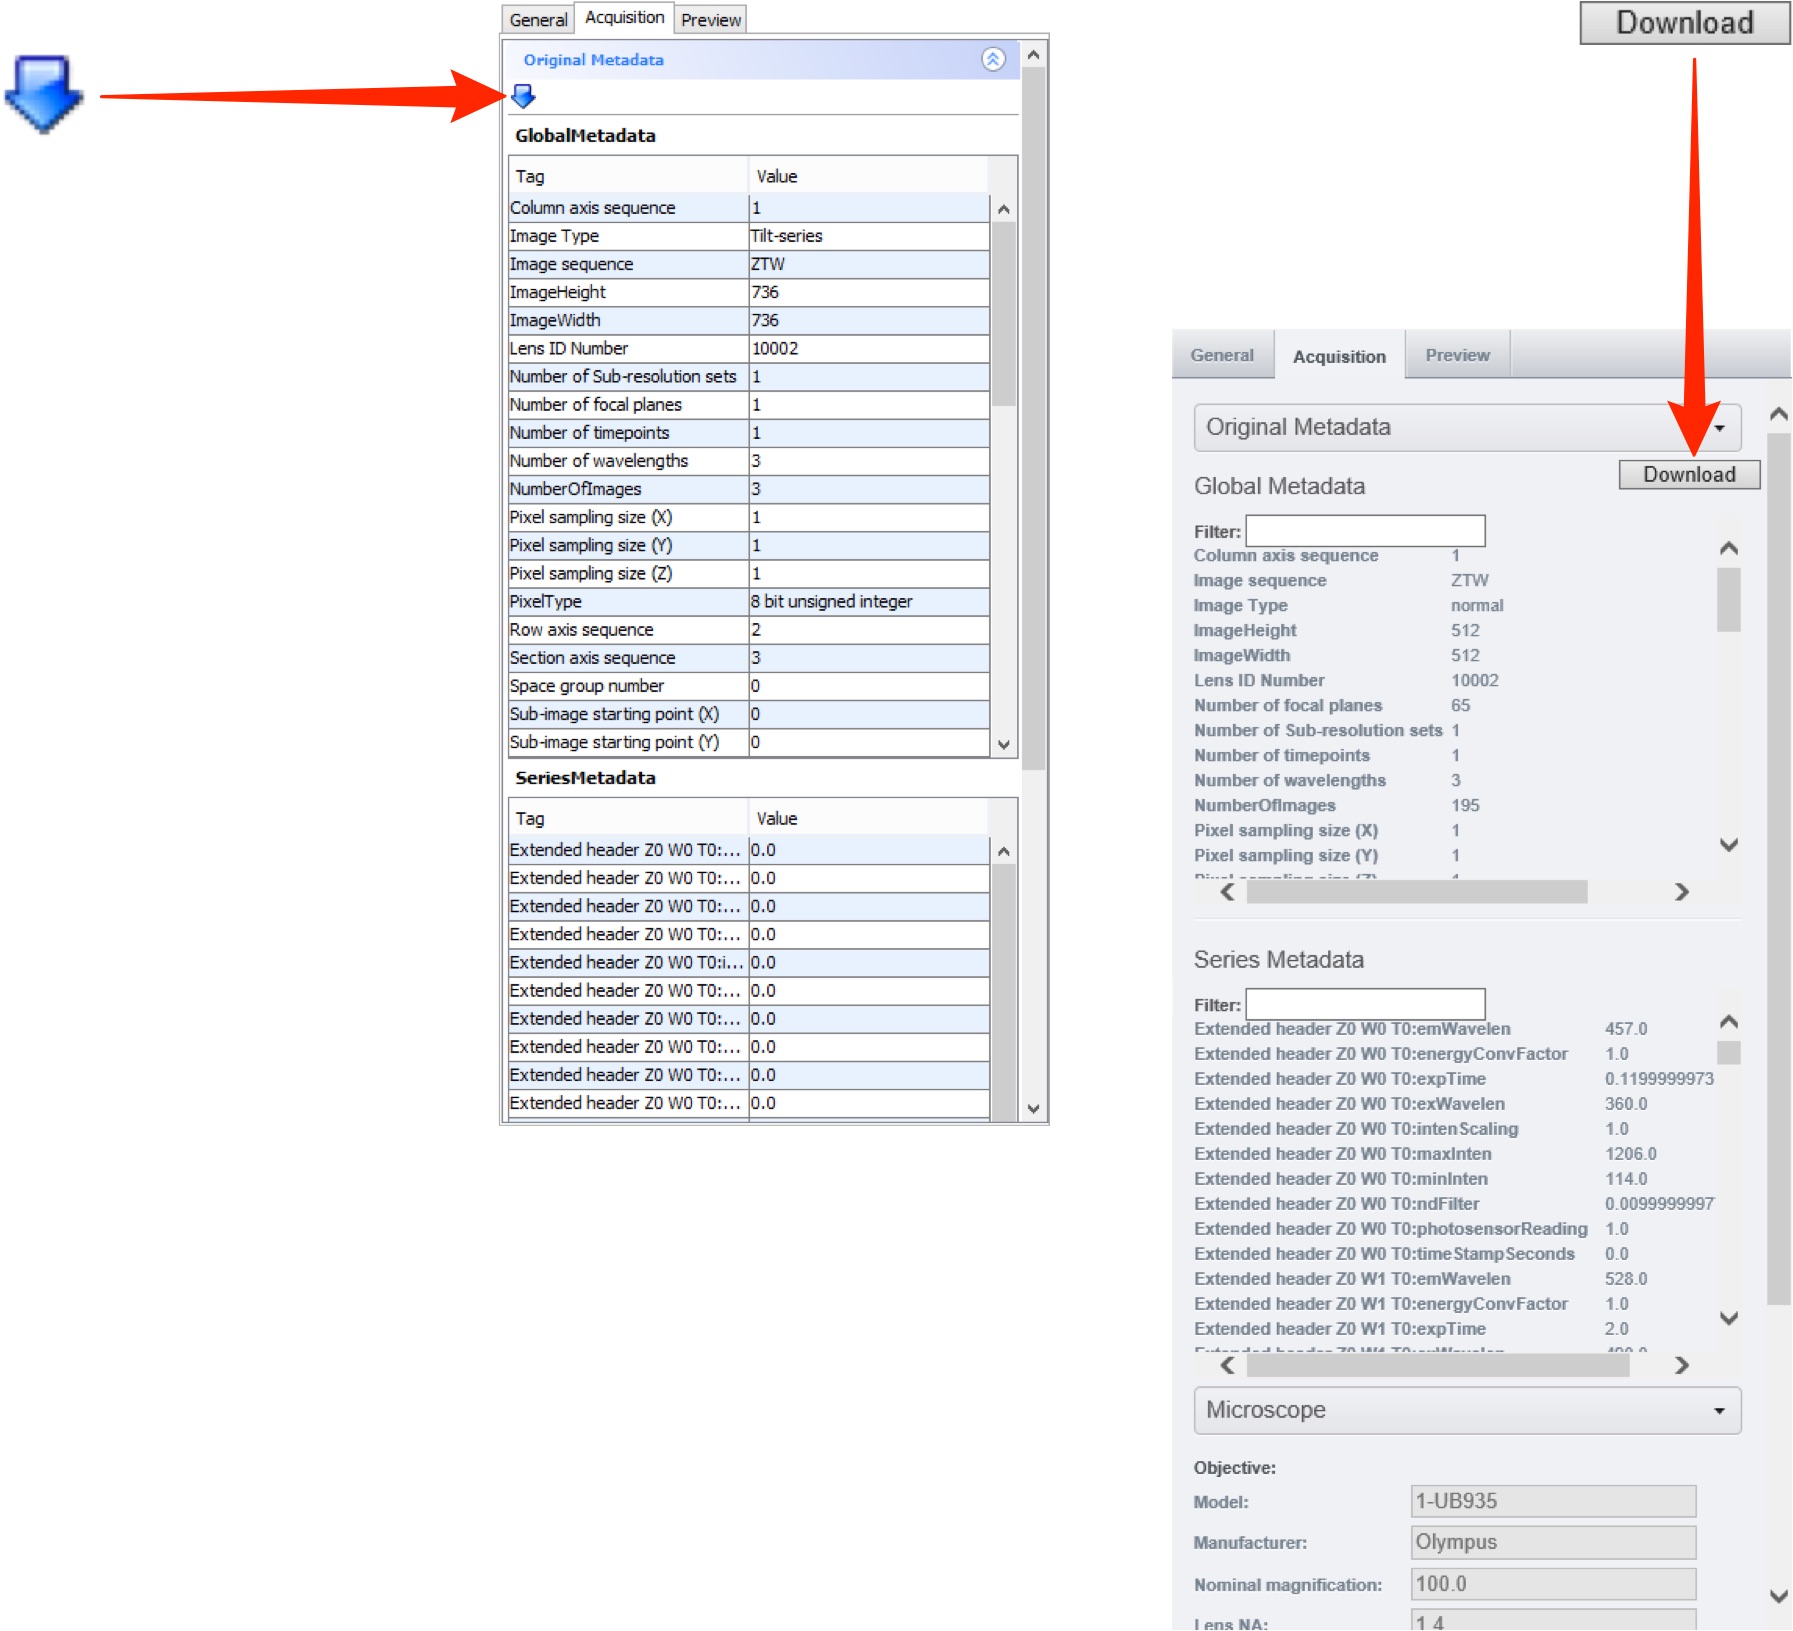
Acquisition metadata
Select the Acquisition tab in the right hand pane to see metadata and microscope details imported with the image.
The original metadata can be downloaded as a file by clicking on the download arrow or Download button.
Managing user settings
OMERO.insight
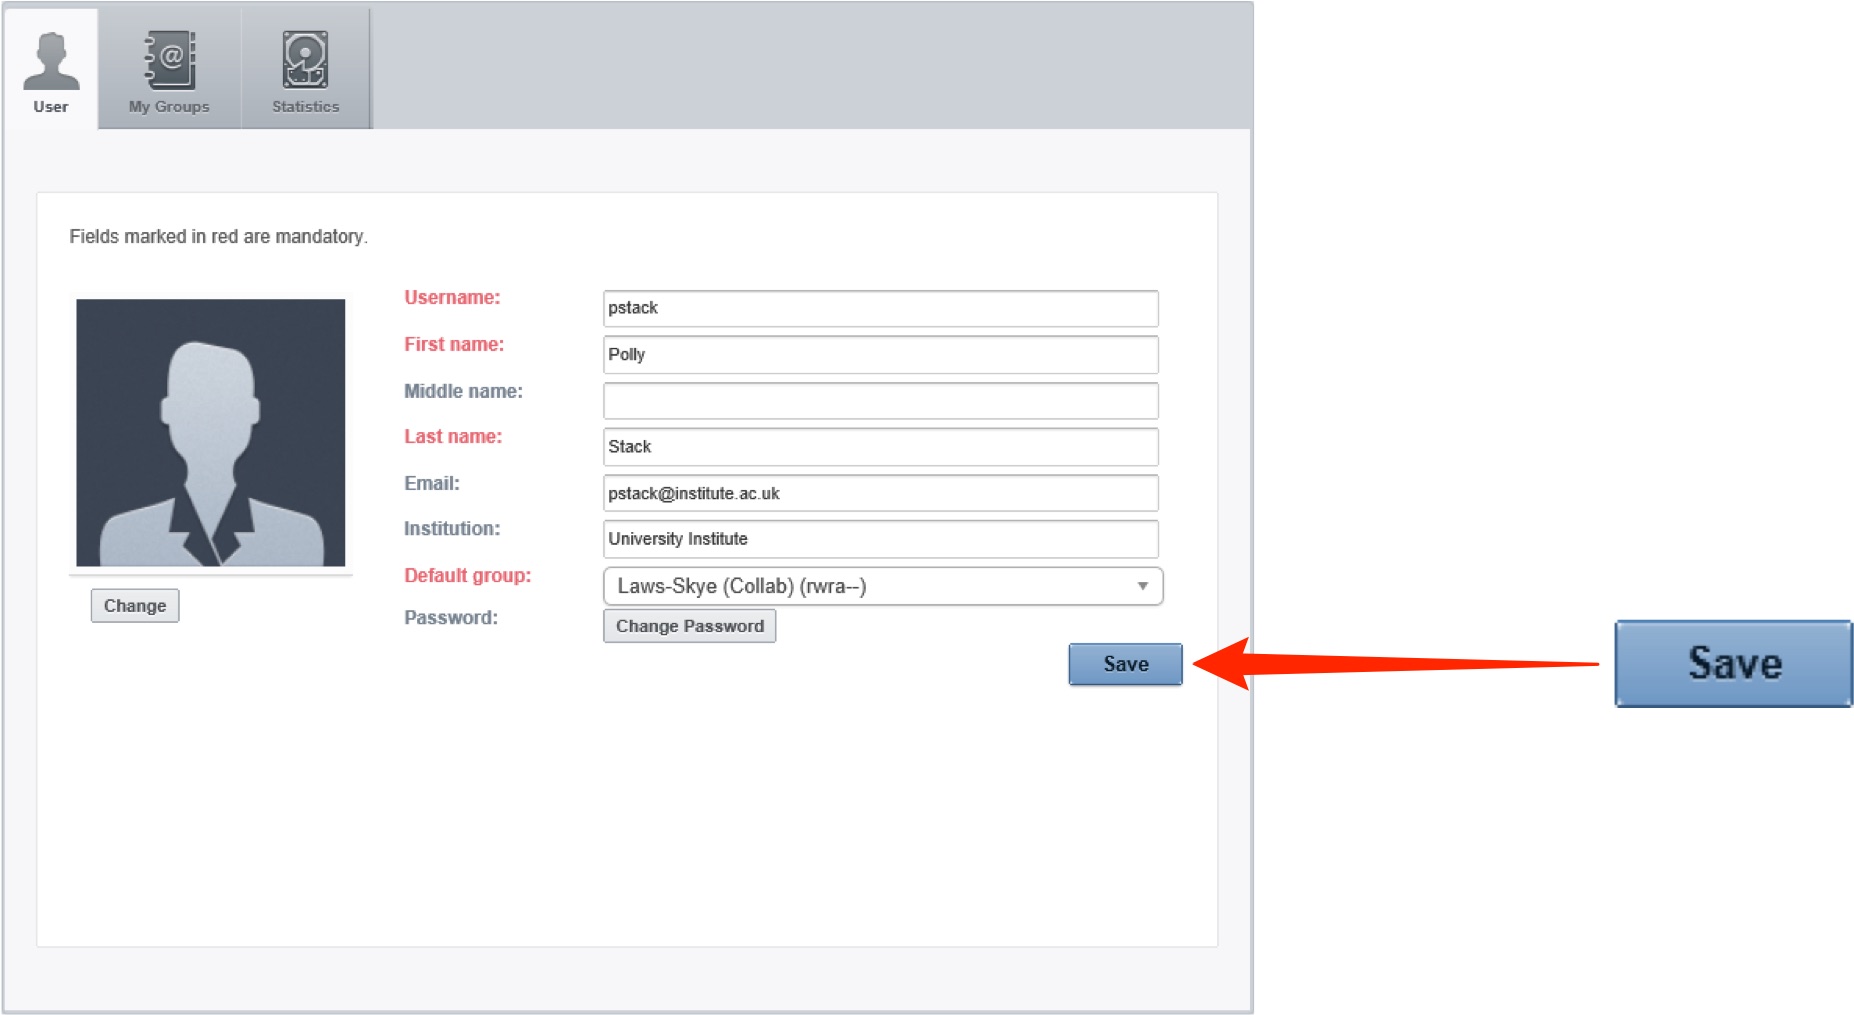
Click on your user name to see the User settings in the right hand pane.
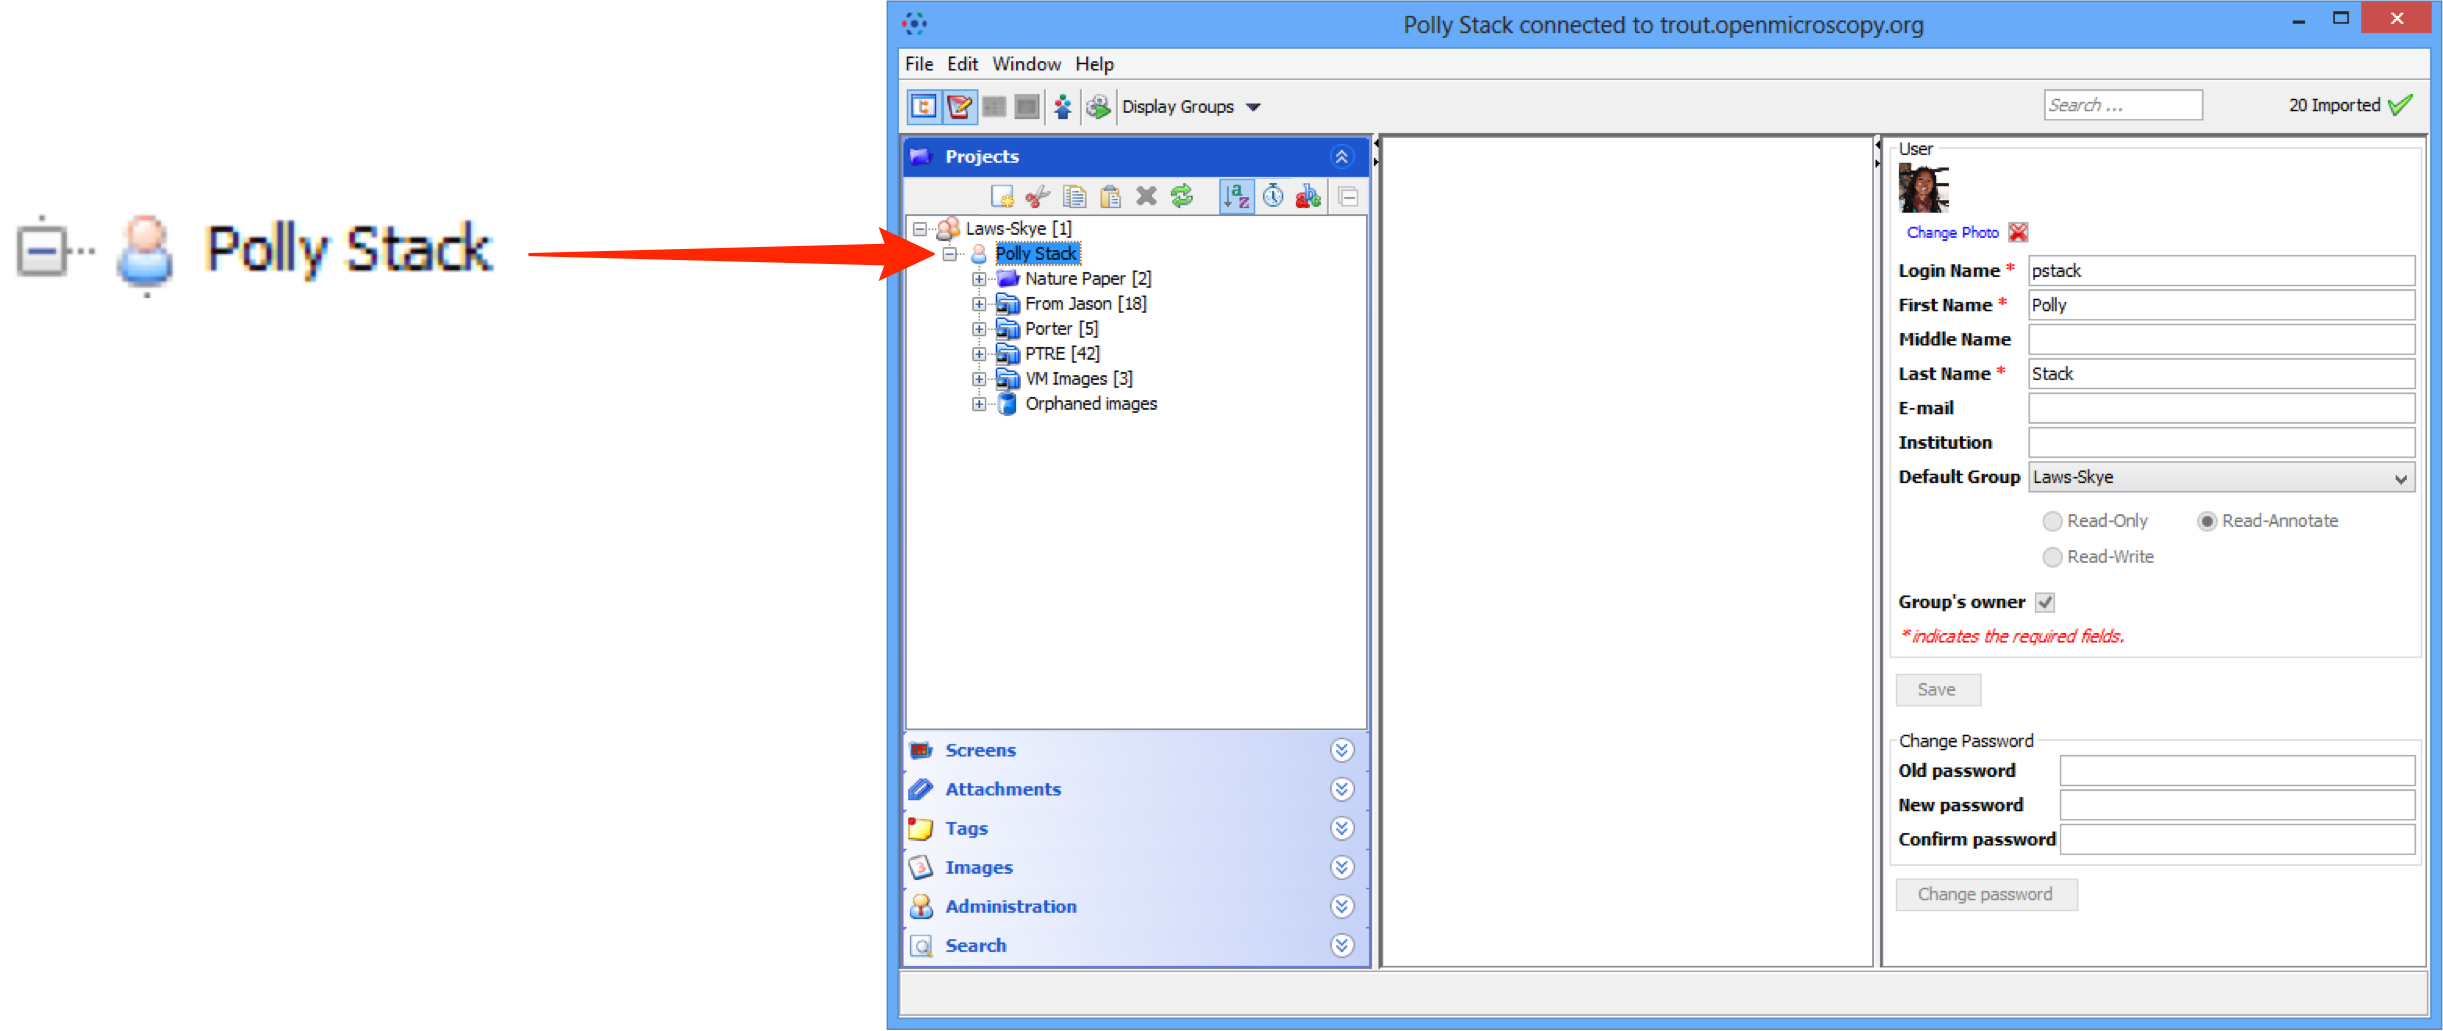
Edit your settings in the various fields.
If you belong to more than one group, set the group displayed when you log into OMERO.insight using the Default group drop-down.
Click Save when done.
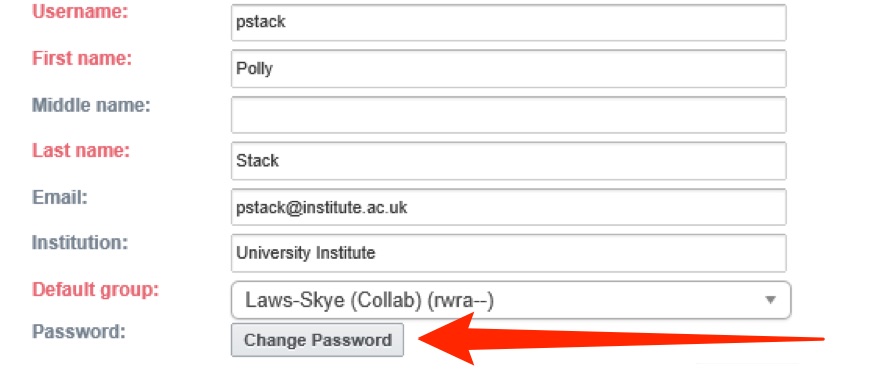
Use the bottom section to change your password.
Click on Change Password to save the change.
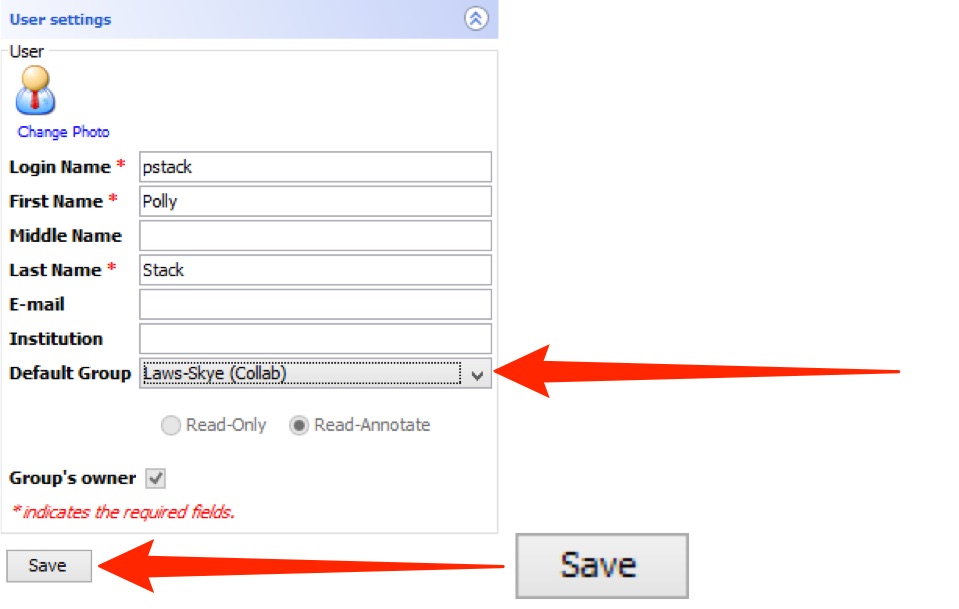
OMERO.web
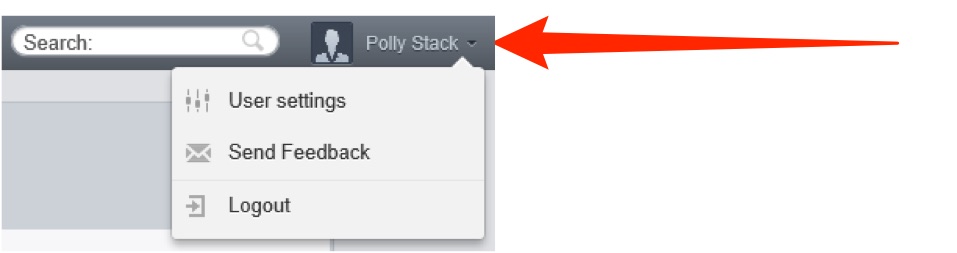
Click on your user name in the top right corner and select User settings from the drop-down.
Edit your settings in the various fields.
If you belong to more than one group, set the group displayed when you log into OMERO.web using the Default group drop-down.
Click Save when done.
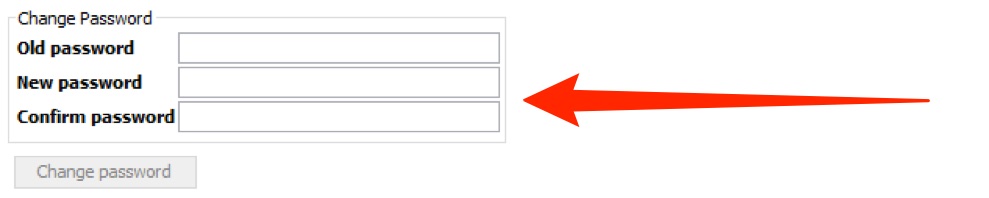
Click on Change Password to change your password.
All Tutorial Material is available on line at: help.openmicroscopy.org
The Main OME website is at: www.openmicroscopy.org